Serial calculation and data editng software : Wsbch
To Japanese
● 1. Executable file and I/O files settings
● 2. Starting Calculation
● 3. Performing and Completing Calculations
● 4. Serial calculation
● 5. Edit window
● 6. Edit Replace window (Replacing in file)
● 7. Replace window (Cross-file replacement)
● 8. Adding files using the Select window
● 9. Deleting files using the Select window
● 10. Renaming files using the Select window
● 11. Copying files using the Select window
● 12. Renaming a folder using the Select window
● 13. Reproducting past execution formats using the Path window
● 14. Duplicating executable format using the Clip button
● 15. Concatenating files using the Process box
● 16. Shortcut operation
● 17. How to input auxiliary data
● 18. Creating 40 data with an angle parameter from wsb12.dat
● 19. Converting CSV data and adding to nk.dat
● 20. How to deal with miscalculations
● 21. Precautions
Performs serial calculation of the executable files based on multiple input data and edits the input and output data. Normally, it is automatically started and configured by Wsems, but here we will explain how to operate it manually.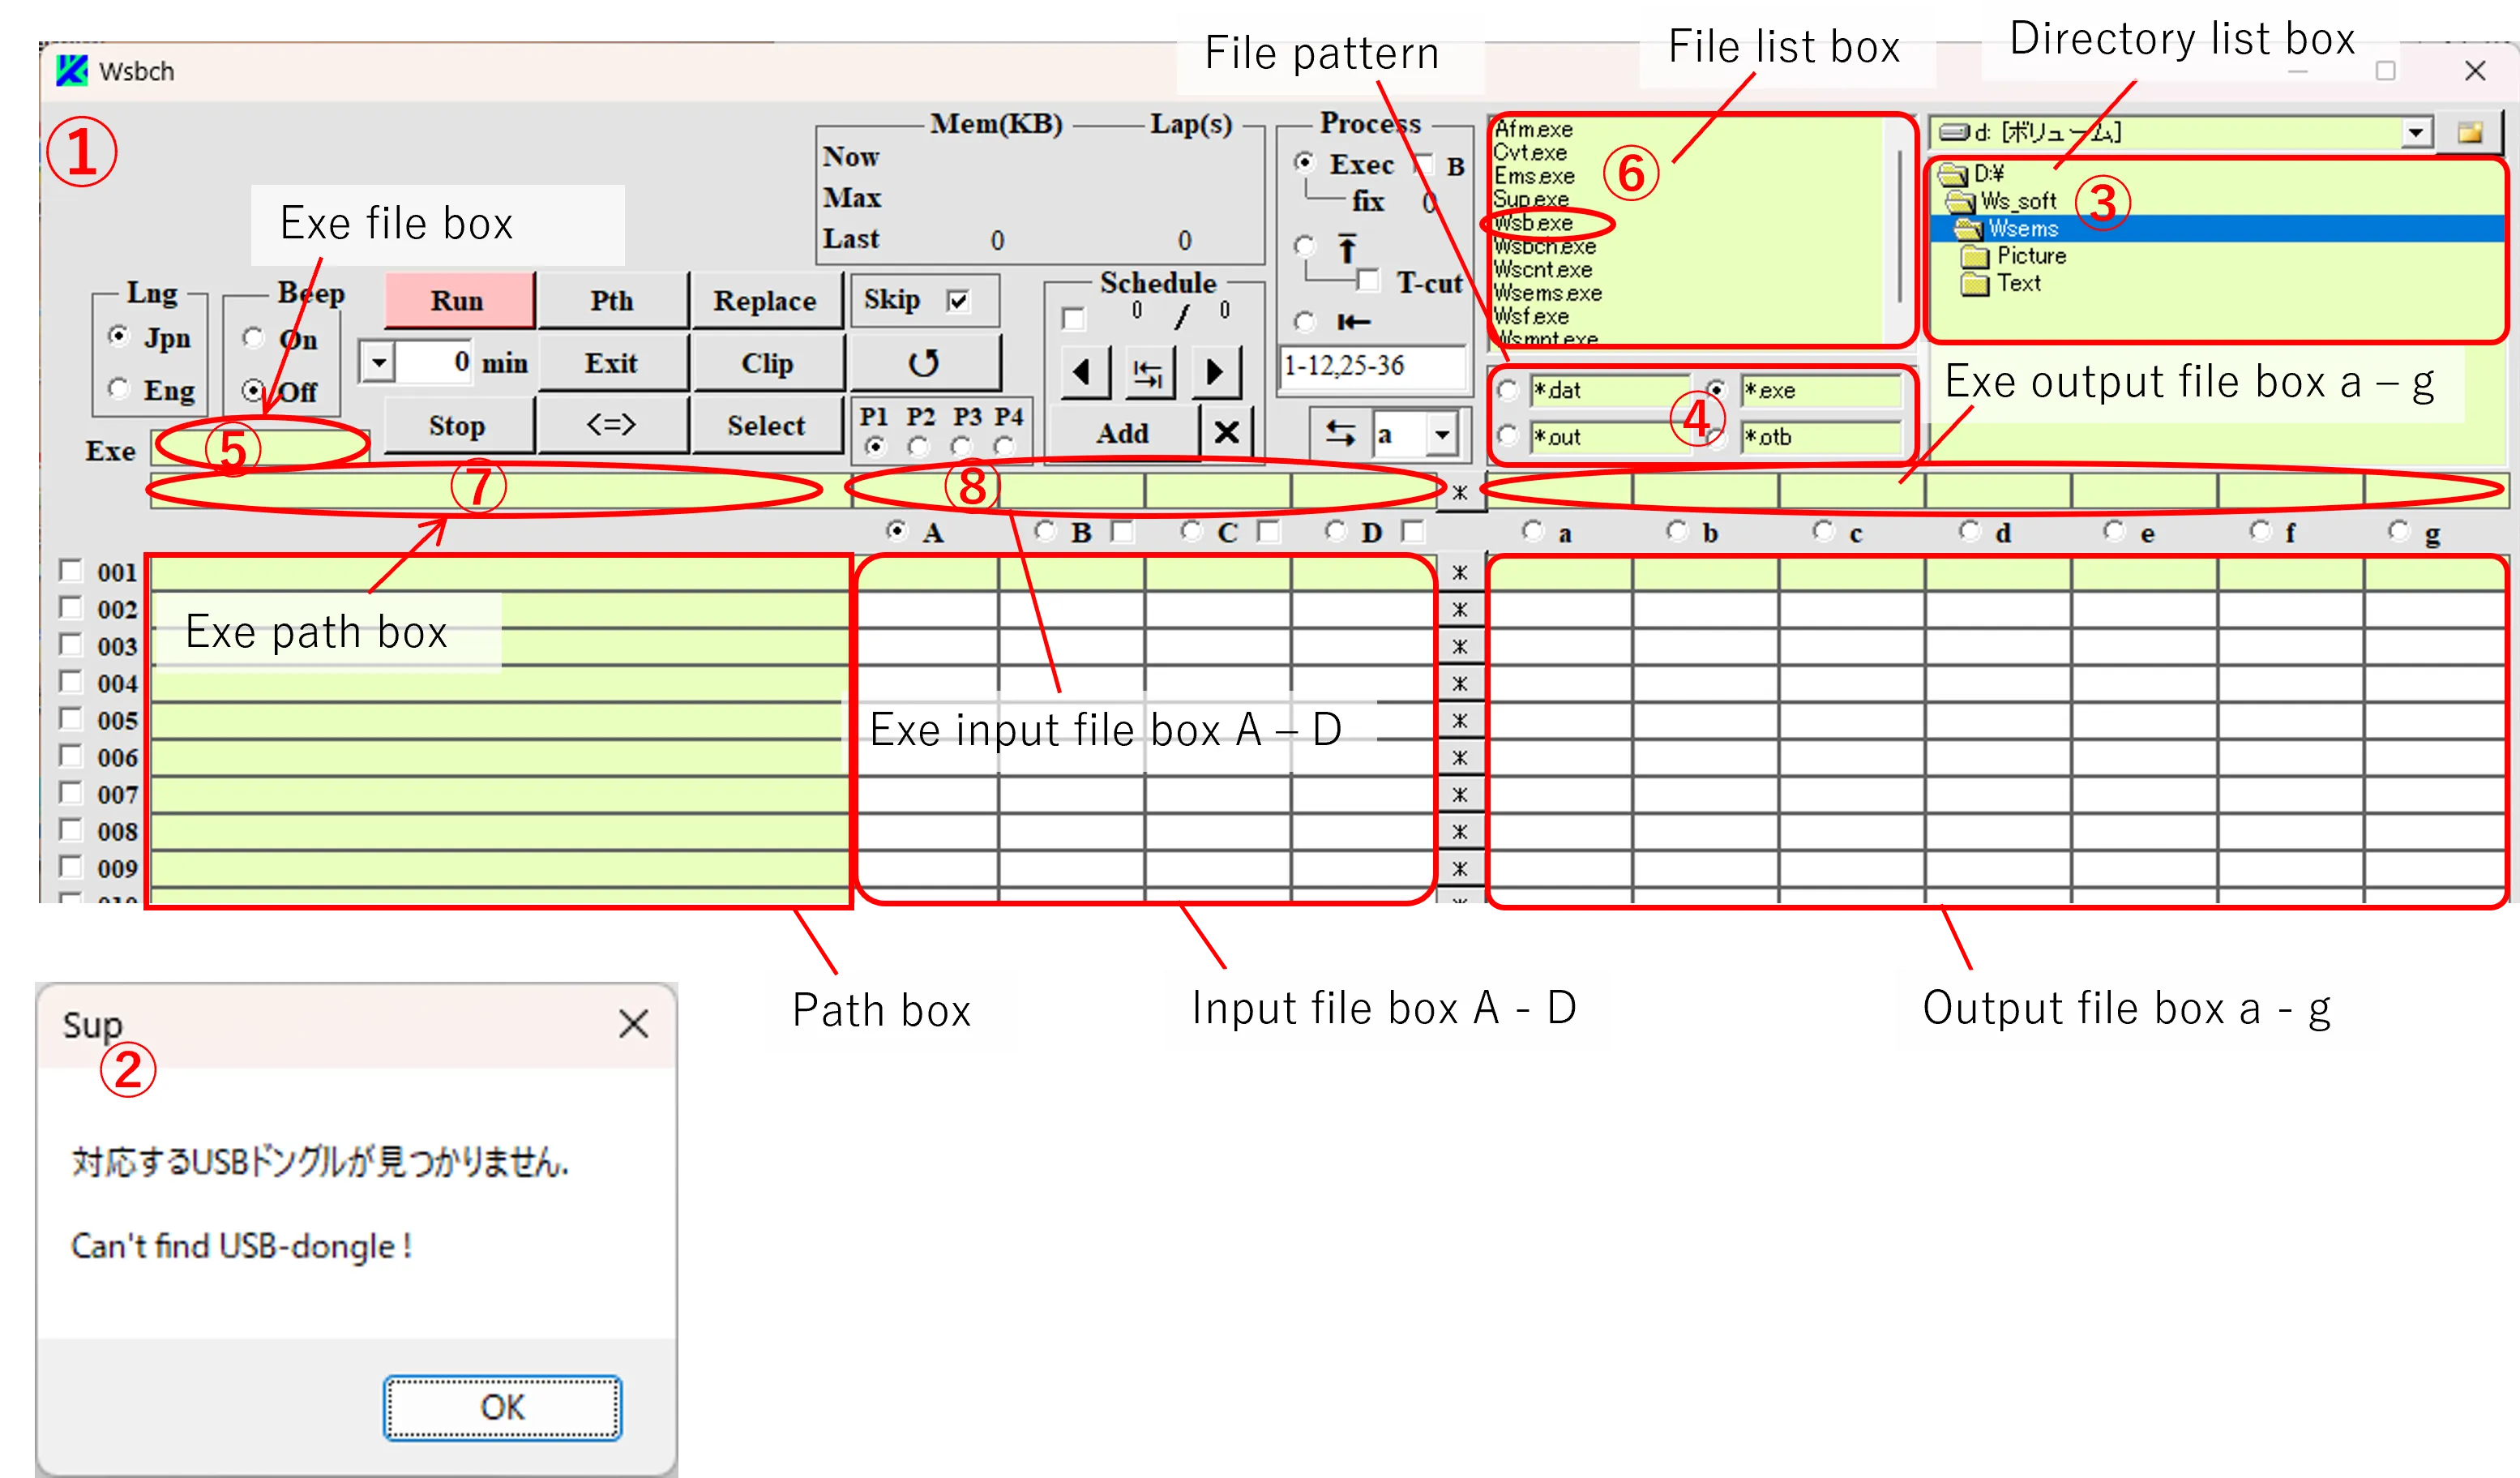
(2) Click A in the Exe input file box ⑧ and type an input file name (wsb.dat). Click the Exe output file boxes a - g respectively, and type in the necessary output file name (e.g., wsb.out) as shown in ⑨ - ⑮. The paths of Exe input/output files are the same as the Exe file path ⑦.
(Note) : If not registered, Exe file ⑤ is limited to Wsb.exe, Wsf.exe, Wsr.exe, Amp.exe, and Cvt.exe; otherwise, the caution window ⑯ appears and a force-quit occurs.

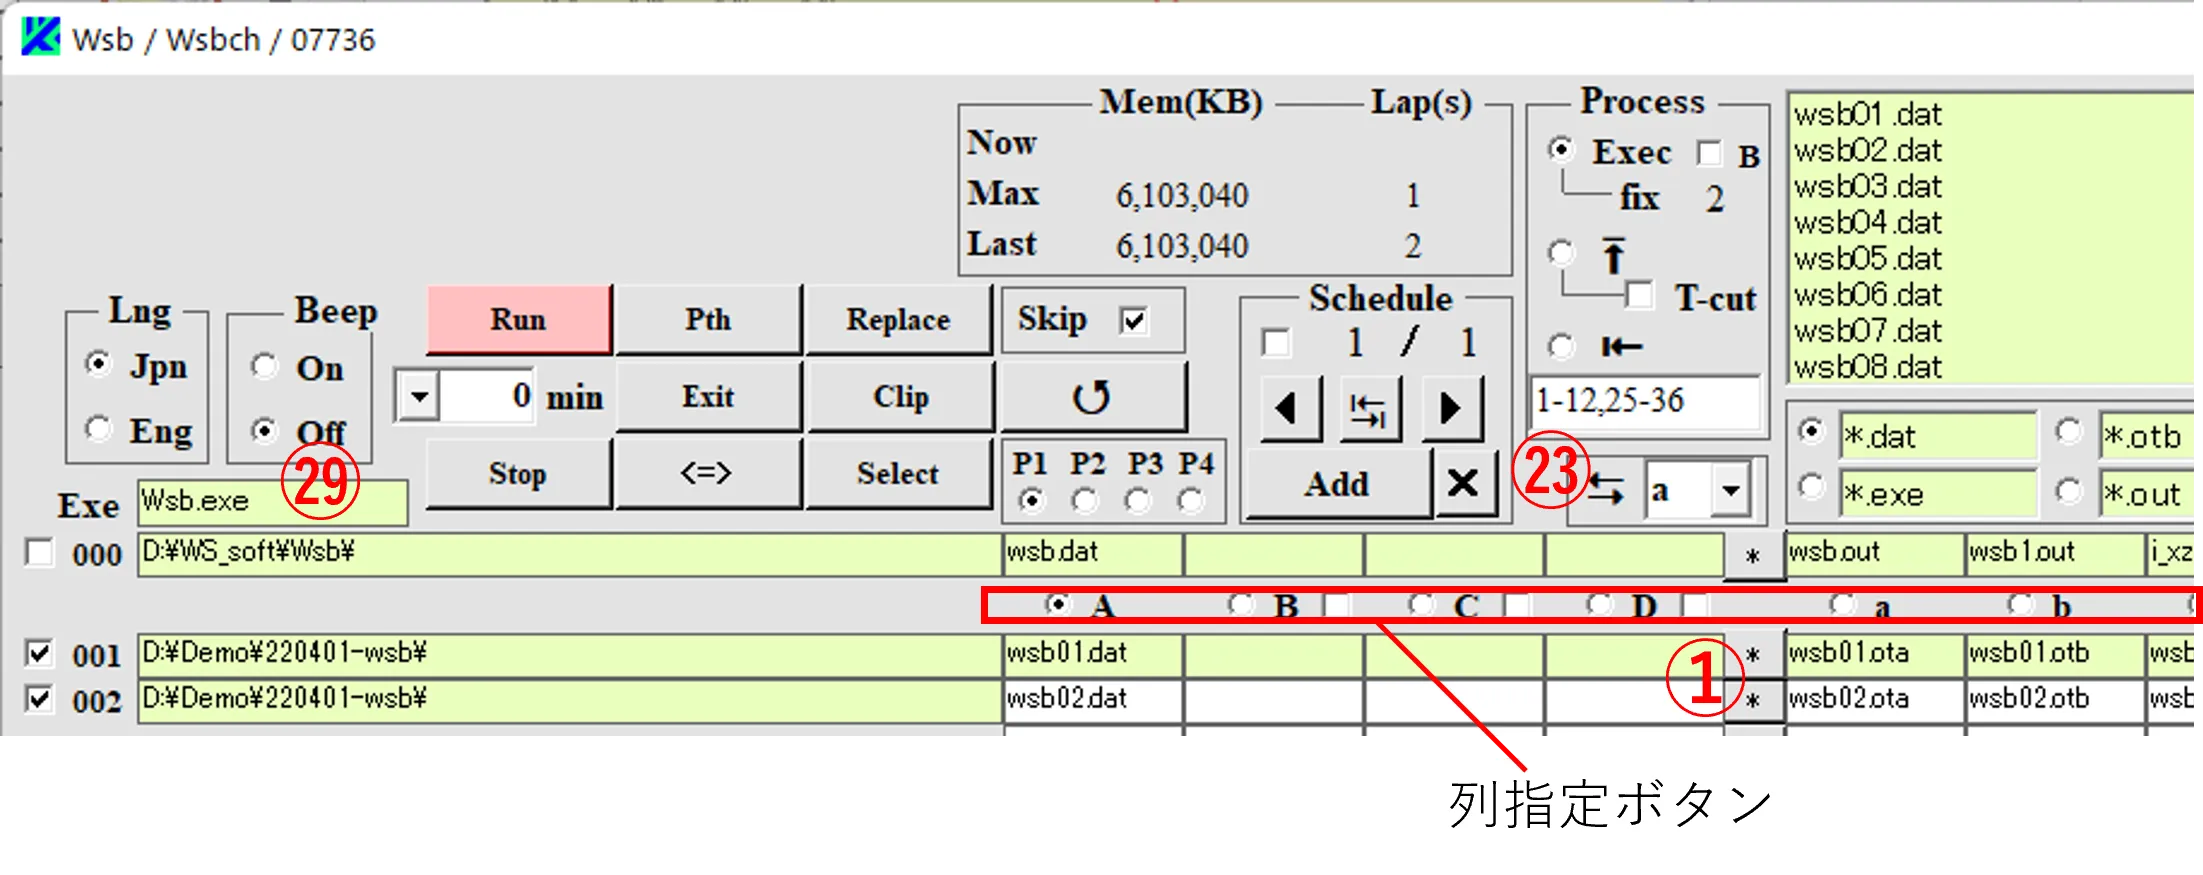
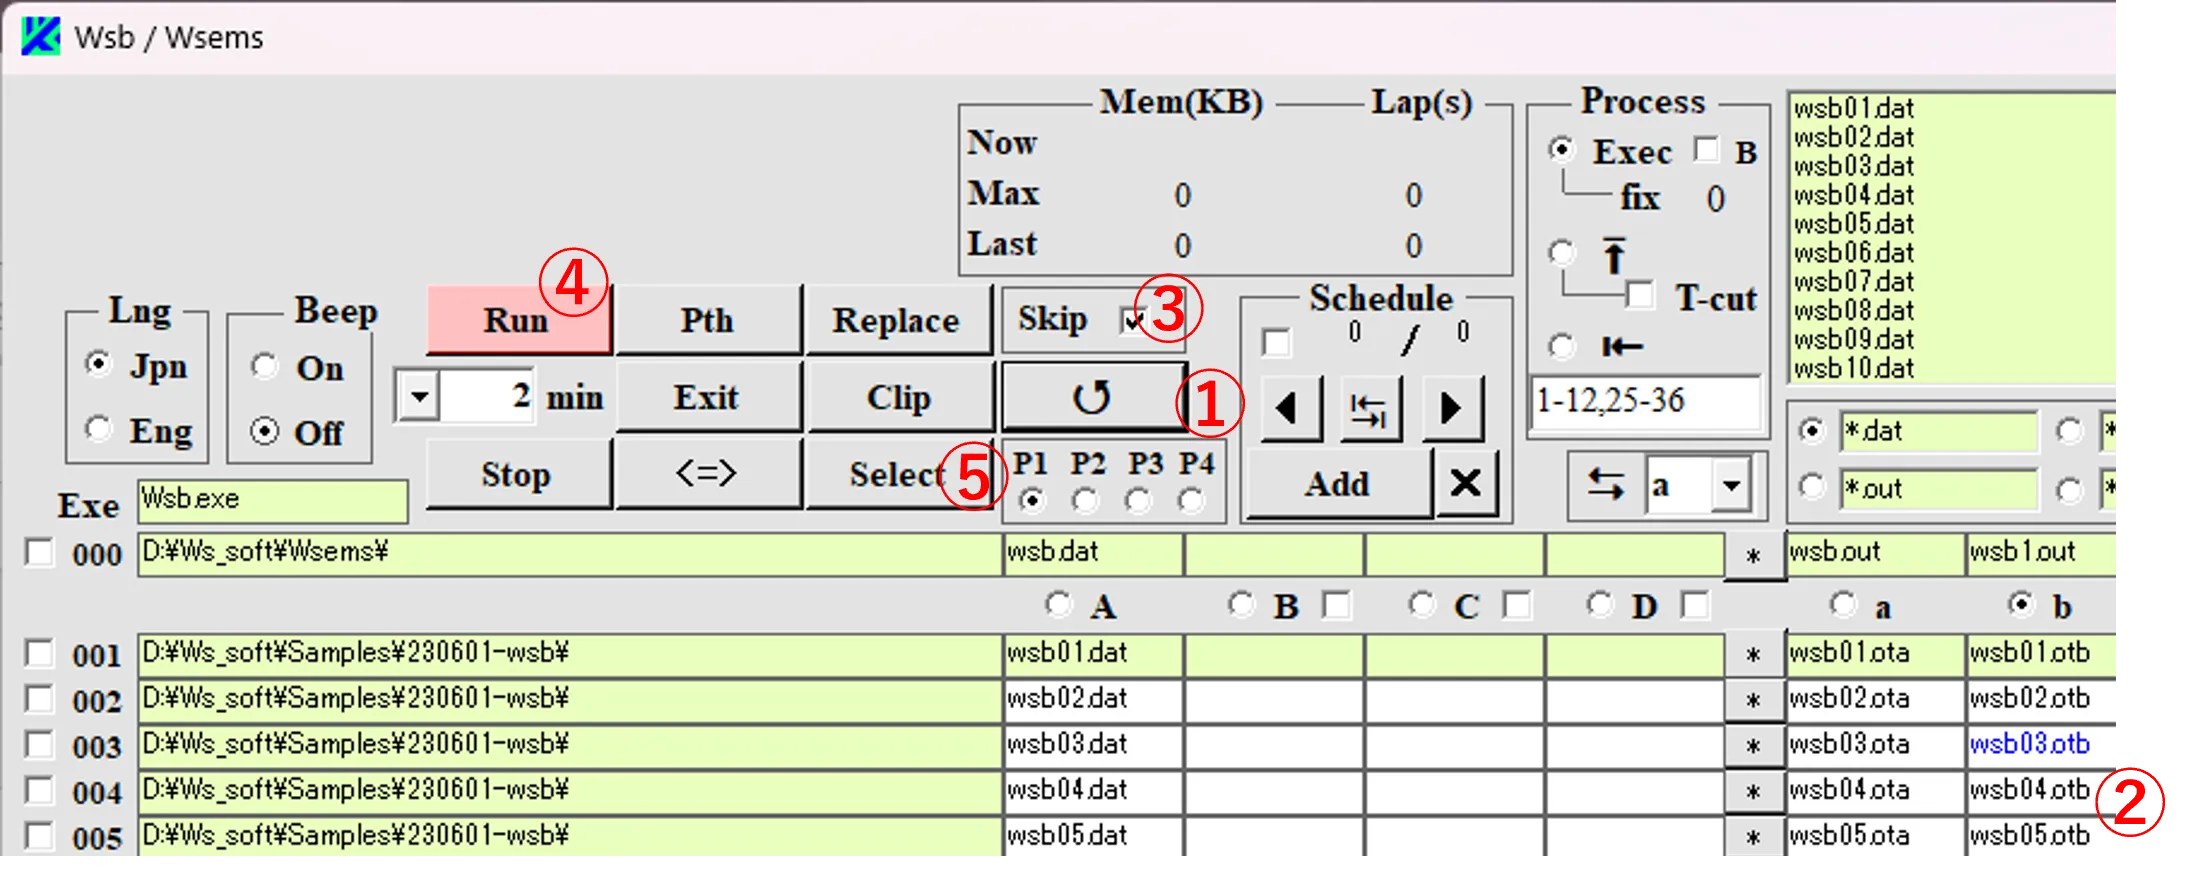
(2) If the Skip box ⑮ is not checked, clicking the Run button ⑯ performs the calculation unconditionally. If checked, the caution window ⑰ appears. If Yes is selected, the calculation begins, and if all files in the output boxes a – g are existing, the calculation skips to the next line. If No is selected, the calculation is canceled. If you want to leave some time before the calculation starts, you can set a waiting time in minutes in ⑱, and if not set, an elapsed time from the calculation start is displayed there. In the calculation flow, the input file (wsb01.dat, etc.) is copied ⑲ to the Exe input file (wsf.dat) in the Exe folder, and the Exe output files (wsb.out etc.) generated by the execution of the exe file (wsb.exe) in the same folder are copied ⑳ to the output files (wsb01.ota etc.) in the output file box. Button ㉑ is for selecting whether the caution windows etc. are in Japanese or English, and button ㉒ is for whether or not a beep sound is emitted at the completion of each calculation.

The DOS window can be set up by left-clicking the icon on the left end of the title bar and by operating the getting pop-up menu.
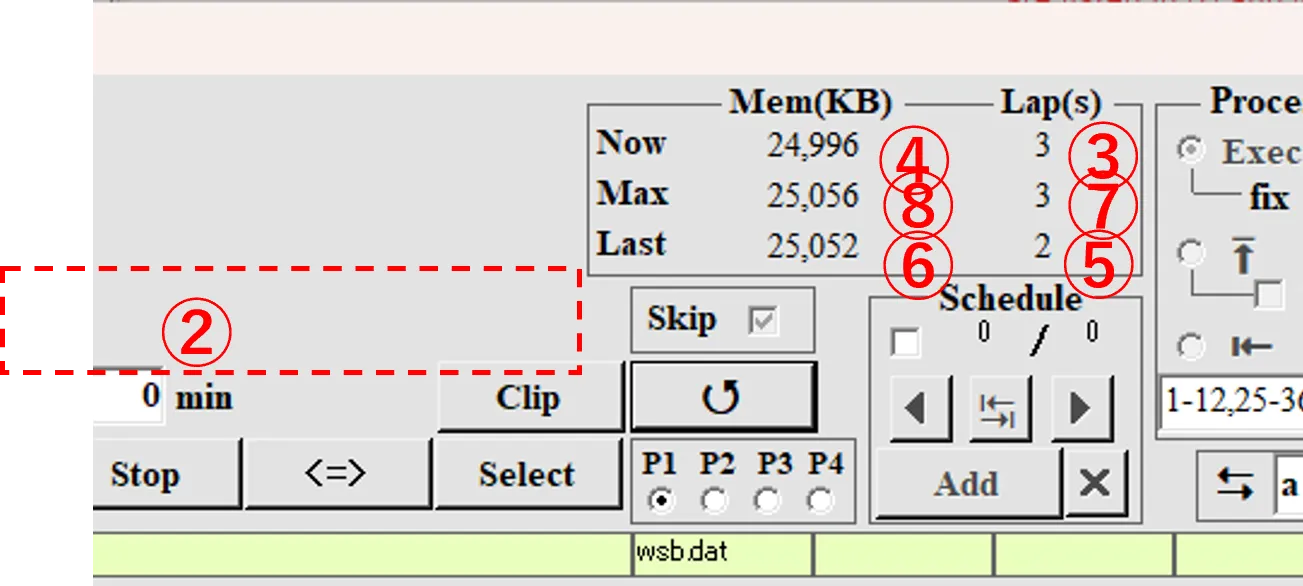
(2) When a calculation is completed, the DOS window ① disappears, and after the box ⑨ is checked, the next row calculation begins. When all calculations are completed, the Run button and other buttons appear as they used to be. Under calculations, clicking the Stop button ⑩ forces termination of the calculating operations. If the DOS window remains, pressing Ctrl & C on the DOS window closes the DOS window. After the calculation is finished, click the ↺ button ⑪ to check the output status. Files whose data get dumped are listed by black color ⑫ and files whose data are empty are by blue color ⑬ (since wsb01.dat is the contents for a 2-D calculation, data for the 3-D output (i_xy.out) becomes empty).

By the way, if the Run button ② is clicked again in this state, box ⑮ is checked in gray and the calculation is moved to the lower line because the Skip box ⑭ is checked. If you want to perform the calculation for the current line, take the checkmark of Skip box off before starting the calculation or delete one of the output files like *.ota by clicking the * button ⑯ to open an Edit window and by clicking the Delete button there).

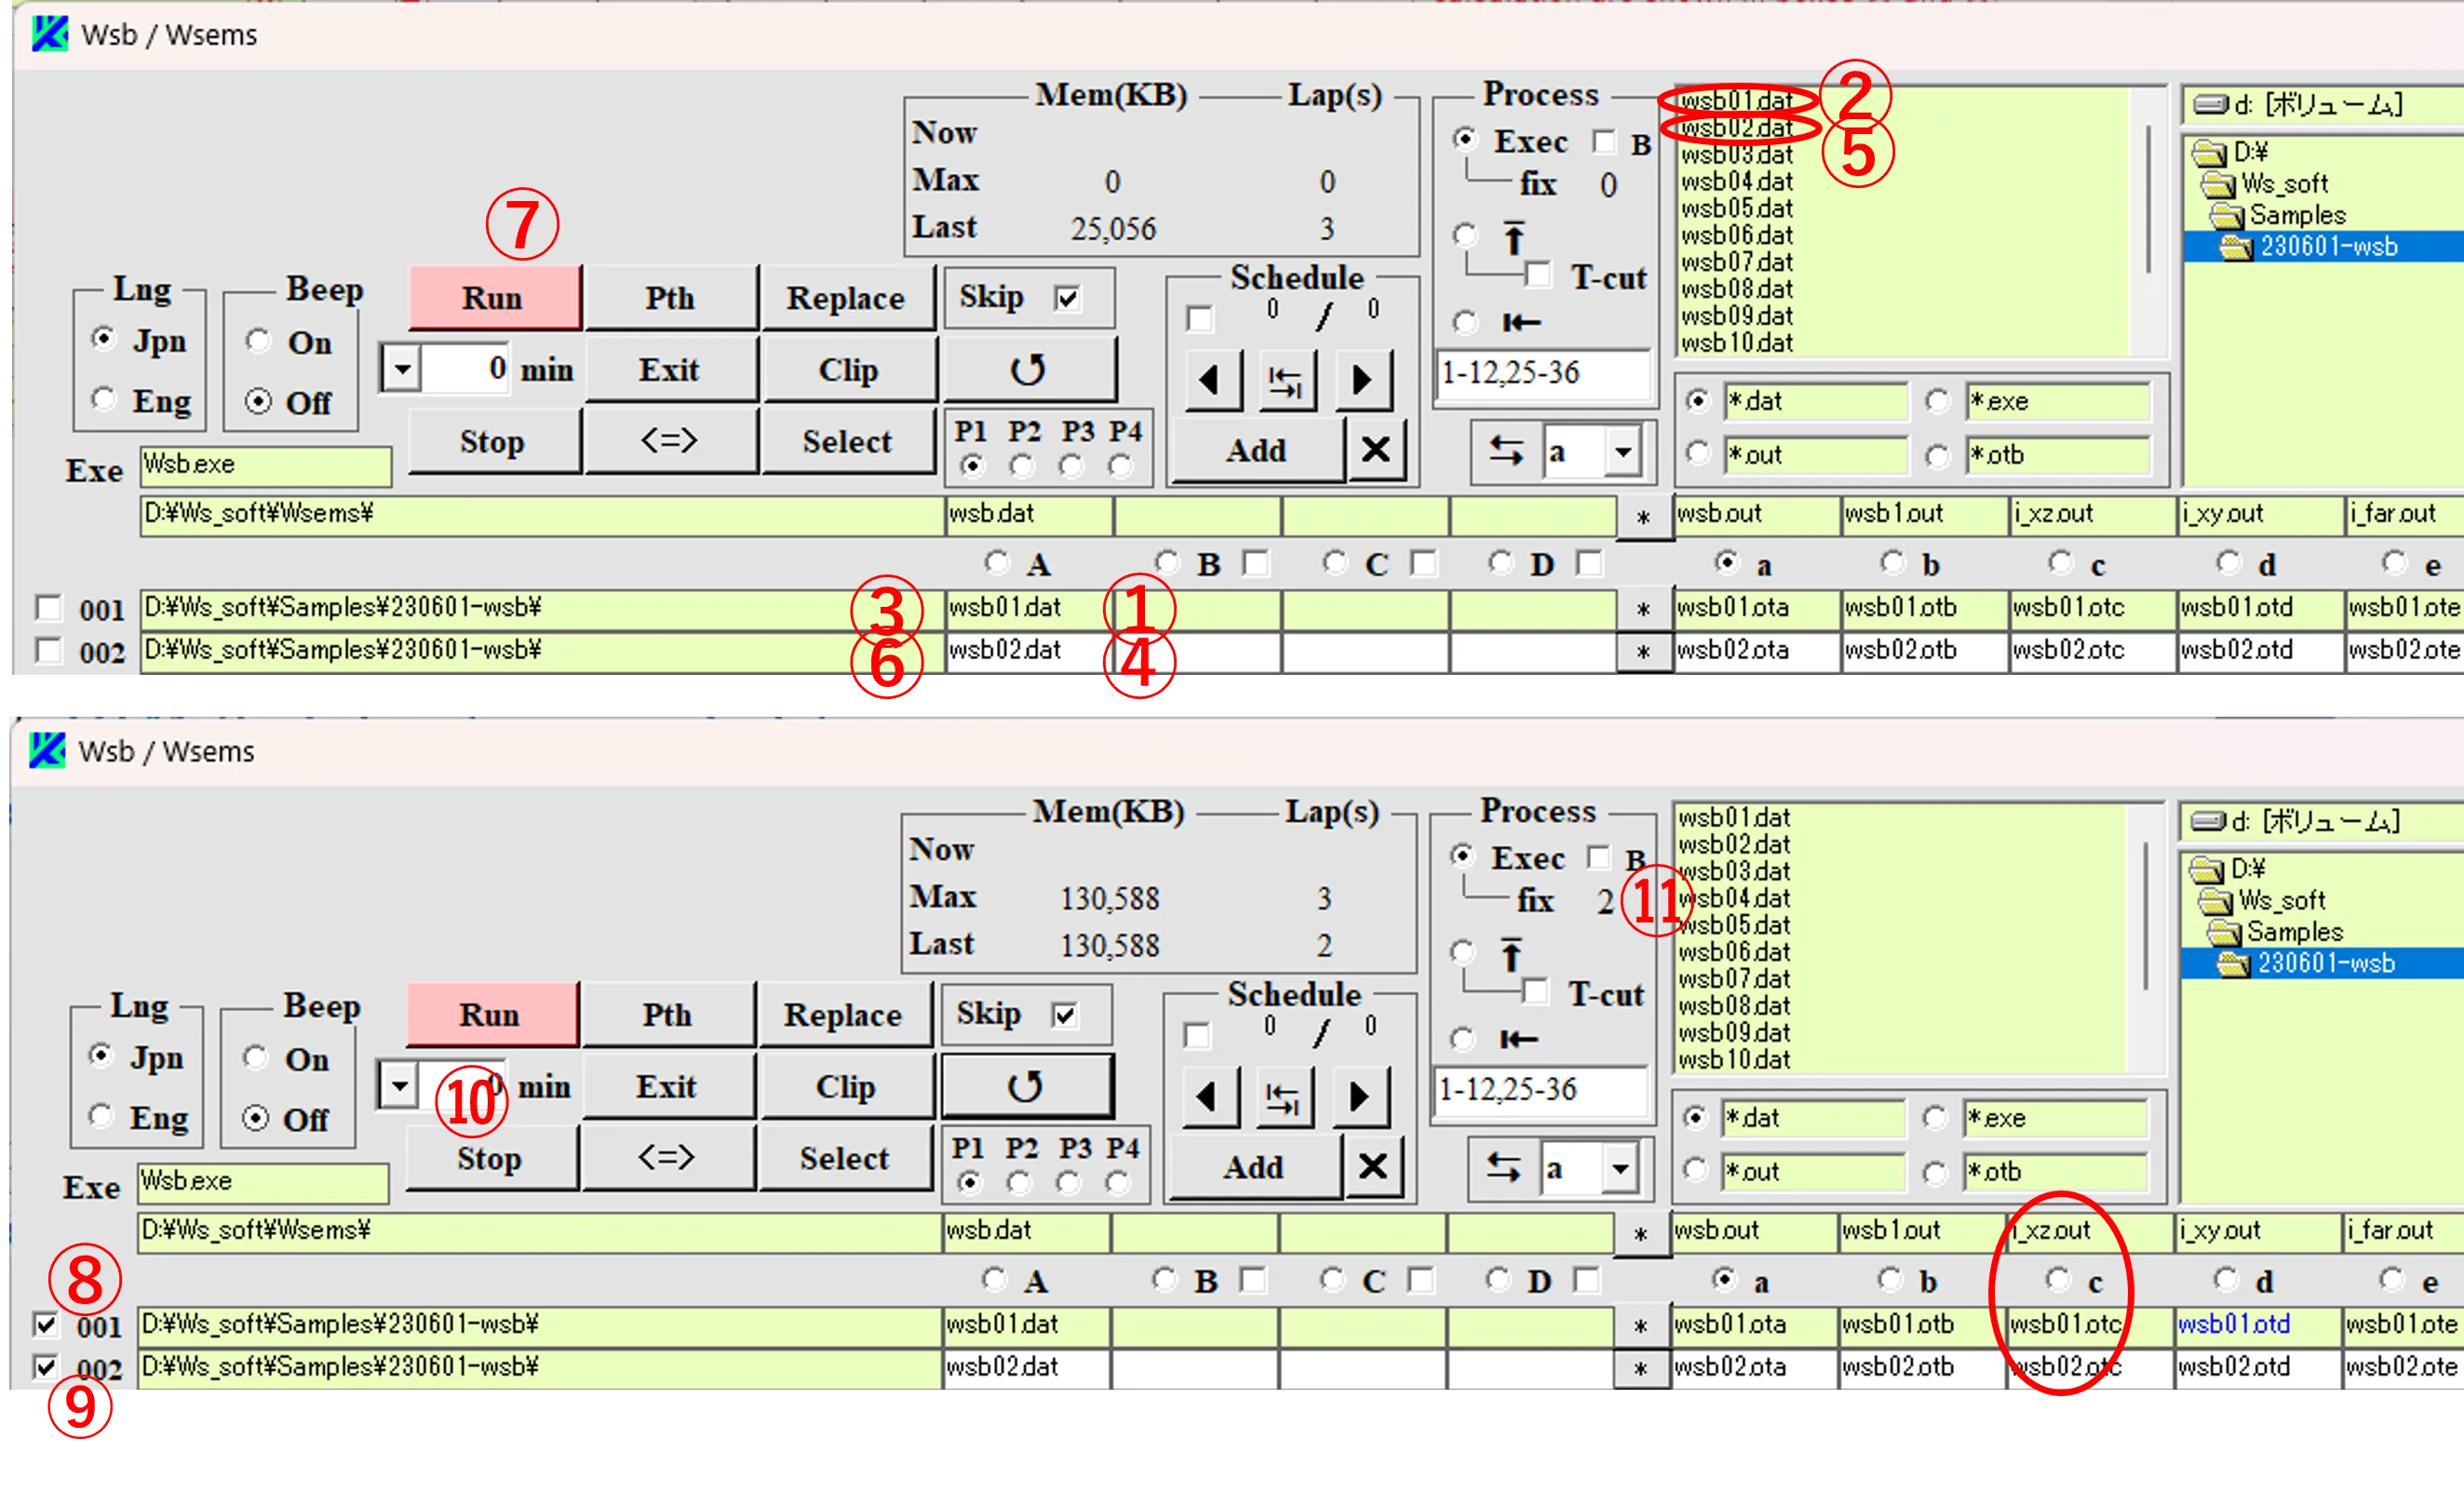
(1) Click the input file box ① in column A and select one of the files ② (wsb01.dat) in the file list to fill the path box ③ and file box ①. Next, click the box ④ in column A and select the next file ⑤ (wsb02.dat) (or double-click the box④) to fill the path box ⑥ and file box④. If the Run button ⑦ is clicked, the calculation is performed and boxes ⑧ and ⑨ are checked in the order of calculating completion. The elapsed time since the Run button was clicked and the number of files that have completed the calculation are shown in boxes ⑩ and ⑪.
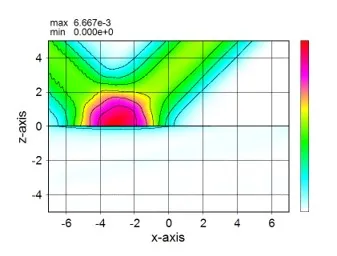
(2) Some of *.out files in the folder where the exe file is stored can be visualized by Wscnt. If registered, the restriction on Wscnt is removed and output files such as *.otc can also be visualized by Wscnt.
● Step 2
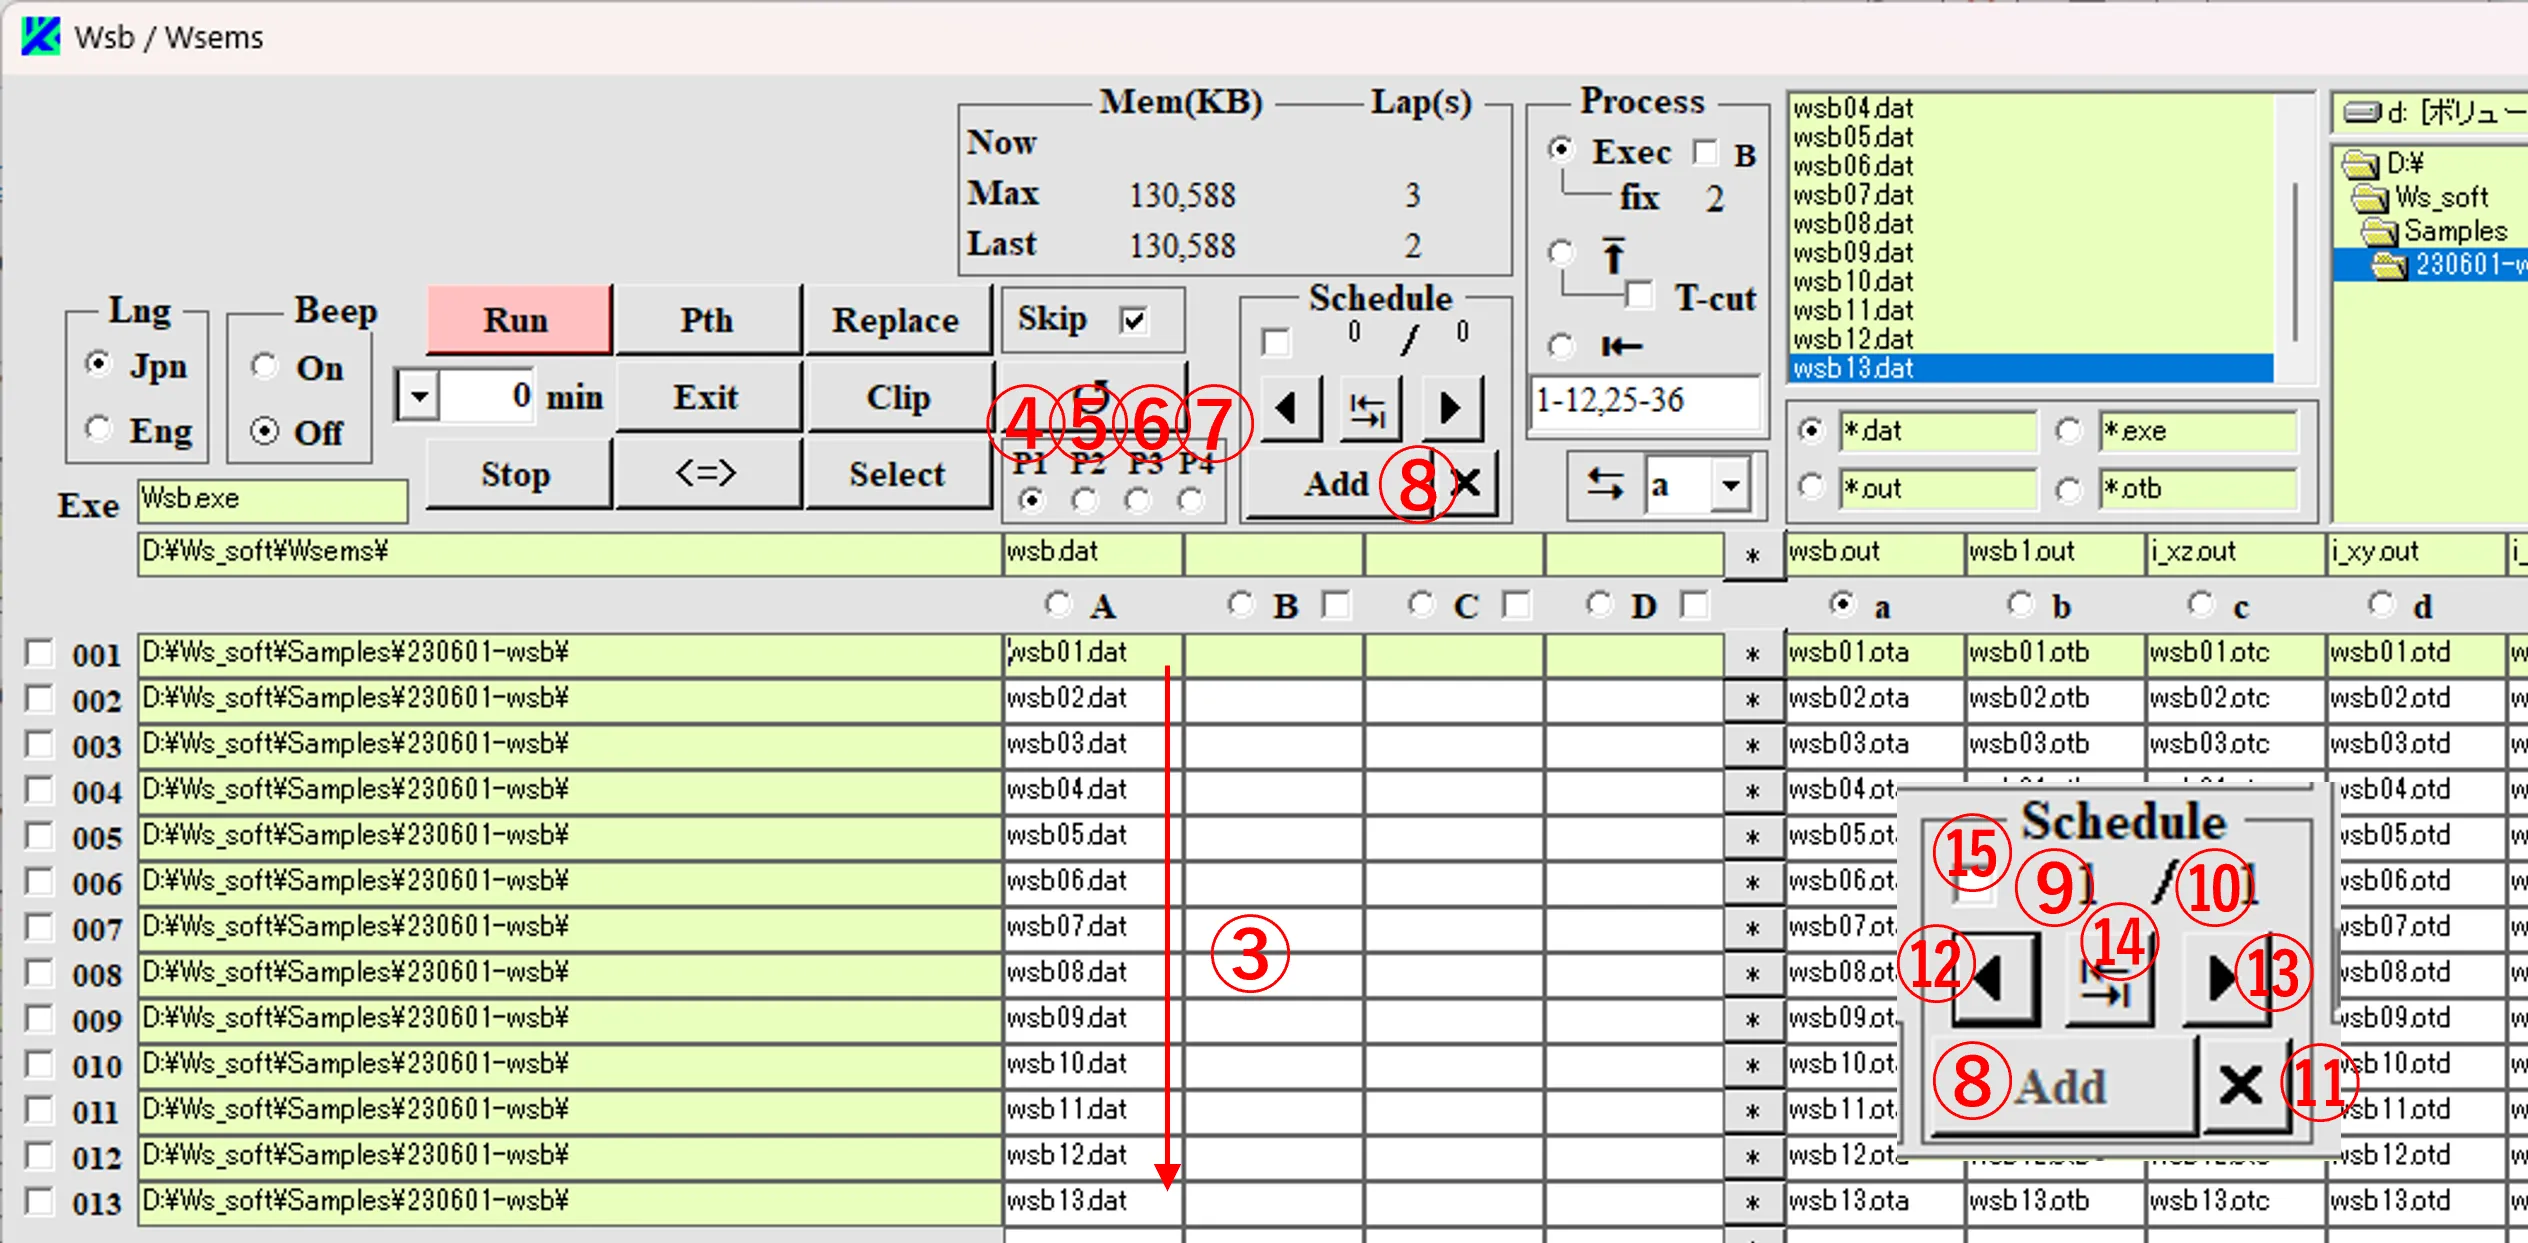
(3) After selecting one of the files ① in the file list, click and hold on the input file box ② in column A and press the Enter key to list all files on the lower side of ① as shown in ③.

(4) Switching the page buttons ④, ⑤, ⑥, and ⑦ brings up columns composed of 25 lines each, and a total of 100 data is available to be listed on the column A boxes. If more calculations are needed, click the Add button ⑧, and the data set is counted as a new Schedule and displayed in ⑨. The number ⑩ is the total number of schedules planned. 999 schedules can be planned by defining arbitrary exe files and input/output files for each schedule. Clicking the × button ⑪ deletes the currently displayed Schedule, clicking the ◀ button ⑫ or the ▶ button ⑬ moves the Schedule back and forth, and clicking the ⑭ button moves the Schedule to the first or last position. Clicking button Run performs the calculation from the top line of column A box to the bottom with turn of a page like ④, ⑤, ⑥, and ⑦. A mark color for the check box ⑮ is changed at every clicking, like black, gray, and nothing. If there are some schedules and the box ⑮ is not checked, the calculation is performed from the beginning (i.e.,⑨ is set to 1). If the check mark is black, the calculation is performed for the current schedule only; if the mark is gray, the calculation is performed after the current Schedule.


(2) If CVS data is pasted into box ③, designating the pasted range and clicking button ⑭ replace Tab codes included in the range with single-byte spaces multiplied by number of box ⑮ (as shown in p. 28 of this document). If the font is distorted by being pasted into box ③, click the ↺ button ⑯. When the file contents have been changed, Save button ⑰ and Rename button ⑱, and Undo button ⑲ appear, and the changed file can be saved, renamed, or redone by clicking each of them. Clicking the ↓⑳ or ↑㉑ button moves the line (row) position of the loaded file up or down, and the contents of the corresponding file are shown in the box ③.

(3) Clicking the button ㉒ moves the loaded file to the one corresponding to column “a” (when the box ㉓ is “a”) at the same line position and clicking the button ㉒ again returns to the original position. Clicking button ㉔ brings up the directory box ㉕, and a new folder can be created by clicking button ㉖. After selecting a folder in box ㉕, clicking on box ㉗ can match the path of box ㉗ to the one of the selected folder. This can be used to copy files in combination with the Save button ⑰. To hide the directory box ㉕, click on the button ㉔ again. The box ㉘ in the right of box ③, whose contents are automatically selected from the type of Exe box ㉙ on the main window, explains data parameters. If you want to see the definitions of other types, use box ㉚ to select them.



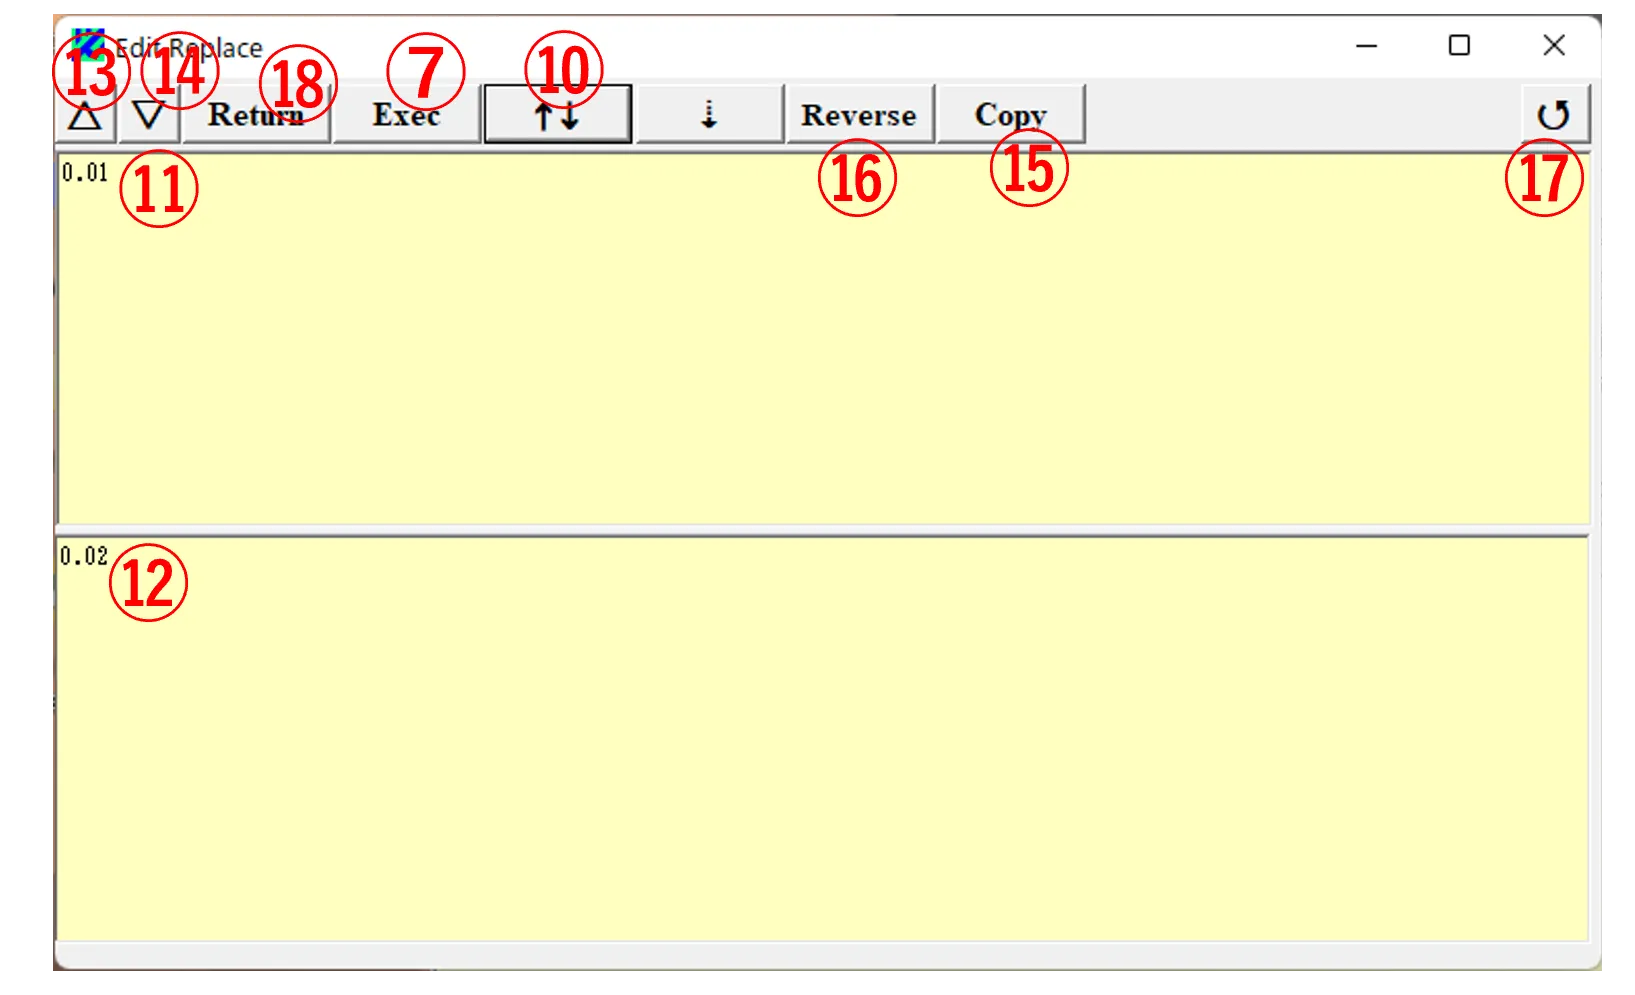
(2) Clicking the button ⑩ switches the contents of the upper and lower boxes as shown in ⑪ and ⑫ (when used in combination with the Exec button ⑦, its function is the same as Undo). Clicking button ⑬ or ⑭ deletes the contents of the upper or lower boxes; clicking Copy button ⑮ copyes the contents of the lower box to the clipboard; clicking Reverse button ⑯ flips the upper box contents vertically and copyes them to the lower box. If the font is distorted by being pasted into the top or bottom box, click the ↺ button ⑰. Click the Return button ⑱ to return to the Edit window.
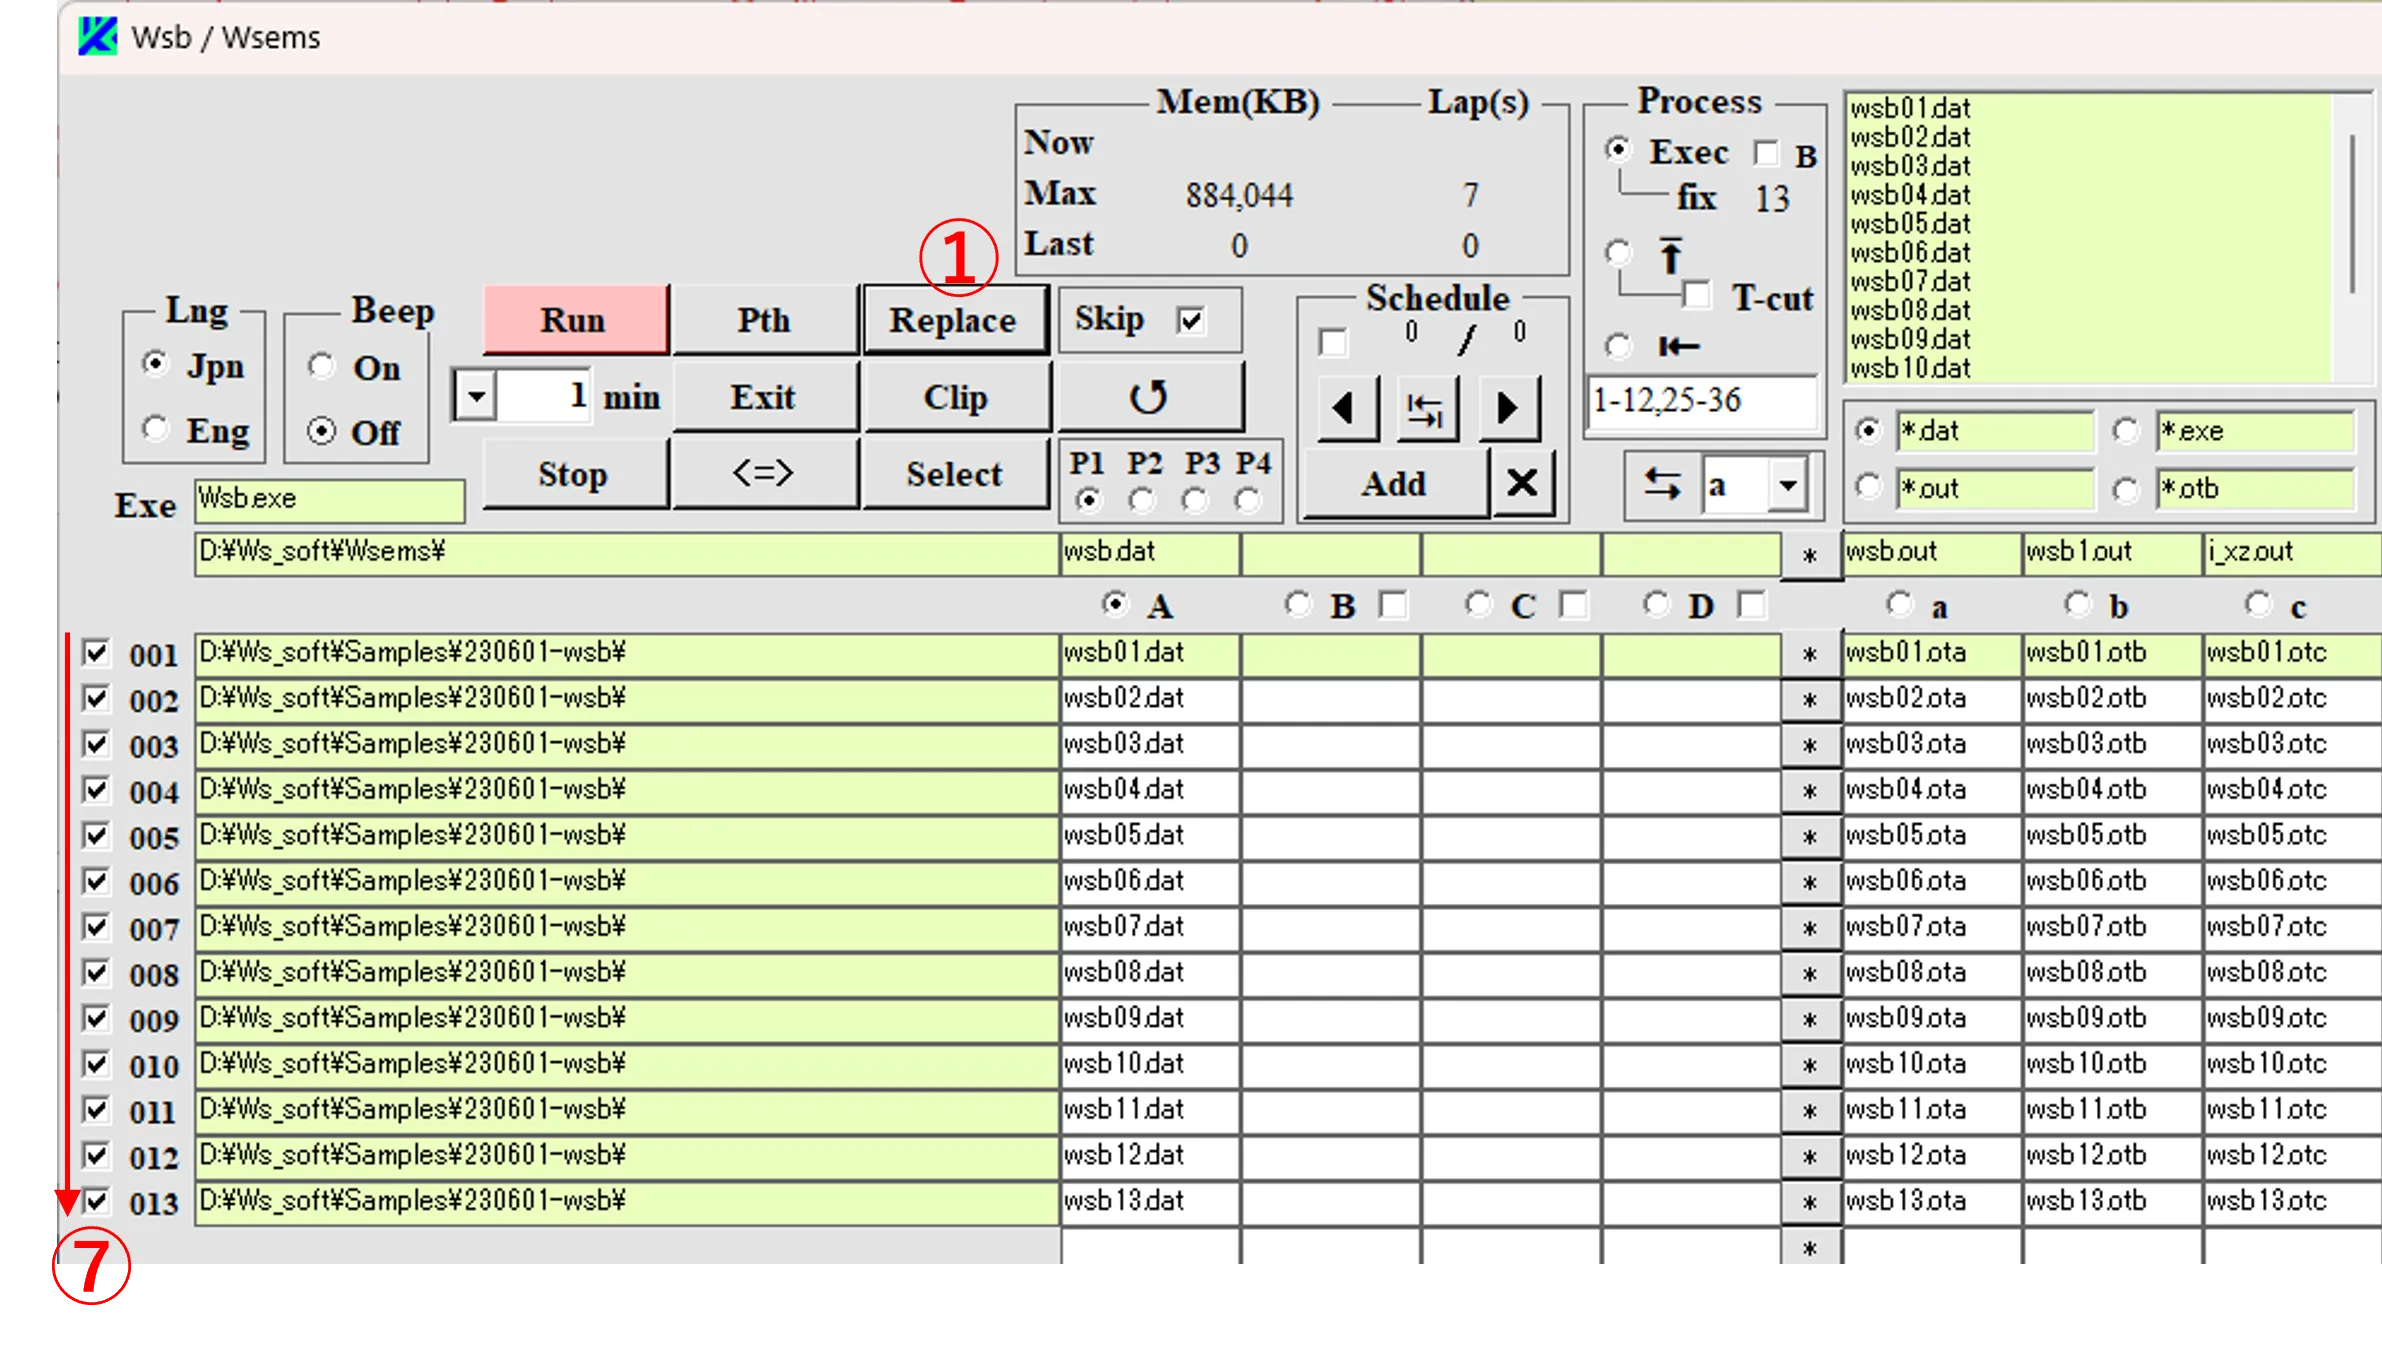
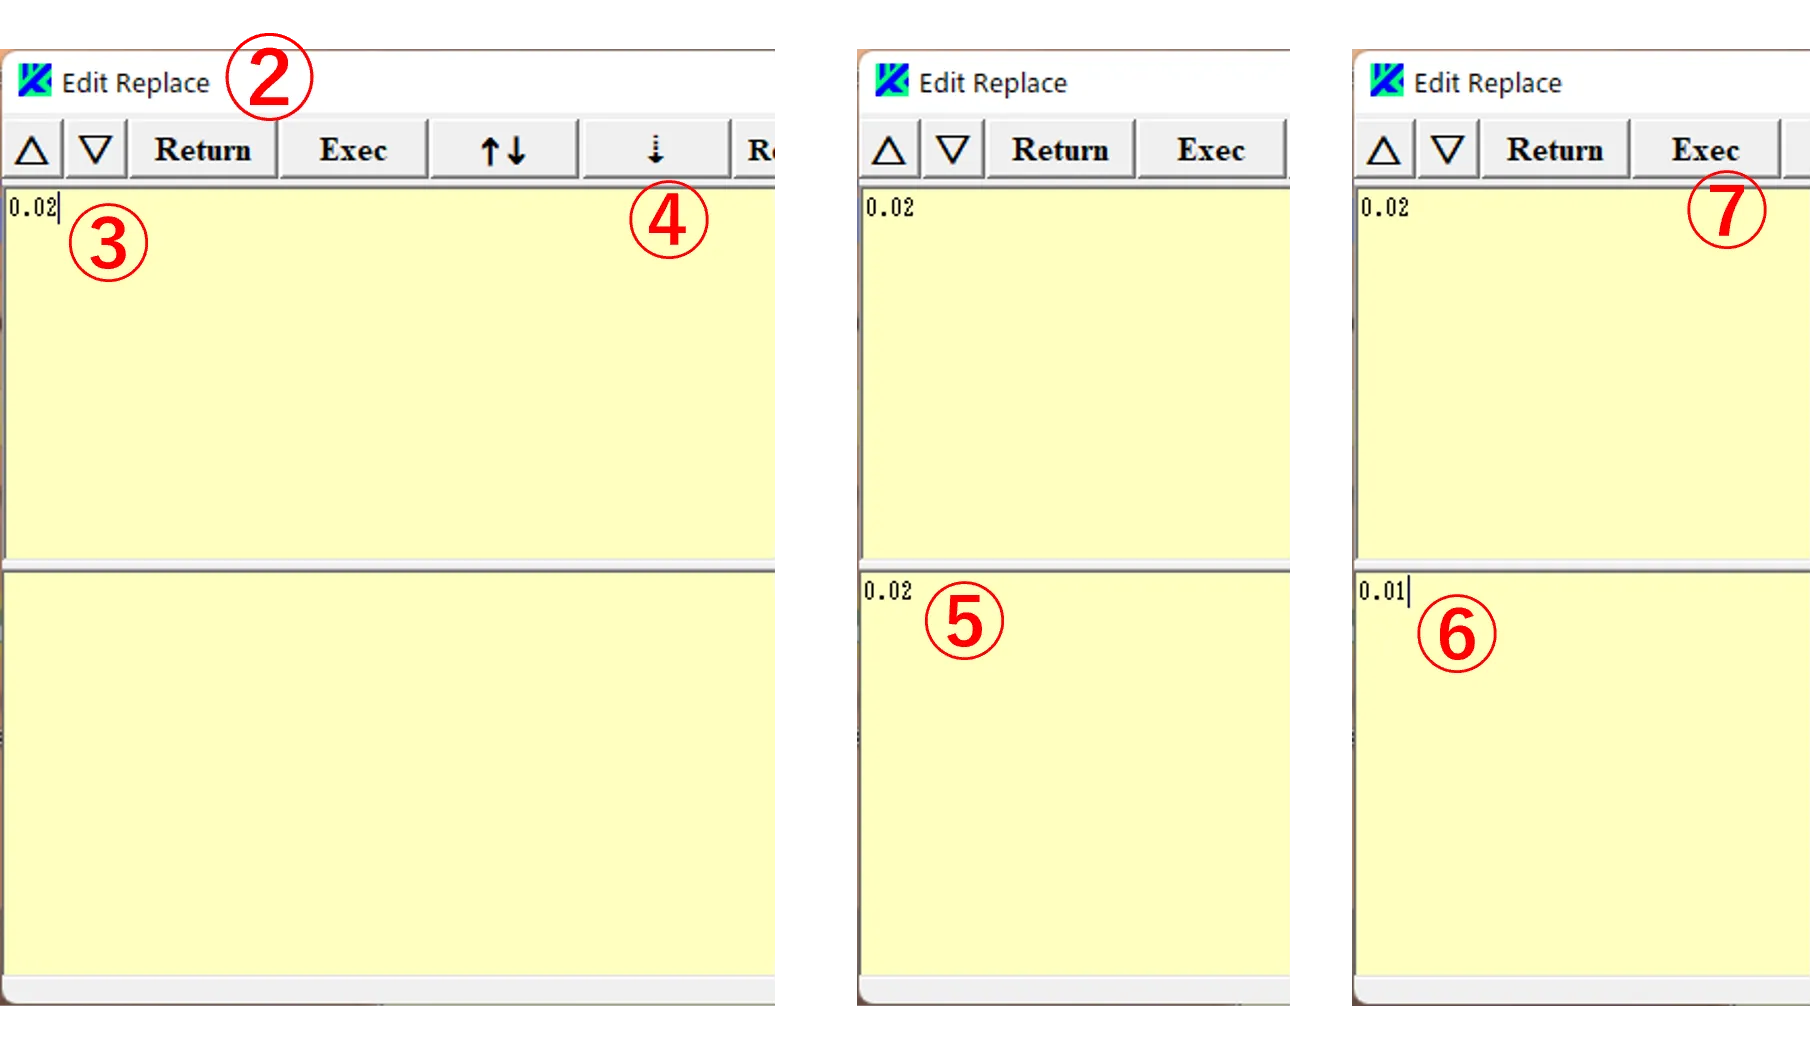
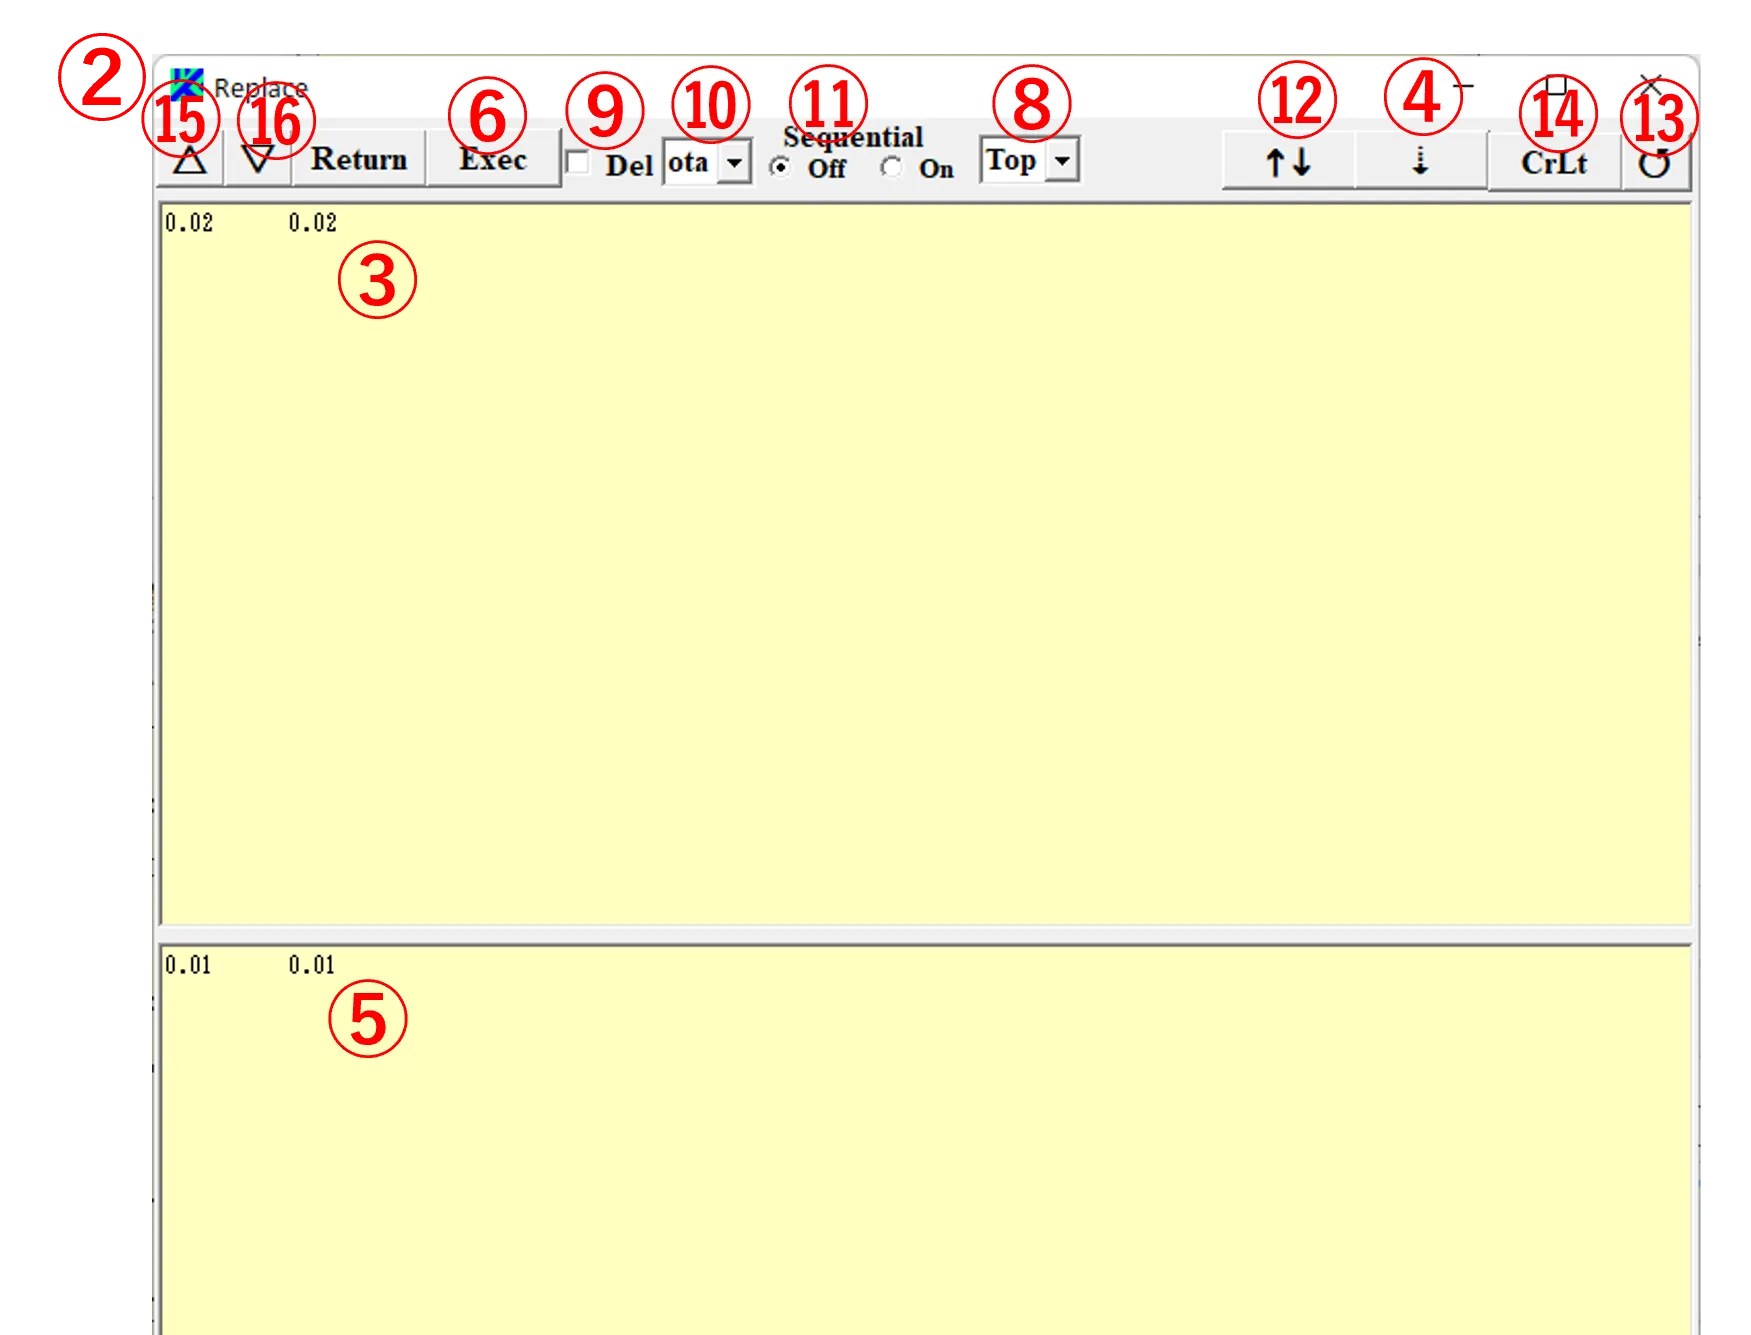
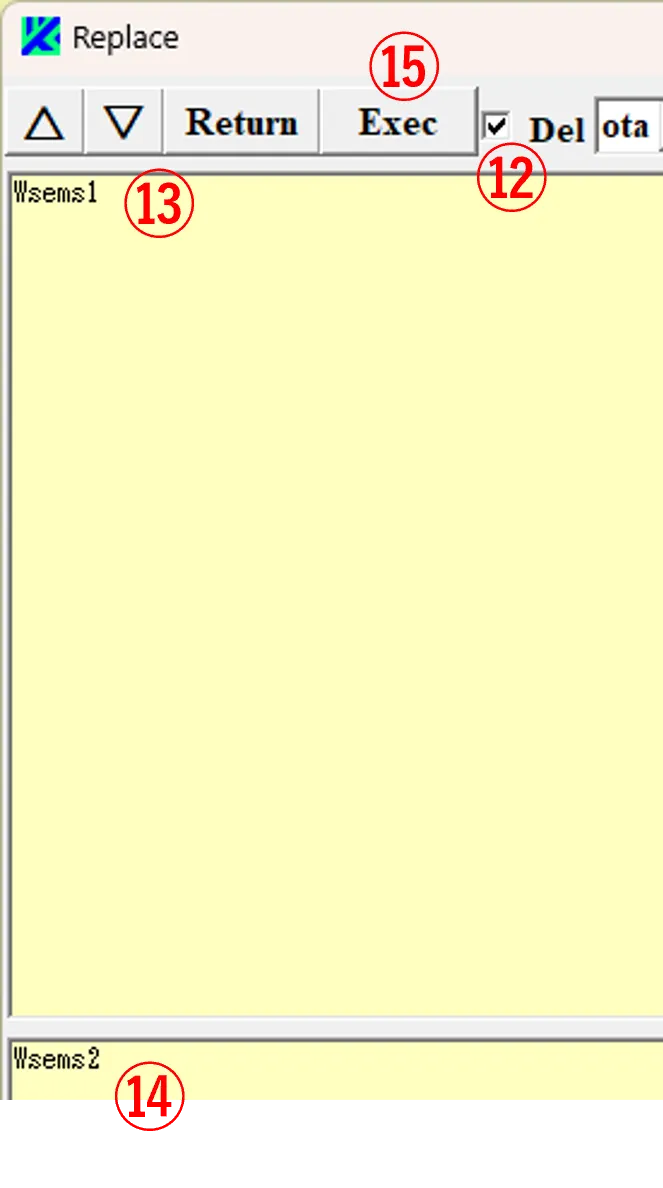
Click the Replace button ① on the main window, and then the Replace window ② appears. Enter (or paste) the text string ③ to be converted in the upper box of the window ② and click the button ④ to copy it into the lower box. Rewrite it to the string ⑤ and click the Exec button ⑥, then the corresponding string is rewritten across files listed in the column A boxes of the main window, and the converted files are checked in black as shown in boxes ⑦. Files for which no corresponding string exists (or no conversion is performed) are checked in gray. If “Top” is selected in box ⑧, only the string first appeared is converted; if “All” is selected there, all strings in the file are converted. If box ⑨ is checked, the output files with an extension designated in box ⑩ (in the case of “ota”, the files standing in the “a” column boxes) are deleted when the conversion is performed. If the Sequential button ⑪ for “on” is checked, performing occurred by Exec button ⑥ is done over all schedules. Clicking the button ⑫ switch the contents of the upper and lower boxes. if the font is distorted when pasted into the upper or lower box, click button ↺ ⑬. Clicking button ⑭ replaces the line feed code with that of the Windows specification. Clicking the ⑮ and ⑯ buttons erase the contents of the upper and lower boxes, respectively.
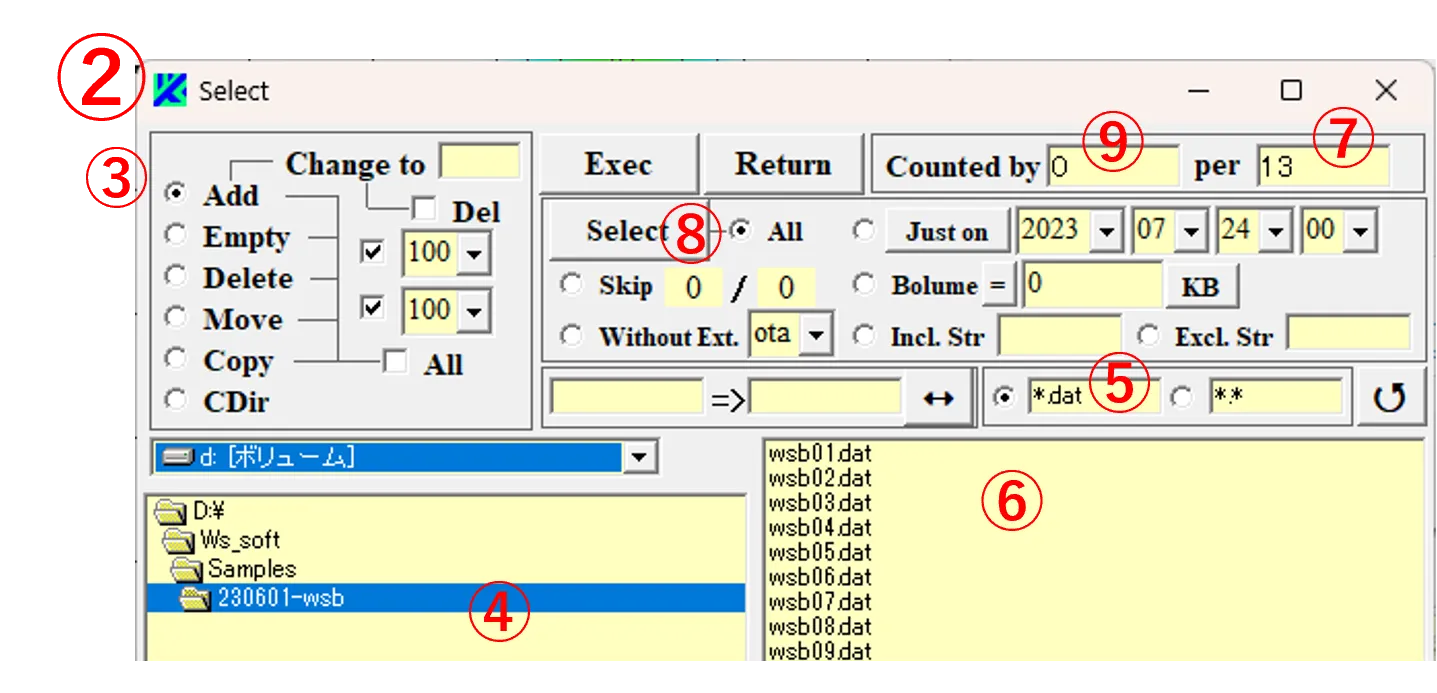
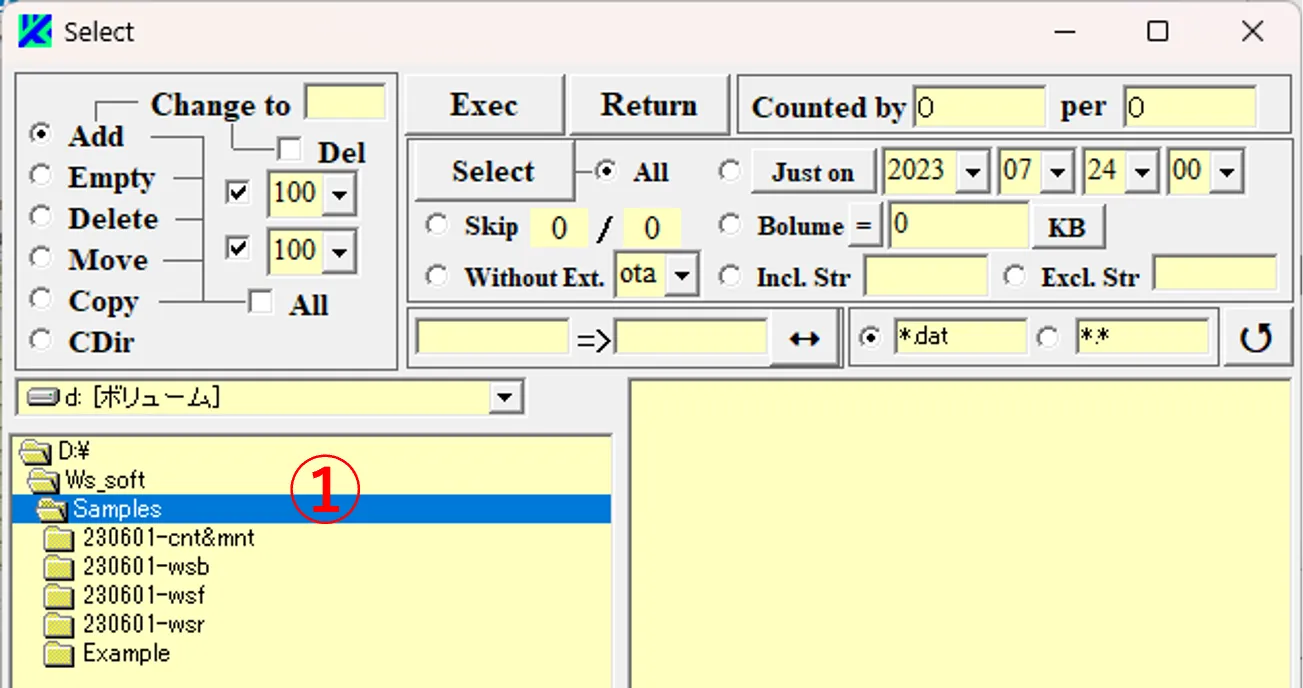
(1) Click the Select button ①, and then the Select window ② appears.Check the Add button ③ and select a drive and a directory ④. If you edit and select *.dat in the file pattern ⑤, the corresponding files appear in box ⑥, and the total number of the files is shown in box ⑦. If you click the Select button ⑧ to select the files, a background color for the selected files is reversed and the number of the files is shown in box ⑨.

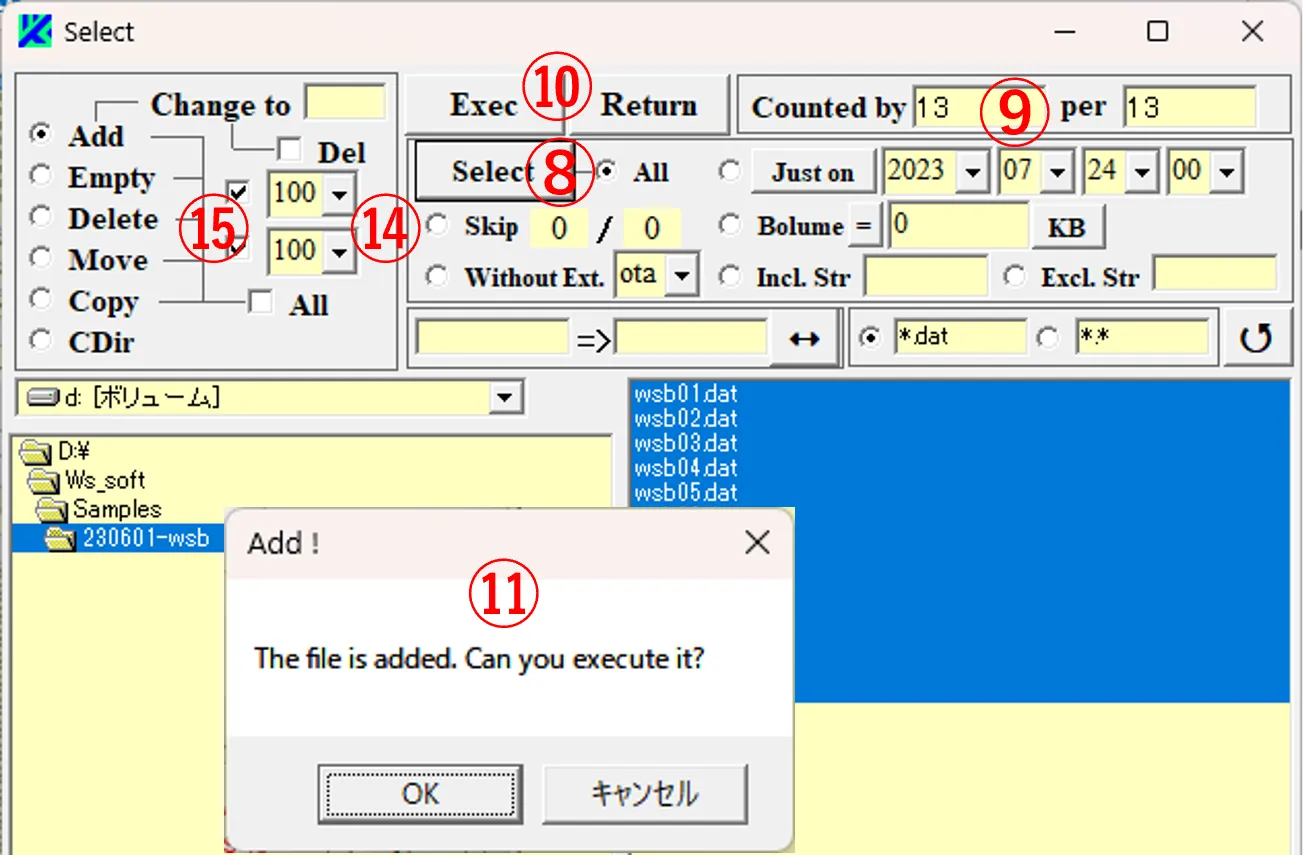
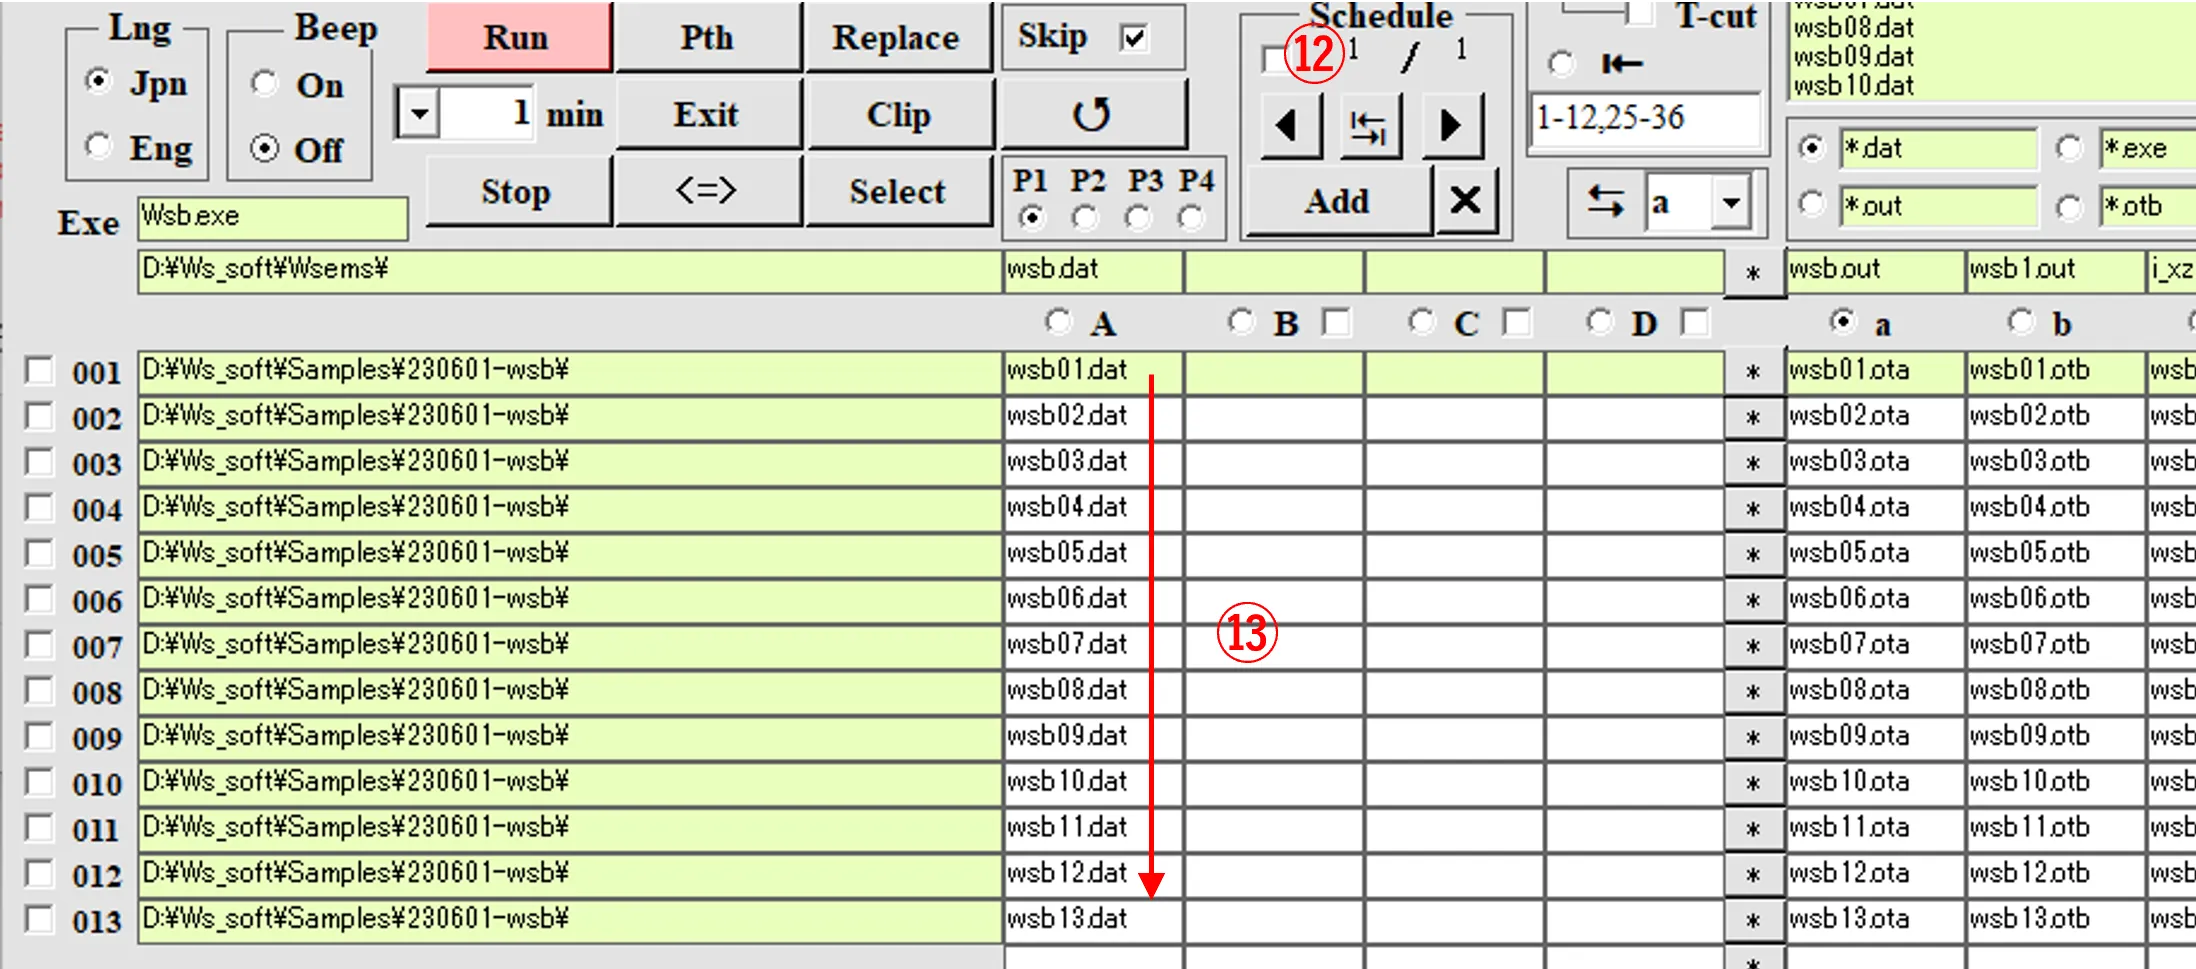
(2) Clicking the Exec button ⑩ brings up the caution window ⑪. Selecting OK adds a schedule like ⑫, and the selected files are listed on the column A boxes ⑬. If the number of files exceeds 100, Schedule ⑫ is automatically updated and added. The two pairs of boxes ⑭ are both 100 by default. If they are set to 80 and 20, for example, 80 files are added to the first Schedule, 20 files to the next Schedule, and 80 files to the next Schedule, and so on. If box ⑮ is unchecked, this regulation is ignored.
● Step 2
(3) If the directory ① including child directories is selected, check box ②, and then list boxes ③ and ④ appear. The names of all directories including child directories are displayed in box ③ and the names of files contained in all child directories are displayed in box ④. The total number of files appears in box ⑤. Files can be selected by dragging them in box ④ (with reversed background color), or all files are selected by clicking button ⑥. The total number of these files appears in box ⑦.
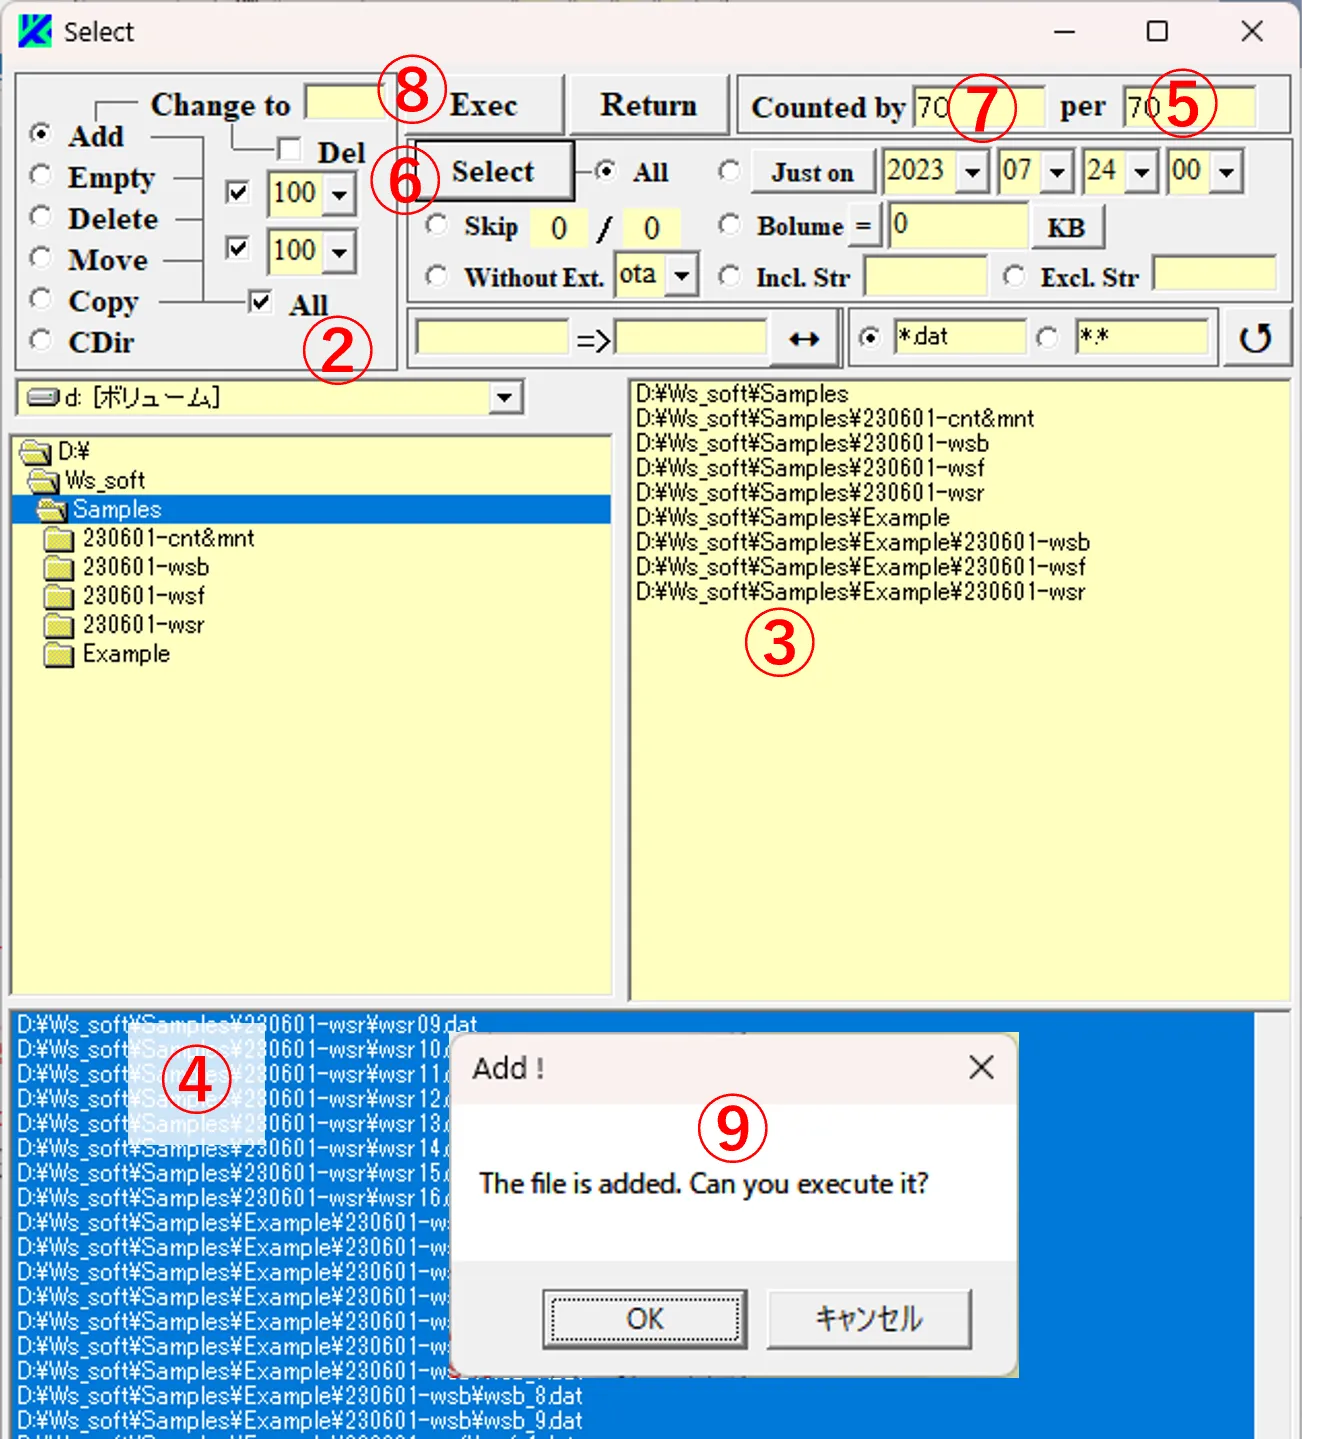
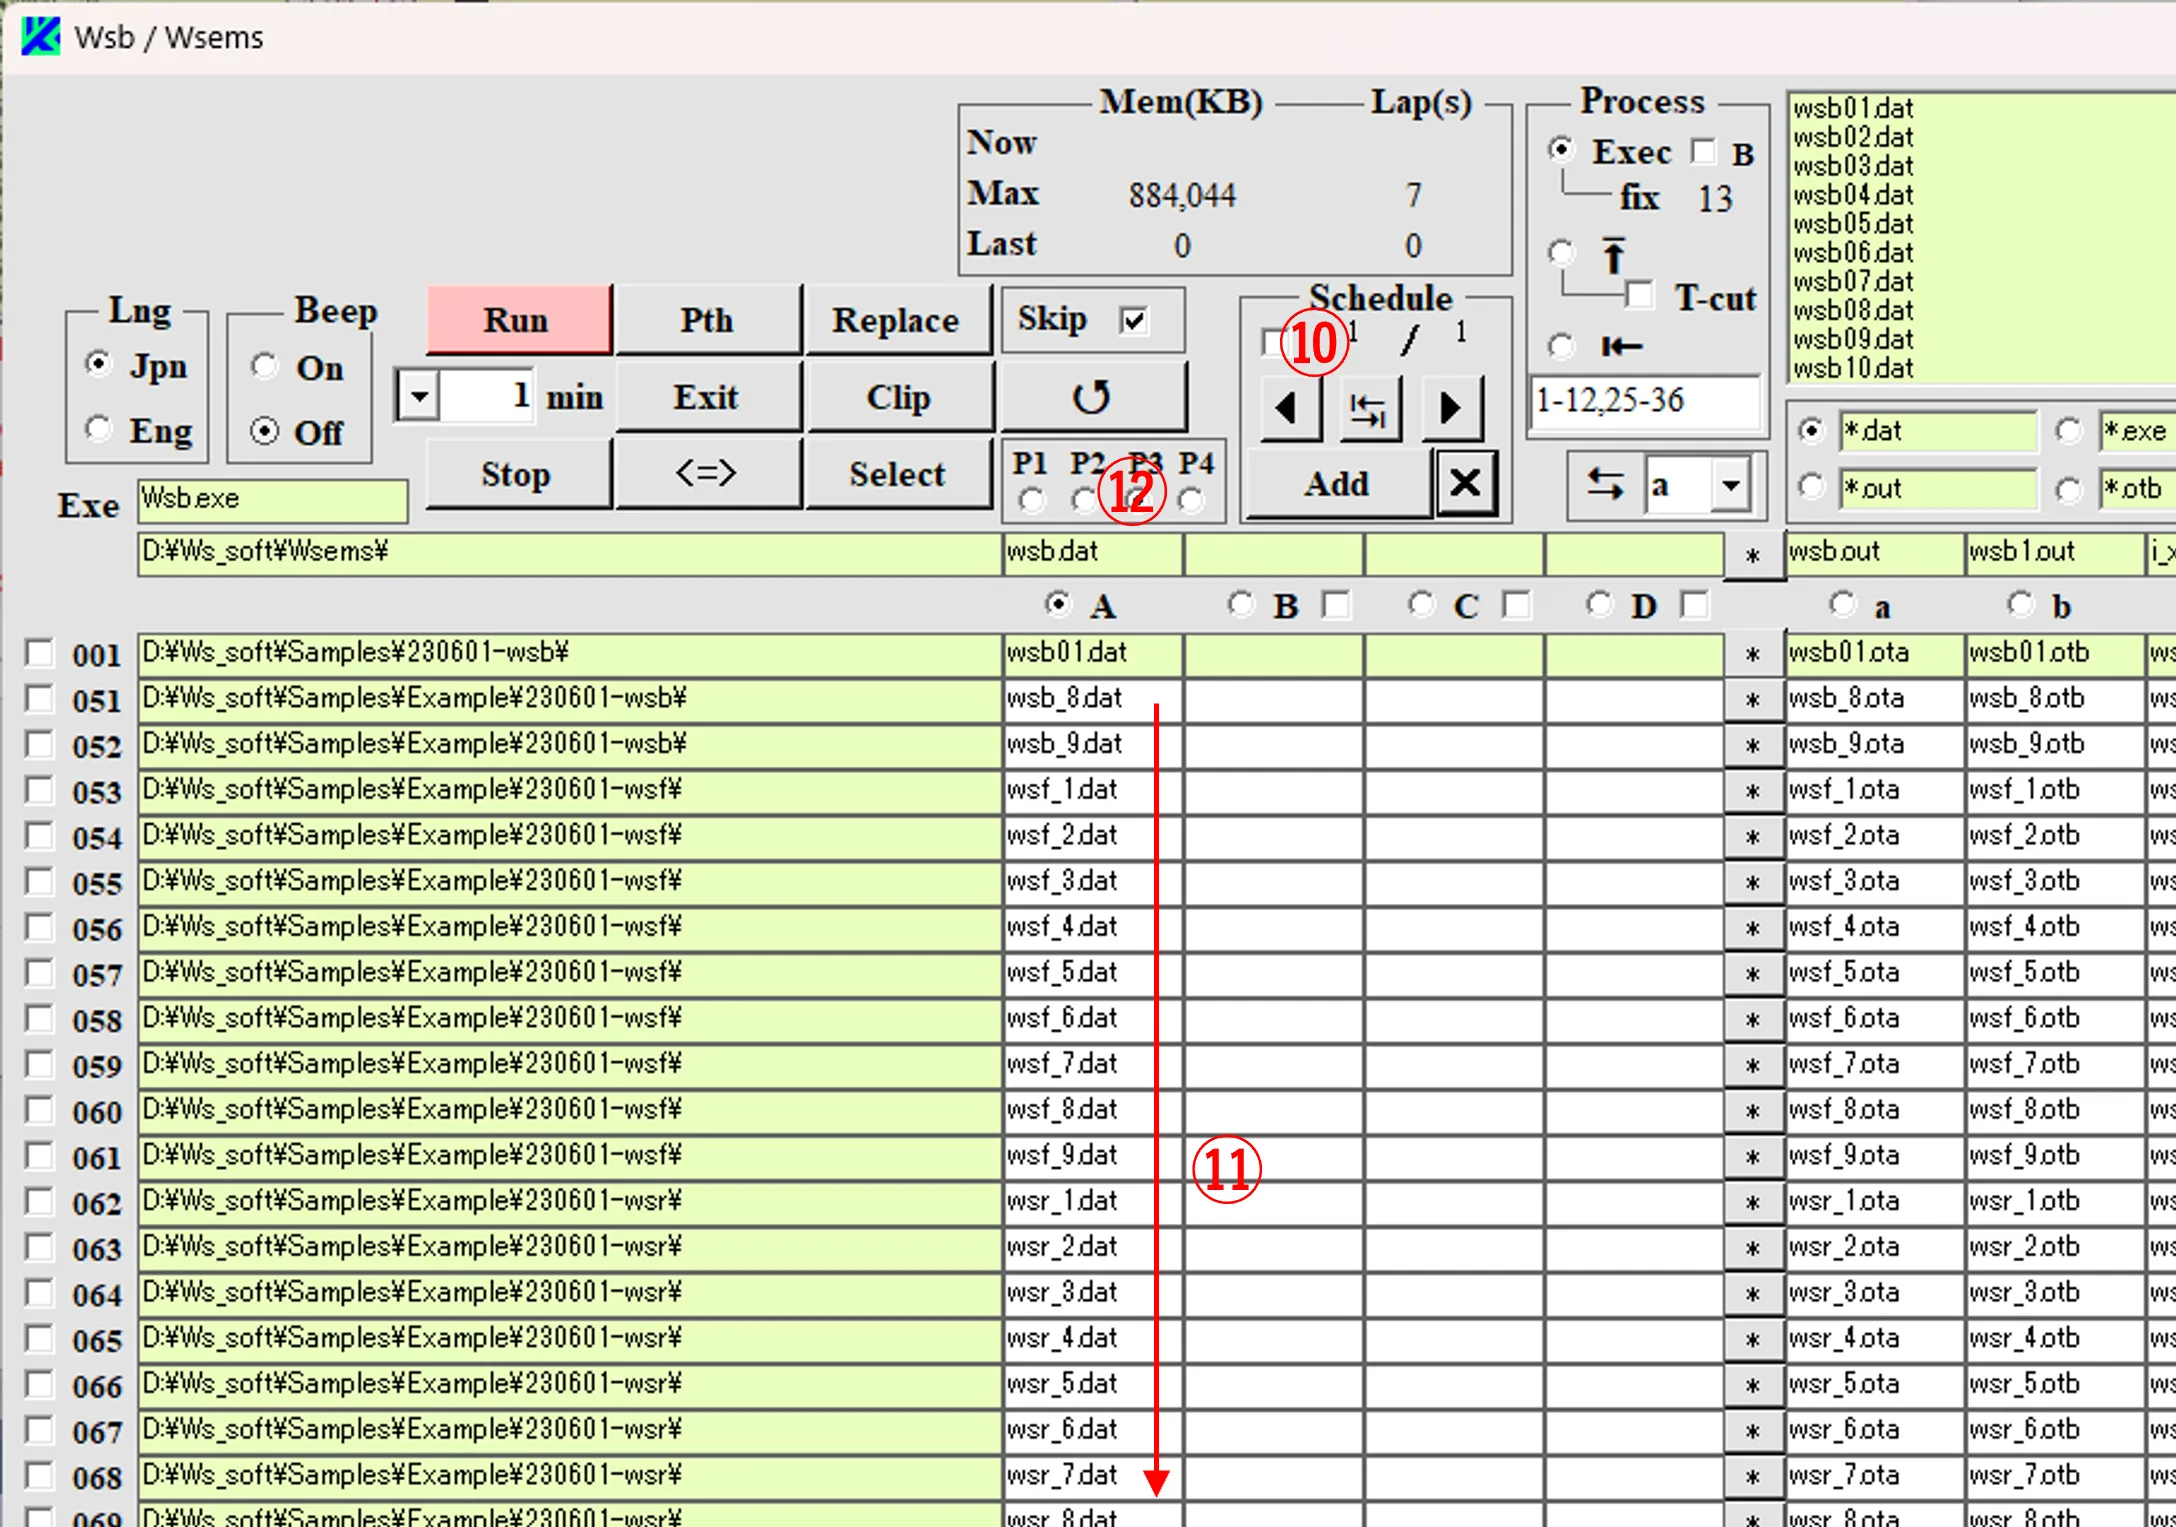
(4) Clicking the Exec button ⑧ brings up the caution window ⑨, and pressing OK button updates Schedule ⑩ of the main window and the selected files are added to column A boxes as shown in ⑪ (Since the number of files exceeds 50, the page button ⑫ is moved up to P3).
● Step 3
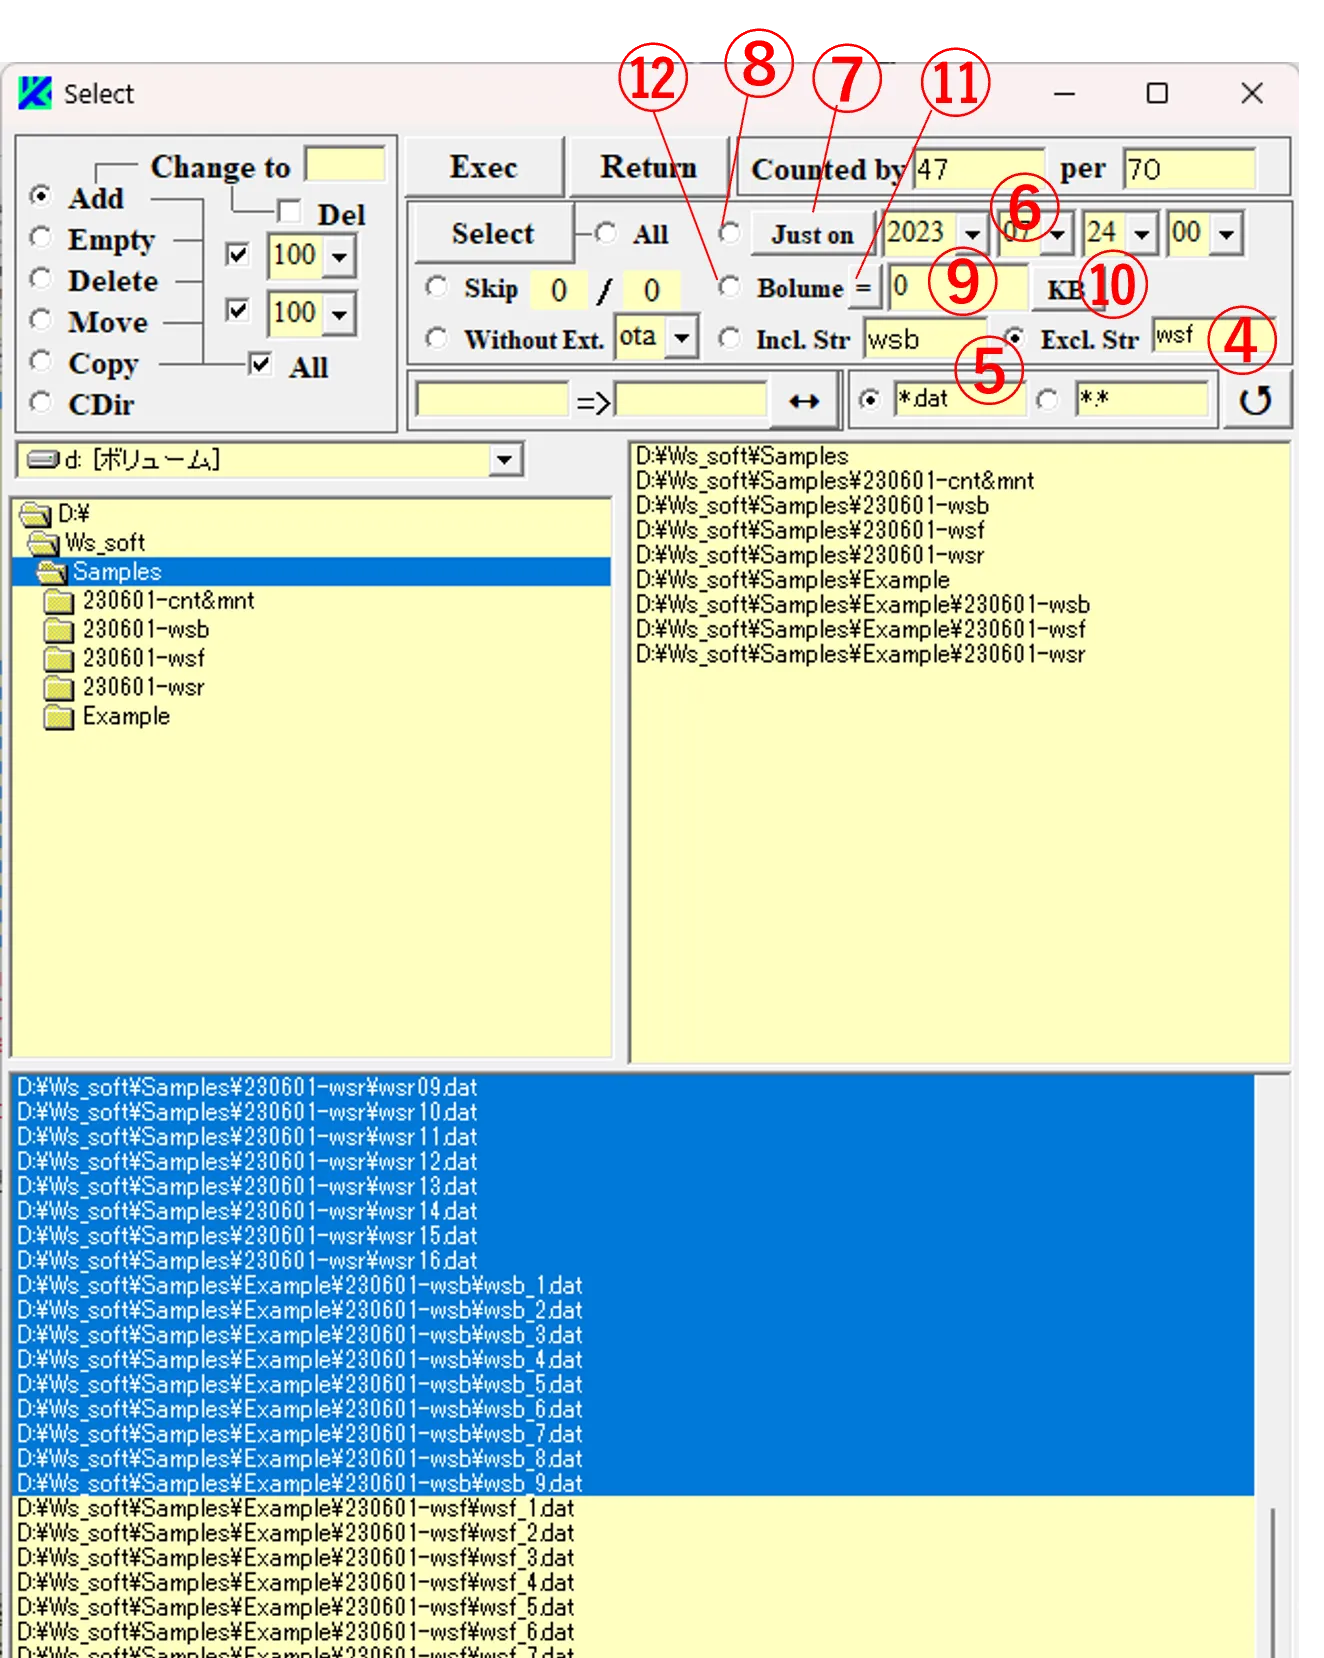
(5) Checking the All box ① displays all files contained in the directory ⓪ on the list box below. These files can be conditionally selected from the list. If you enter a string in box ② and check button ③, you can select files of which names contain the string of ②.
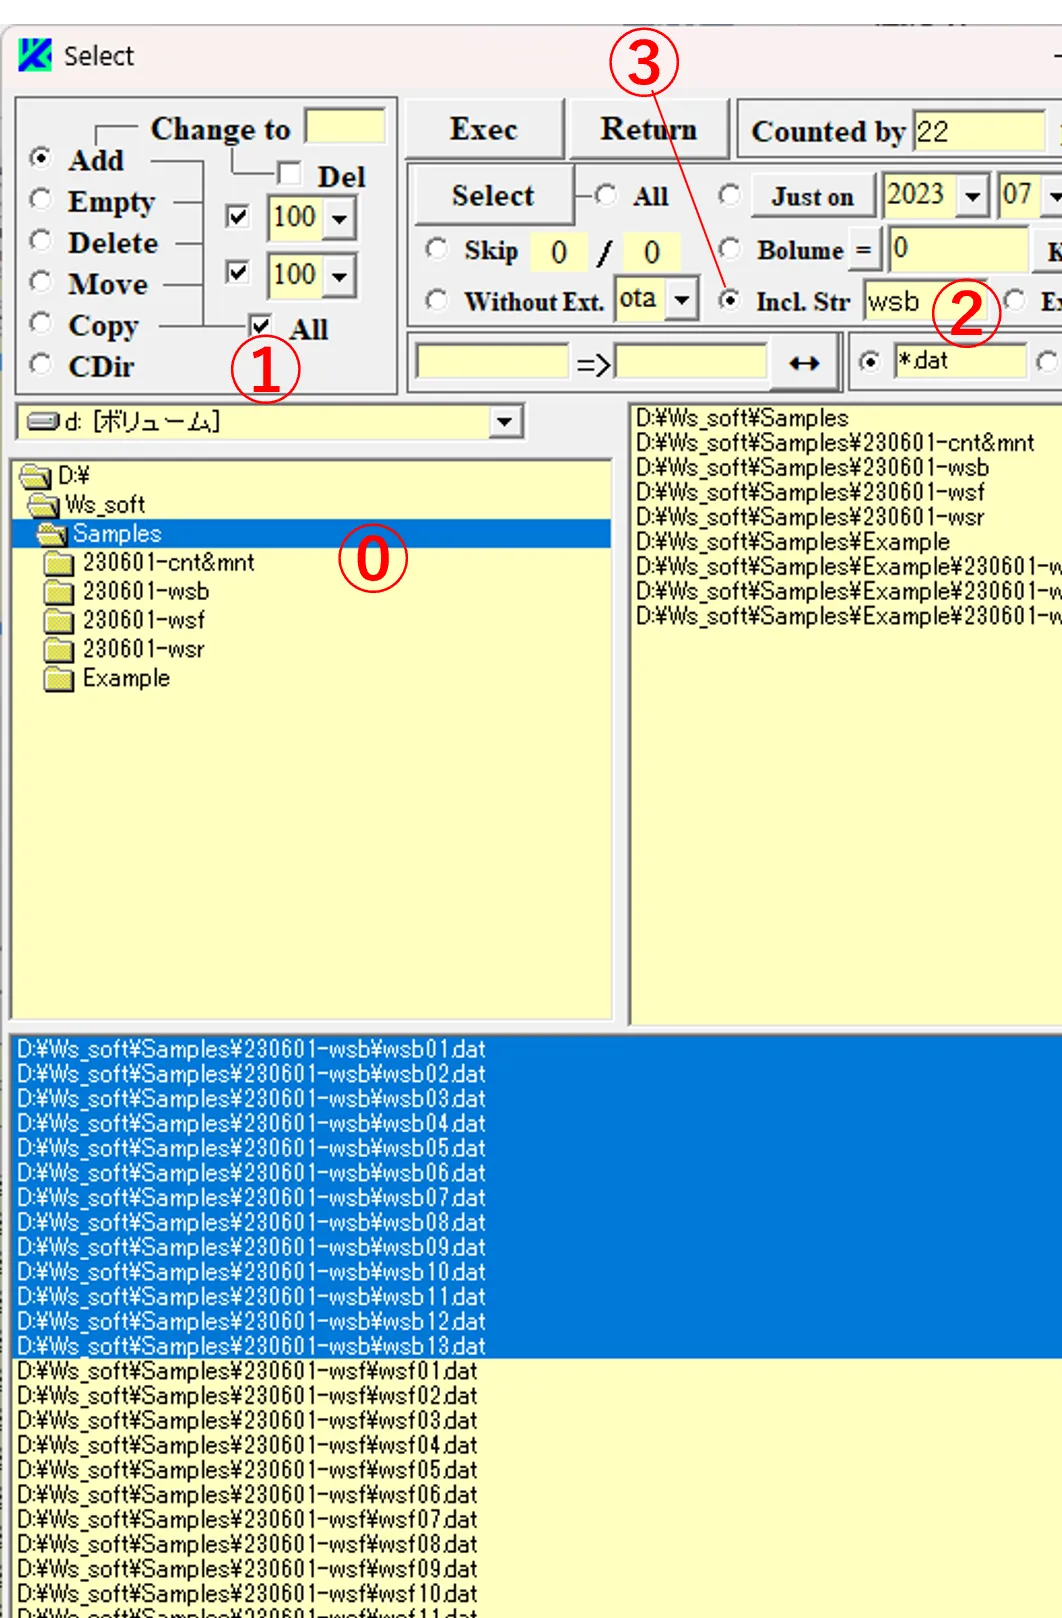
(6) If you input a string in box ④ and check button ⑤, you can select files of which names do’t contain the string of ④. To sort out files by a created time, set the date and time in box ⑥, select “Before” or “After” or “Just on” by button ⑦, and check button ⑧. To sort out them by a file size, enter a numerical value in box ⑨, select a unit name from button ⑩, select a magnitude relationship from button ⑪, and check box ⑫.
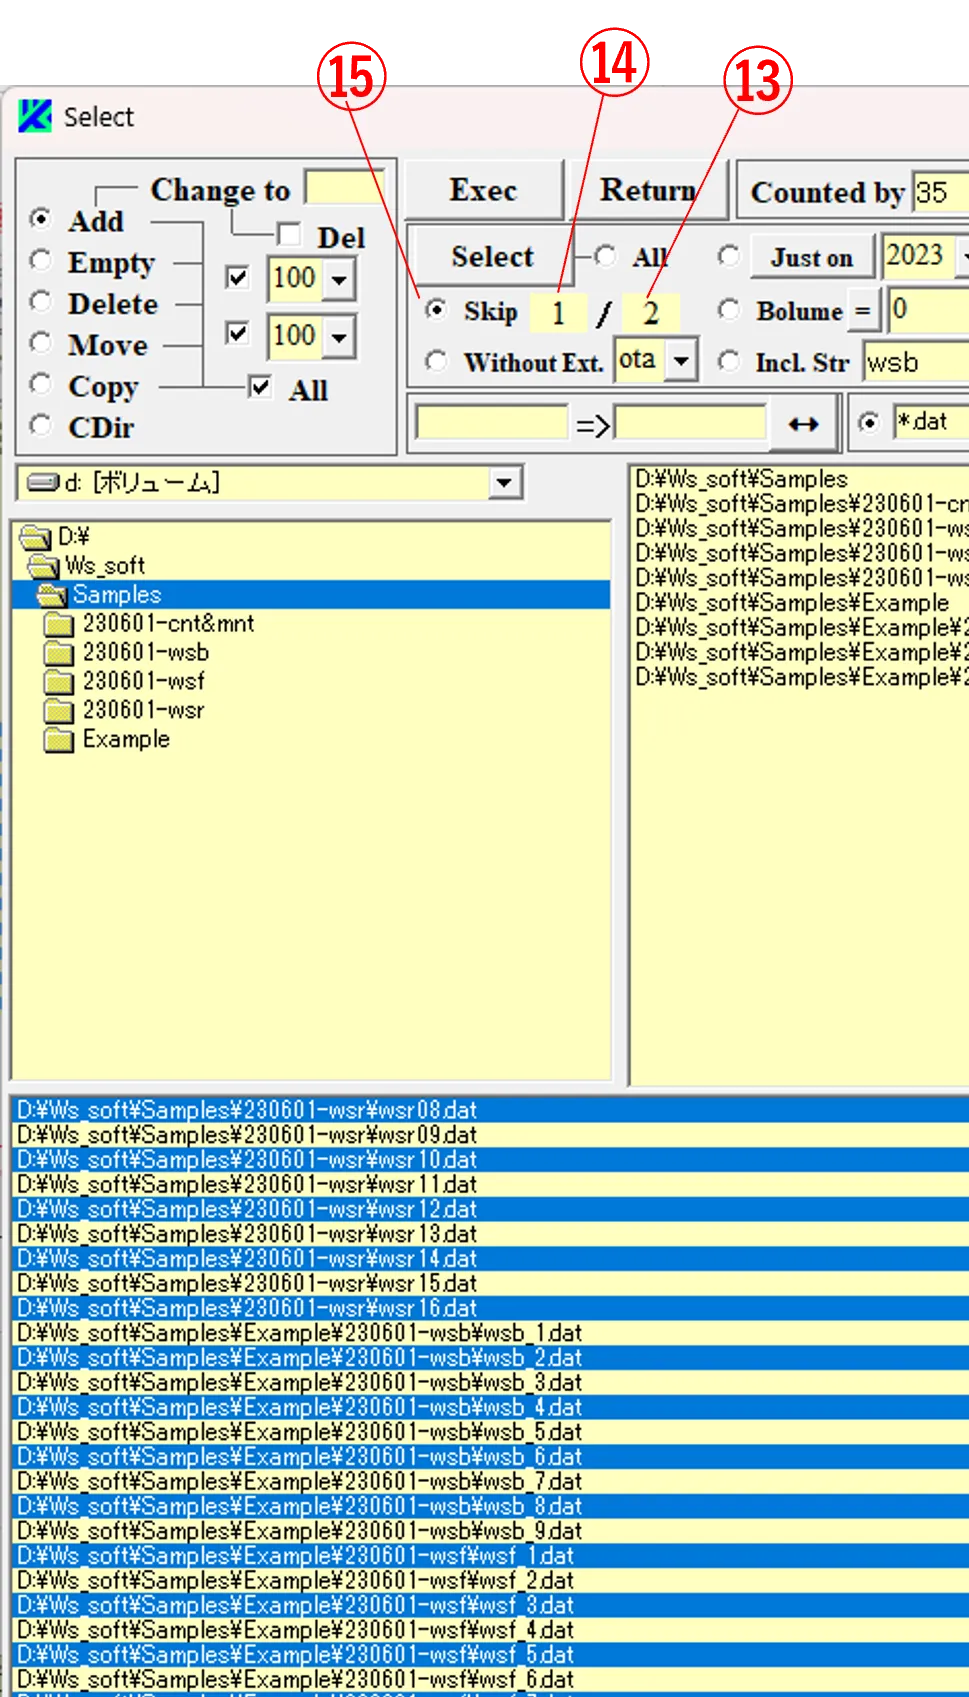
(7) If you enter a value (i.e., m and n) in boxes ⑬ and ⑭ and check button ⑮, you can select files from the n-th at m-th intervals.
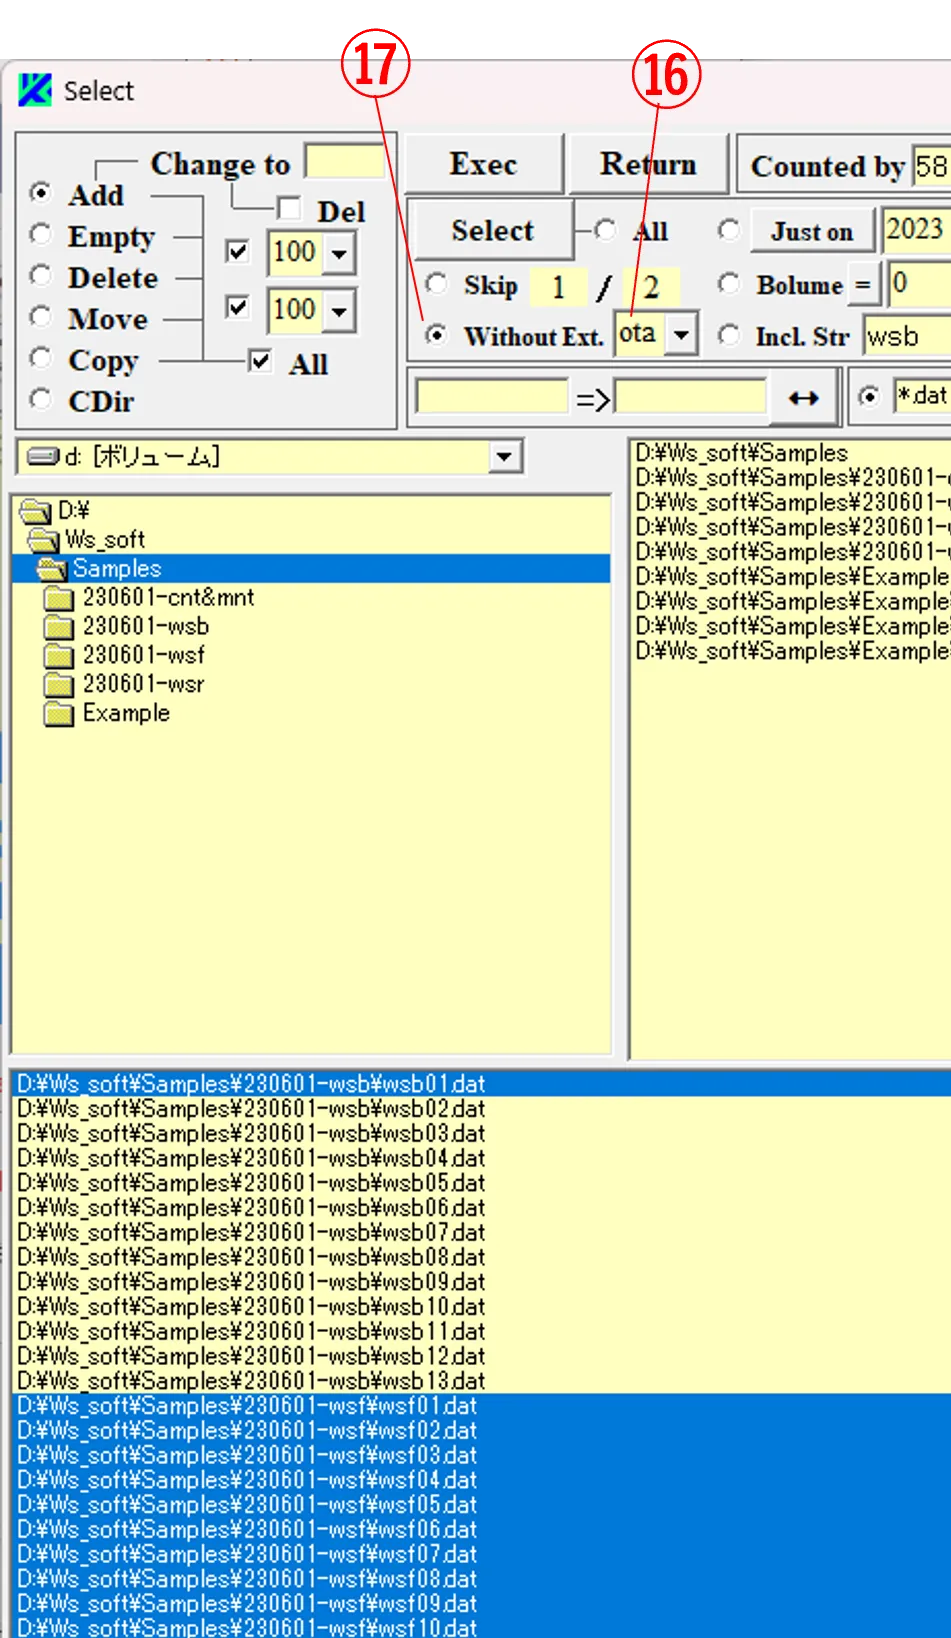
(8) If you select the extension name (ota) from box ⑯ and check button ⑰, you can select files which cease to exist by an exchange of extension (that is, files that have not been calculated by Wsbch).
● Step 4
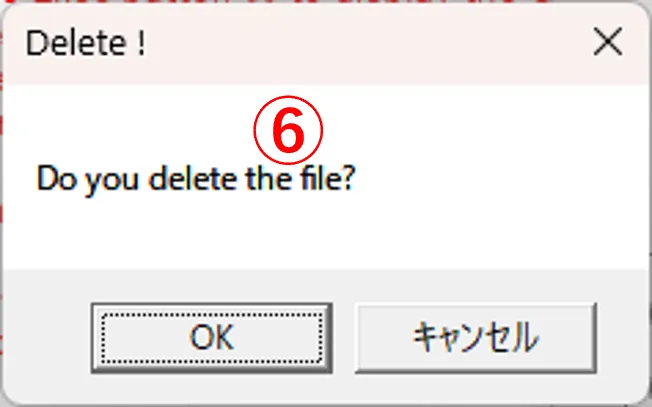
(9) Select *.ota for the file pattern ① and click on the All box ②, and the corresponding files are displayed in the lower box ③. Enter a string in box ④ and check the button ⑤ to select files. The back colors of the selected files are reversed in box ③. Enter the file extension in box ⑥, check the Del box ⑦. If you click the Exec button ⑧, caution windows ⑨ and ⑩ appear sequentially.
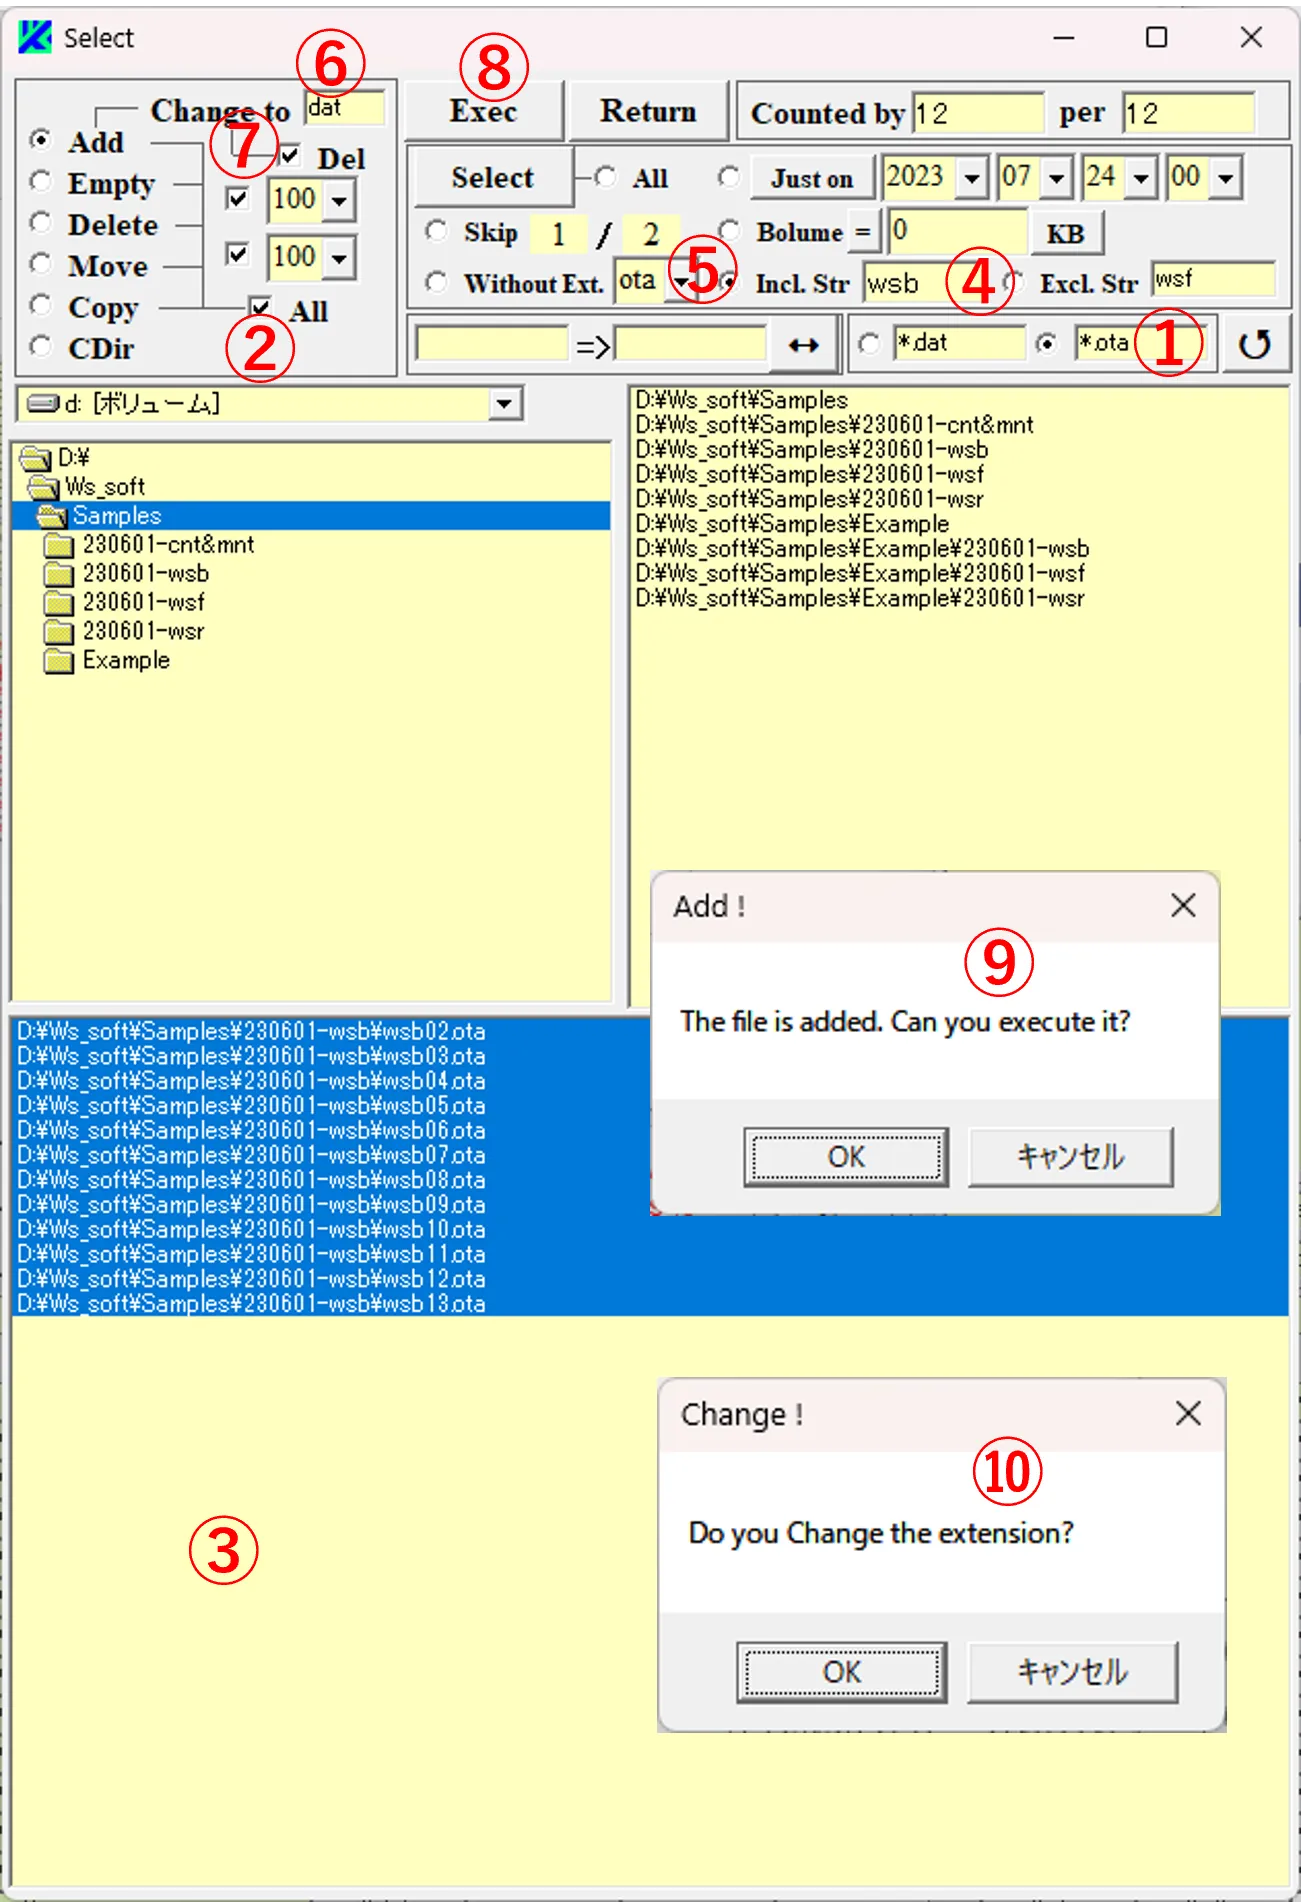
(10) If you press OK button for each, the selected files are listed on column “A” boxes of the main window with changed extension from “ota” to “dat” as shown in ⑪. Since the files in column “a” boxes ⑫ are deleted due to checked Del box ⑦ (this is confirmed by clicking the ↺ button ⑬), all listed data are eligible for calculation by clicking the Run button ⑭.
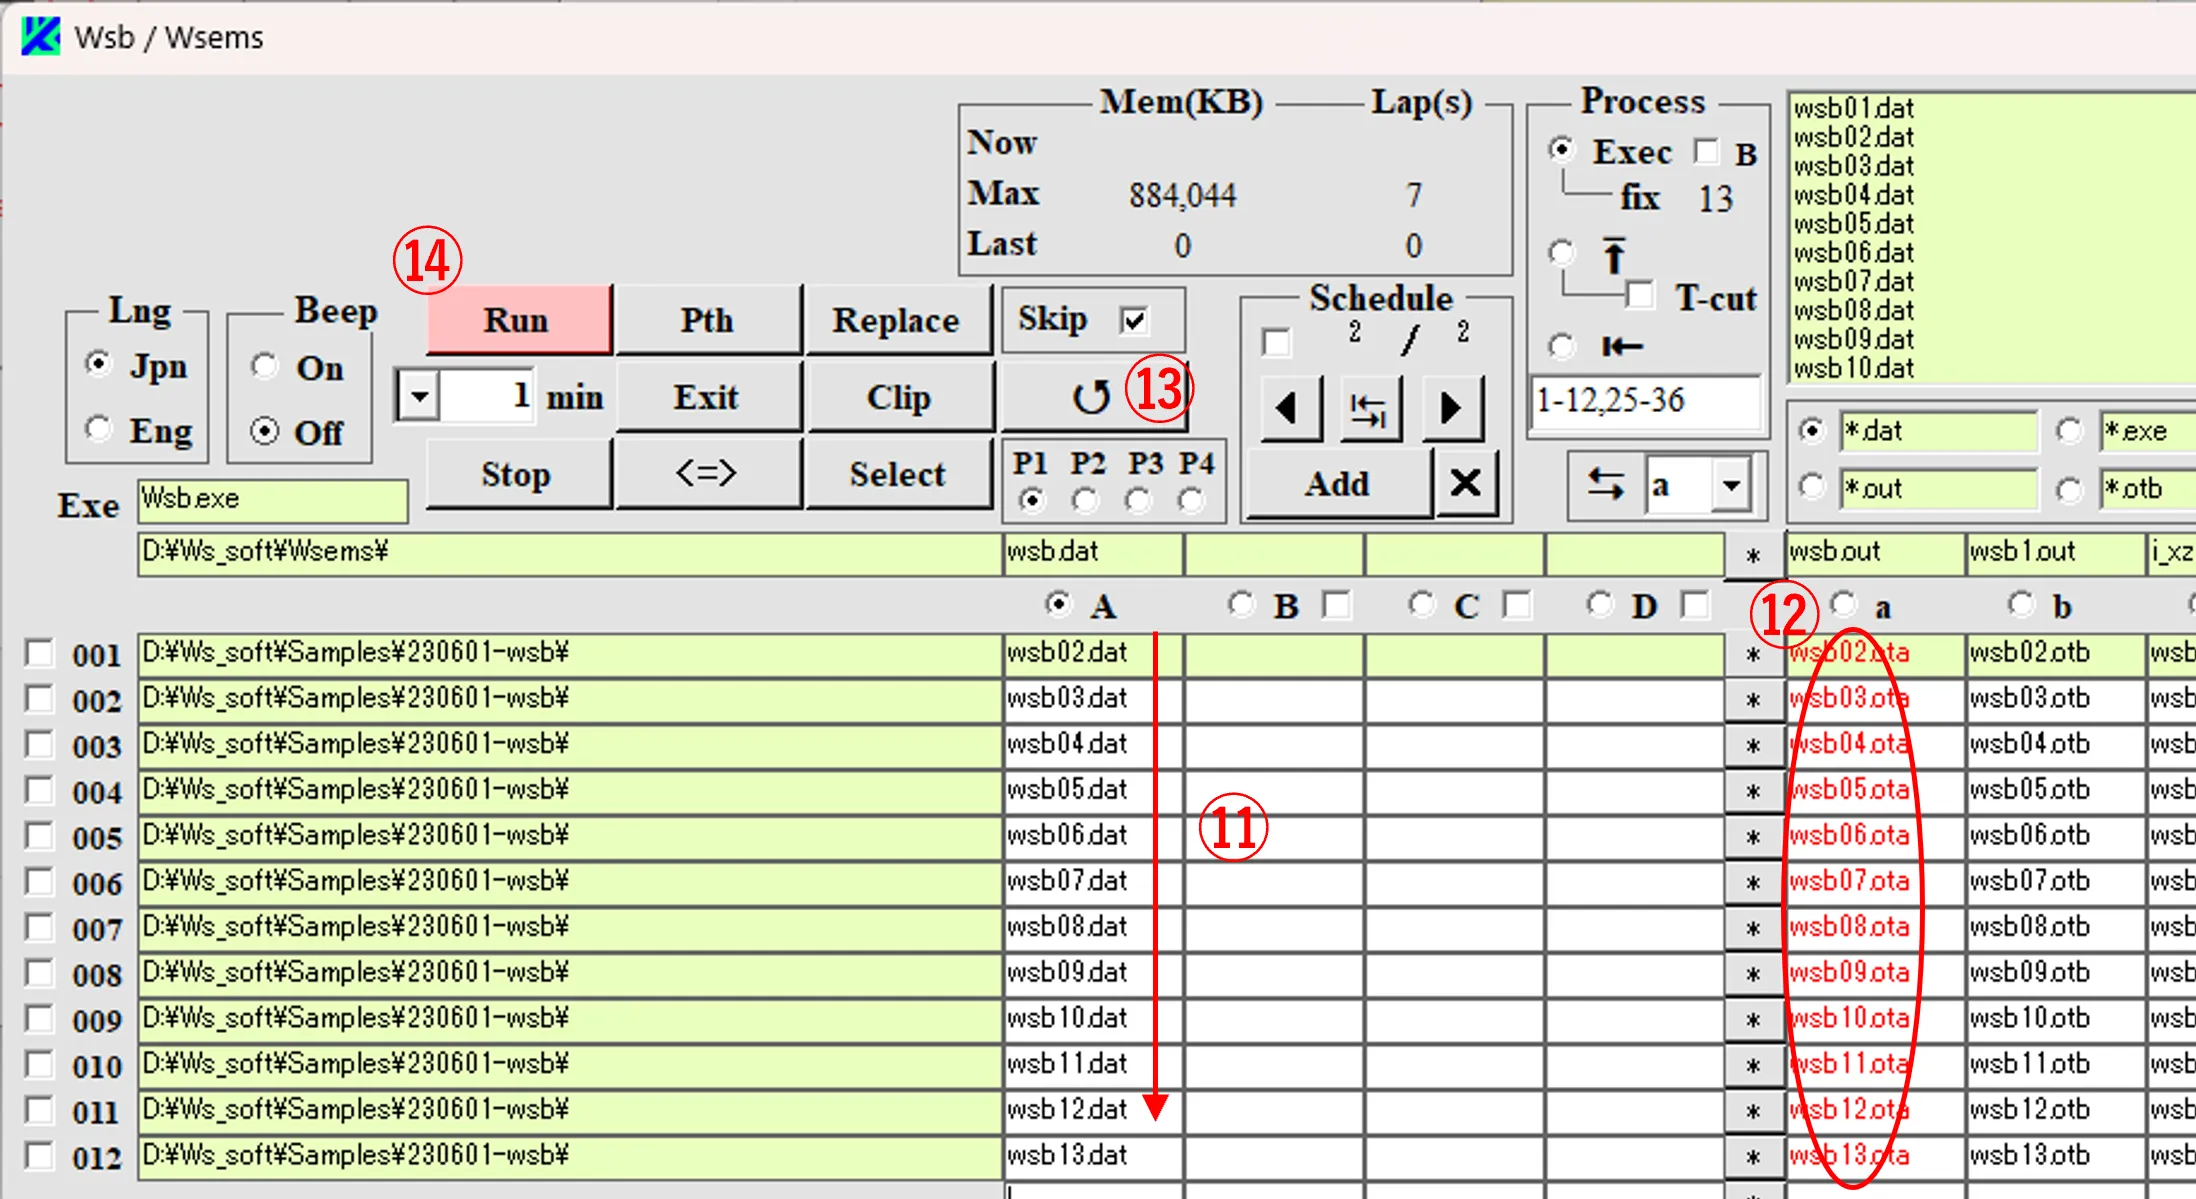
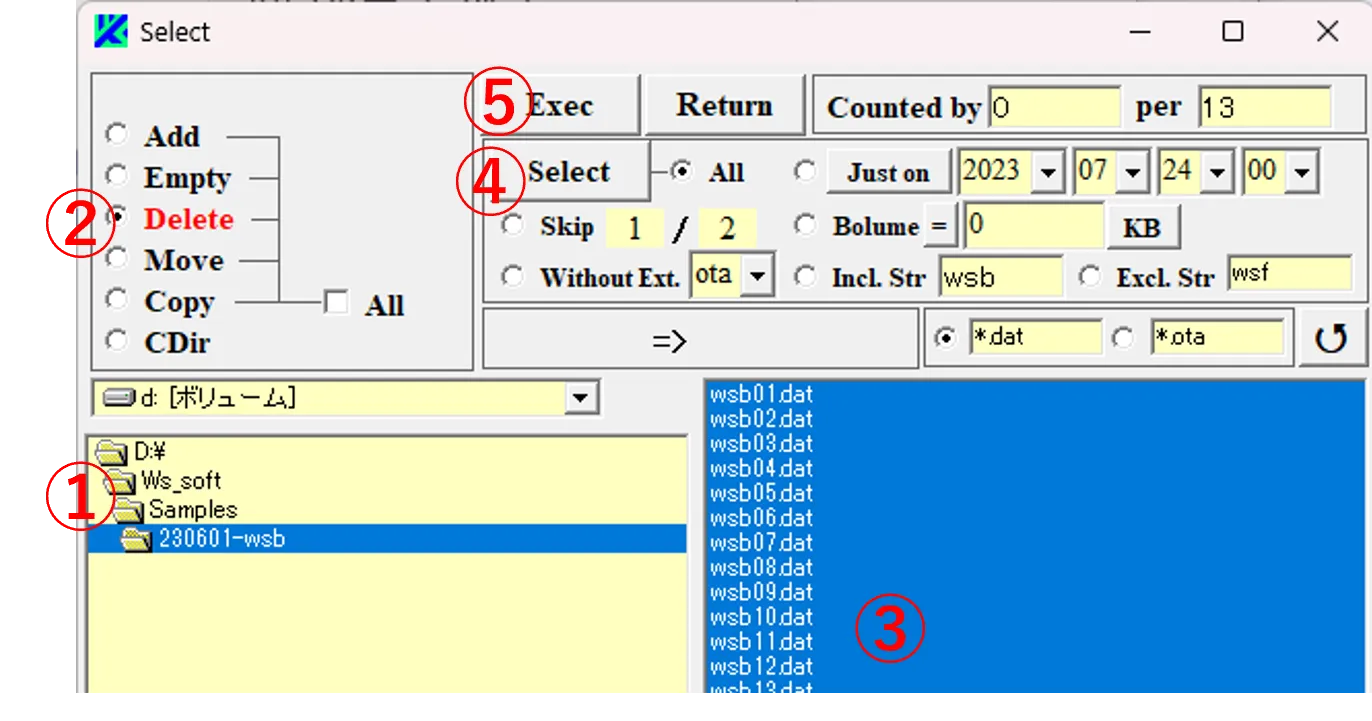
(2) If you press OK button for each, the selected files are listed on column “A” boxes of the main window with changed extension from “ota” to “dat” as shown in ⑪. Since the files in column “a” boxes ⑫ are deleted due to checked Del box ⑦ (this is confirmed by clicking the ↺ button ⑬), all listed data are eligible for calculation by clicking the Run button ⑭.
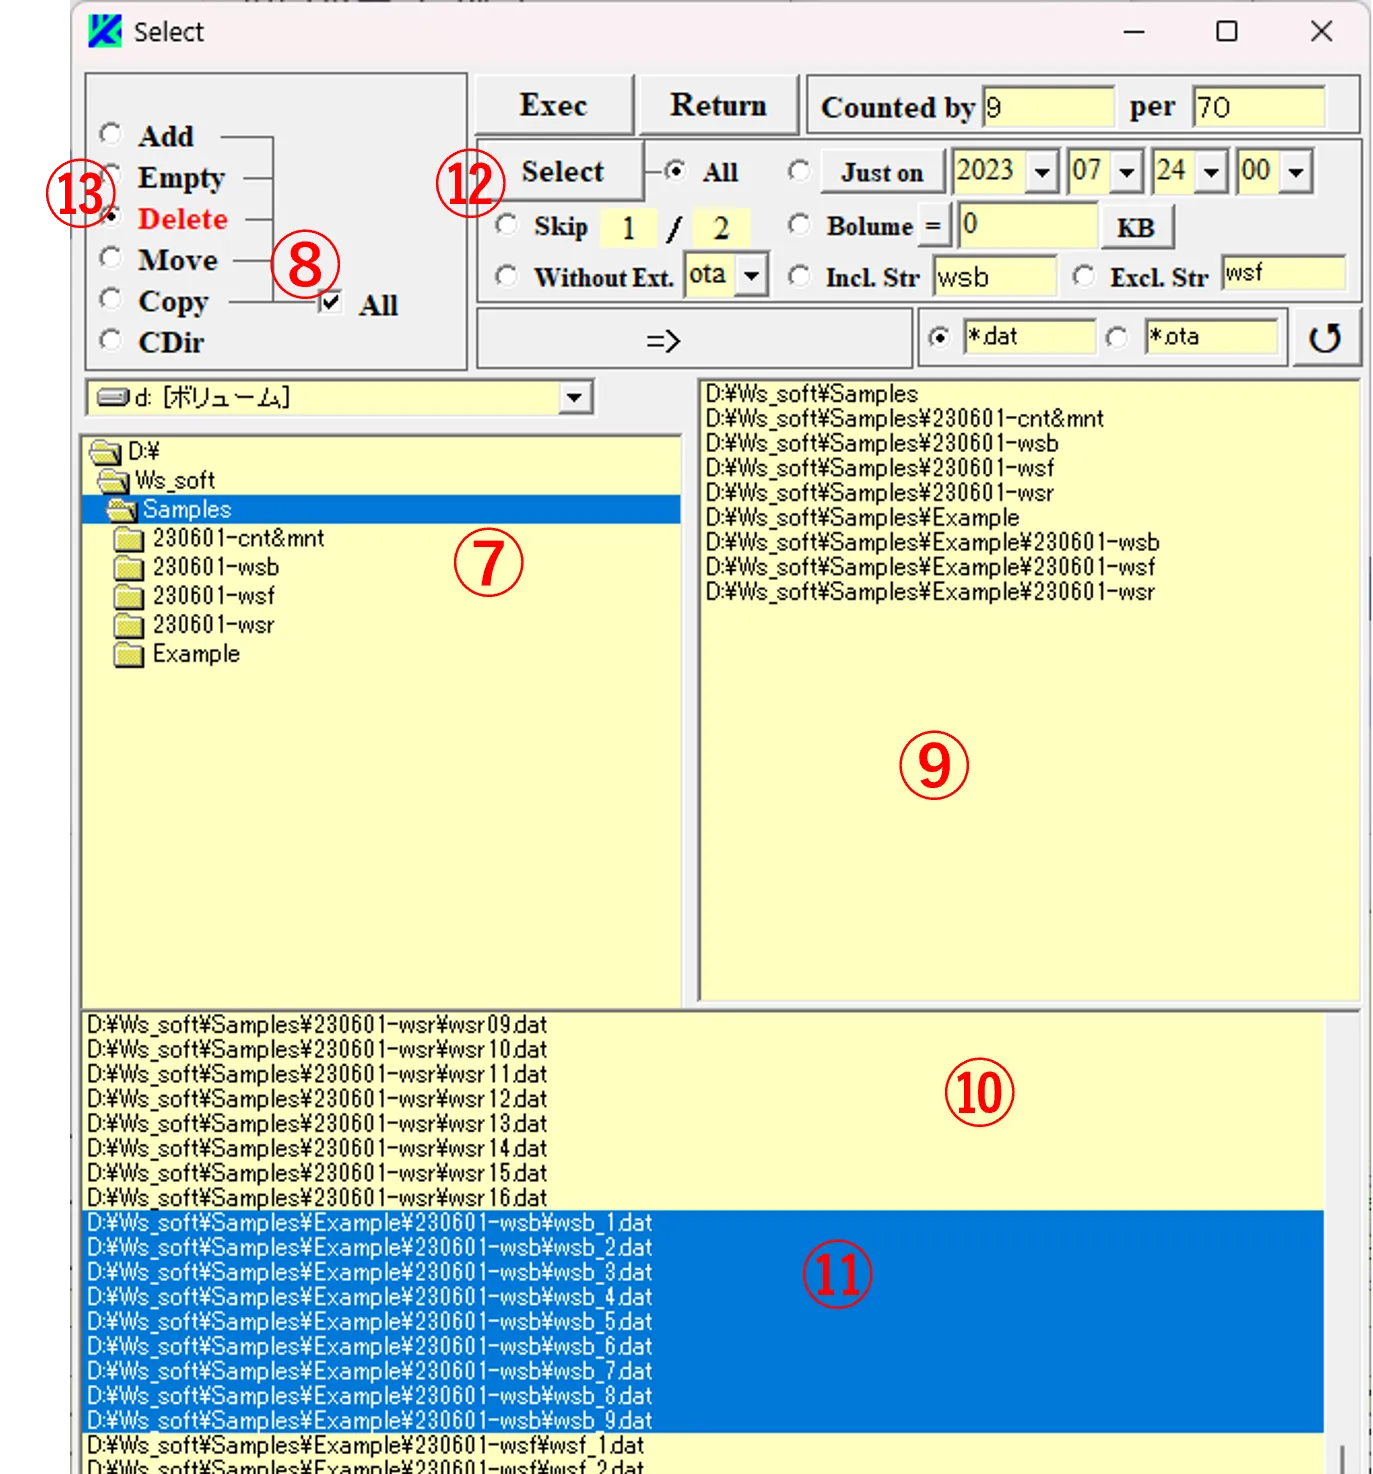
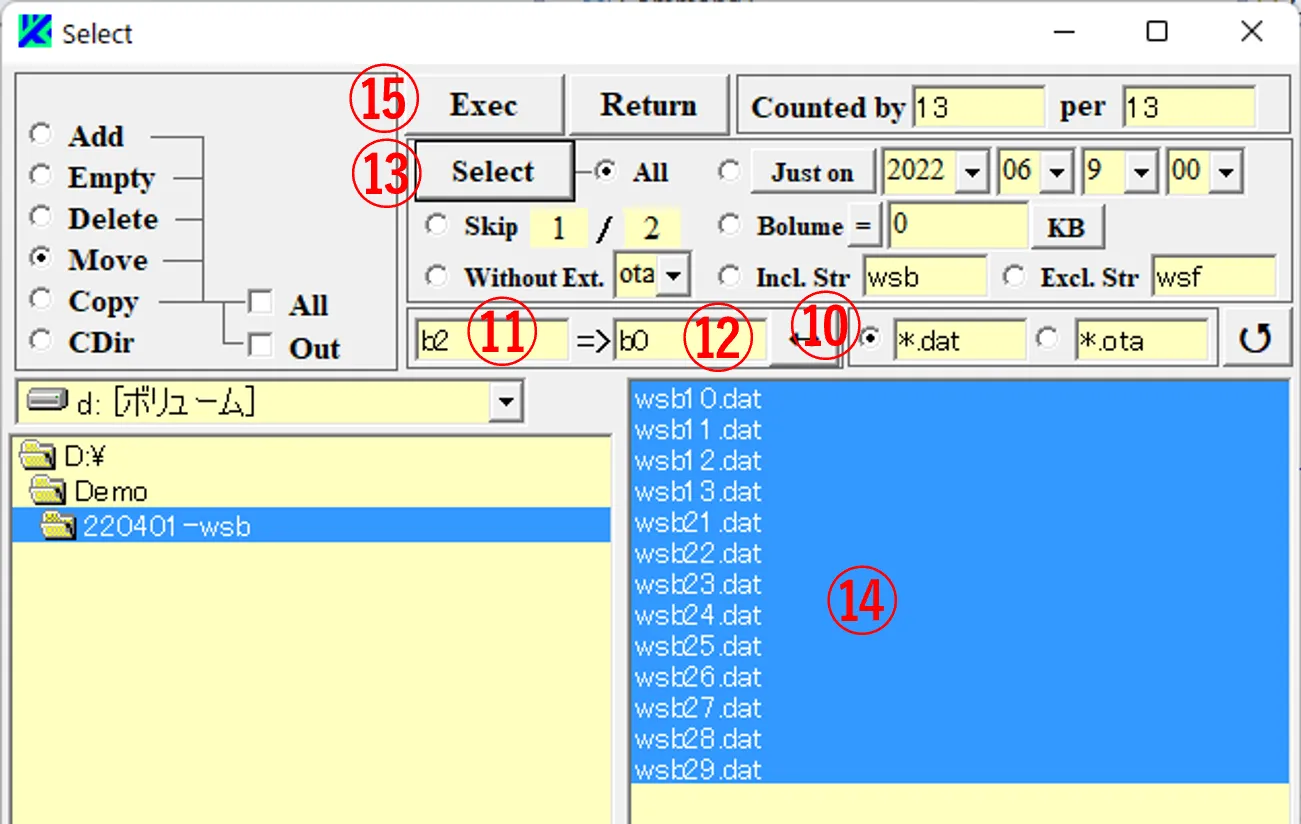
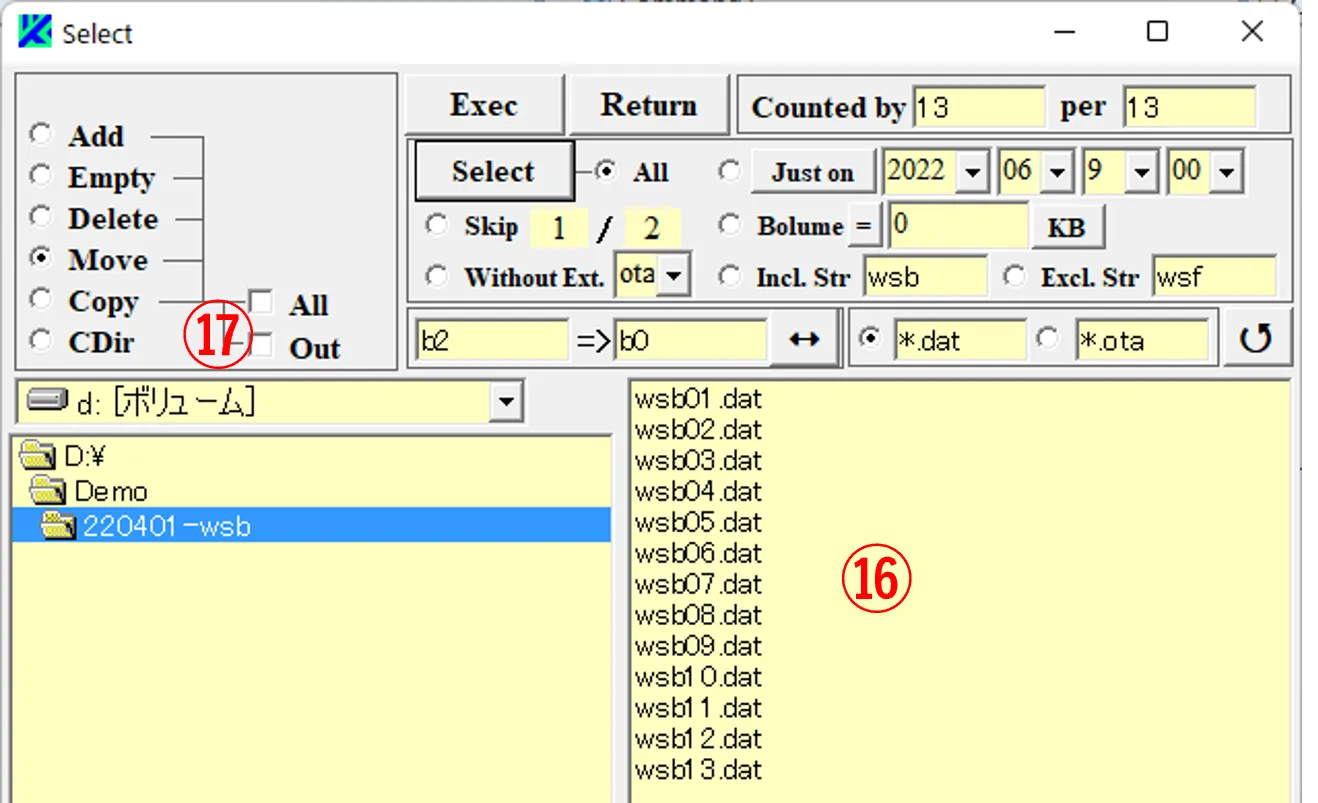
(2) If a file with the same name already exists, it will be overwritten. To undo the renaming, click the ↔ button ⑩ to exchange the text order for ⑪ and ⑫, and click the Select button ⑬ to select files ⑭, and click the Exec button ⑮ to return them to the ones ⑯ before renamed. If you check the Out button ⑰, you can rename files across folders in the same way.
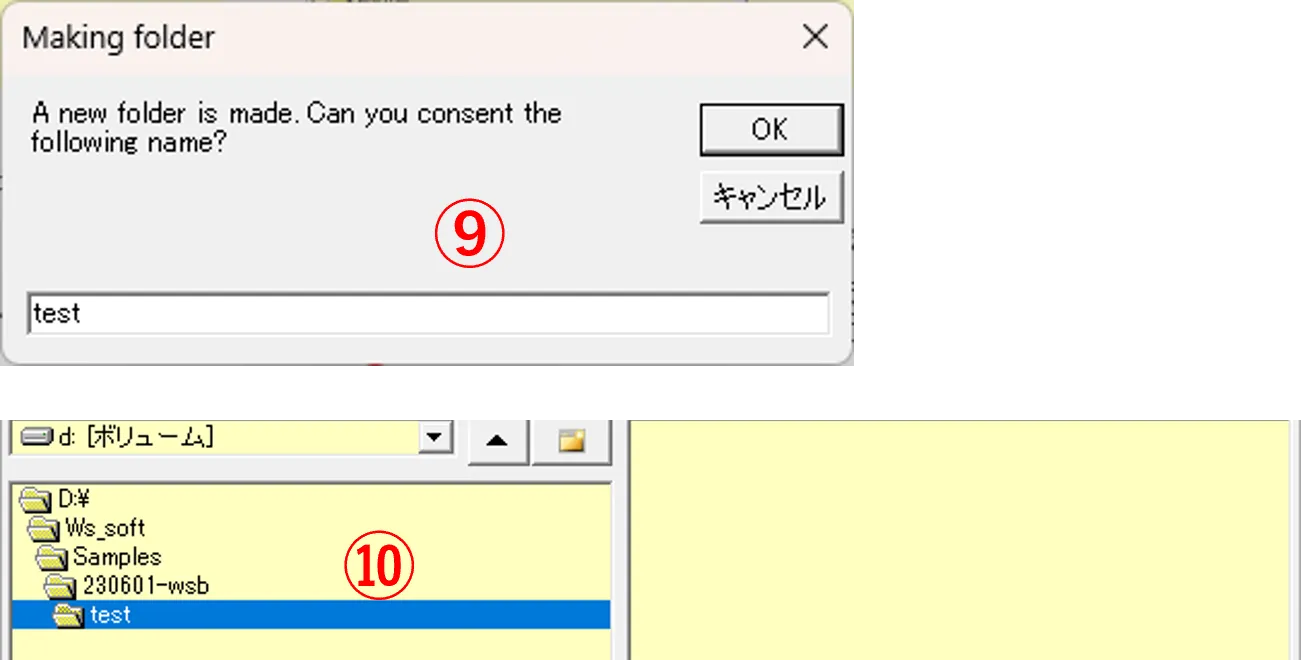
(2) Click the button ⑧ to open the caution window ⑨. Enter a folder name (test) there and press OK button to create a new folder ⑩.
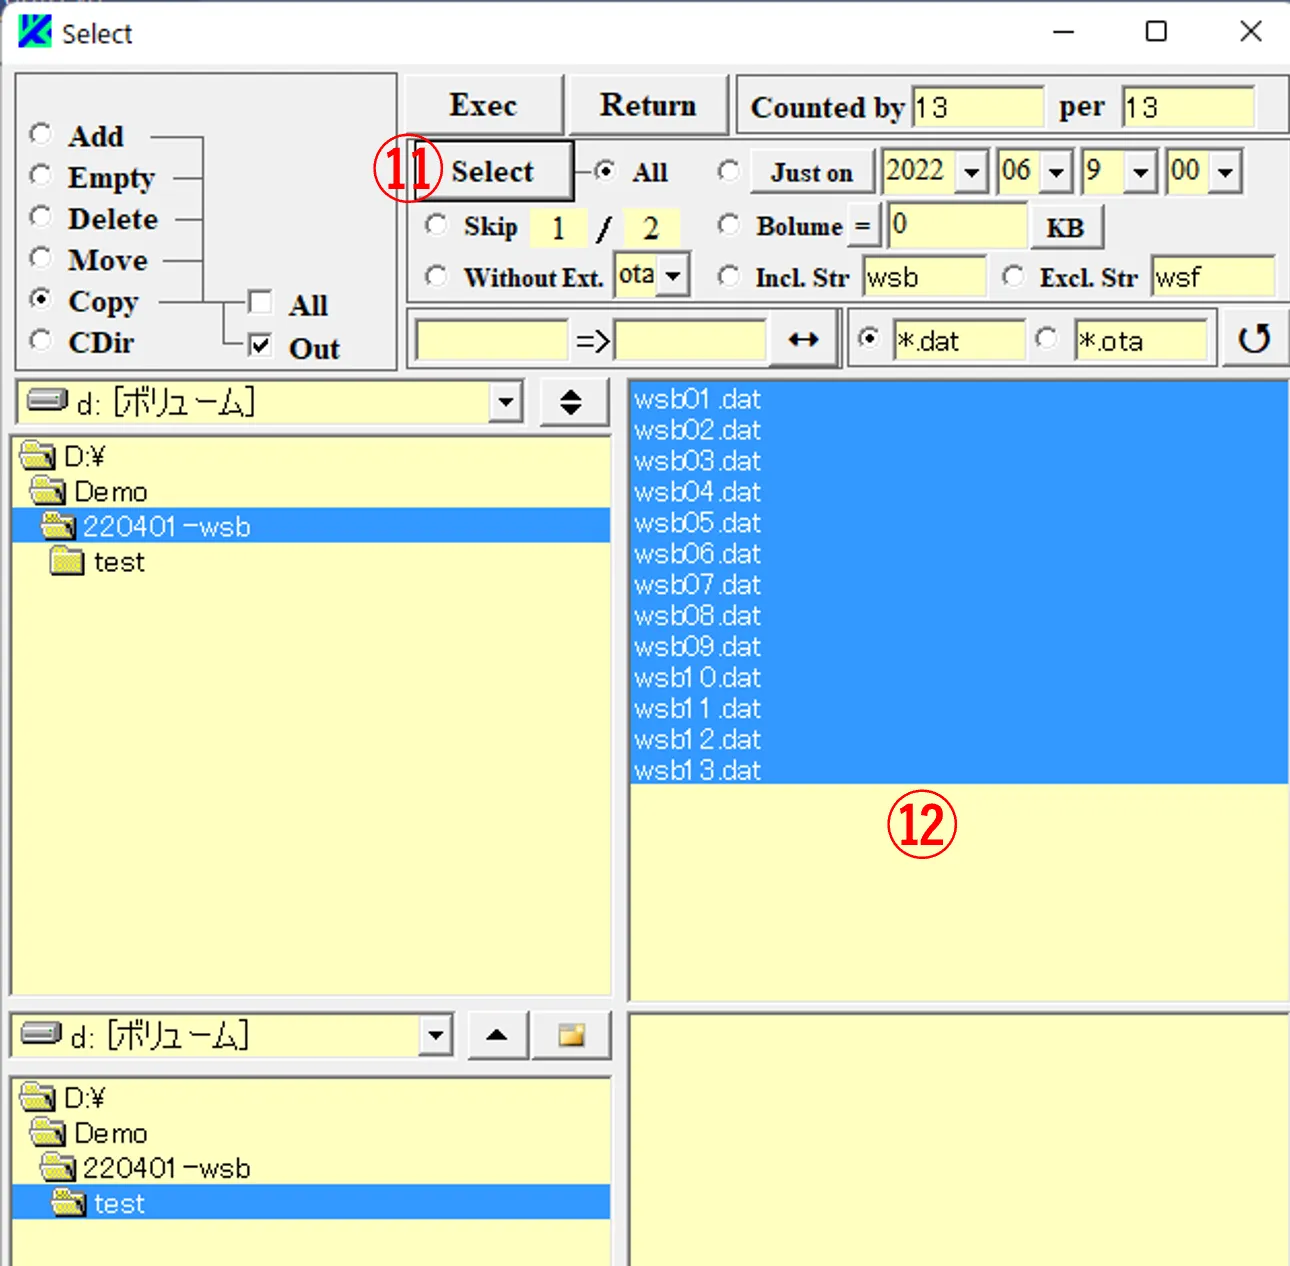
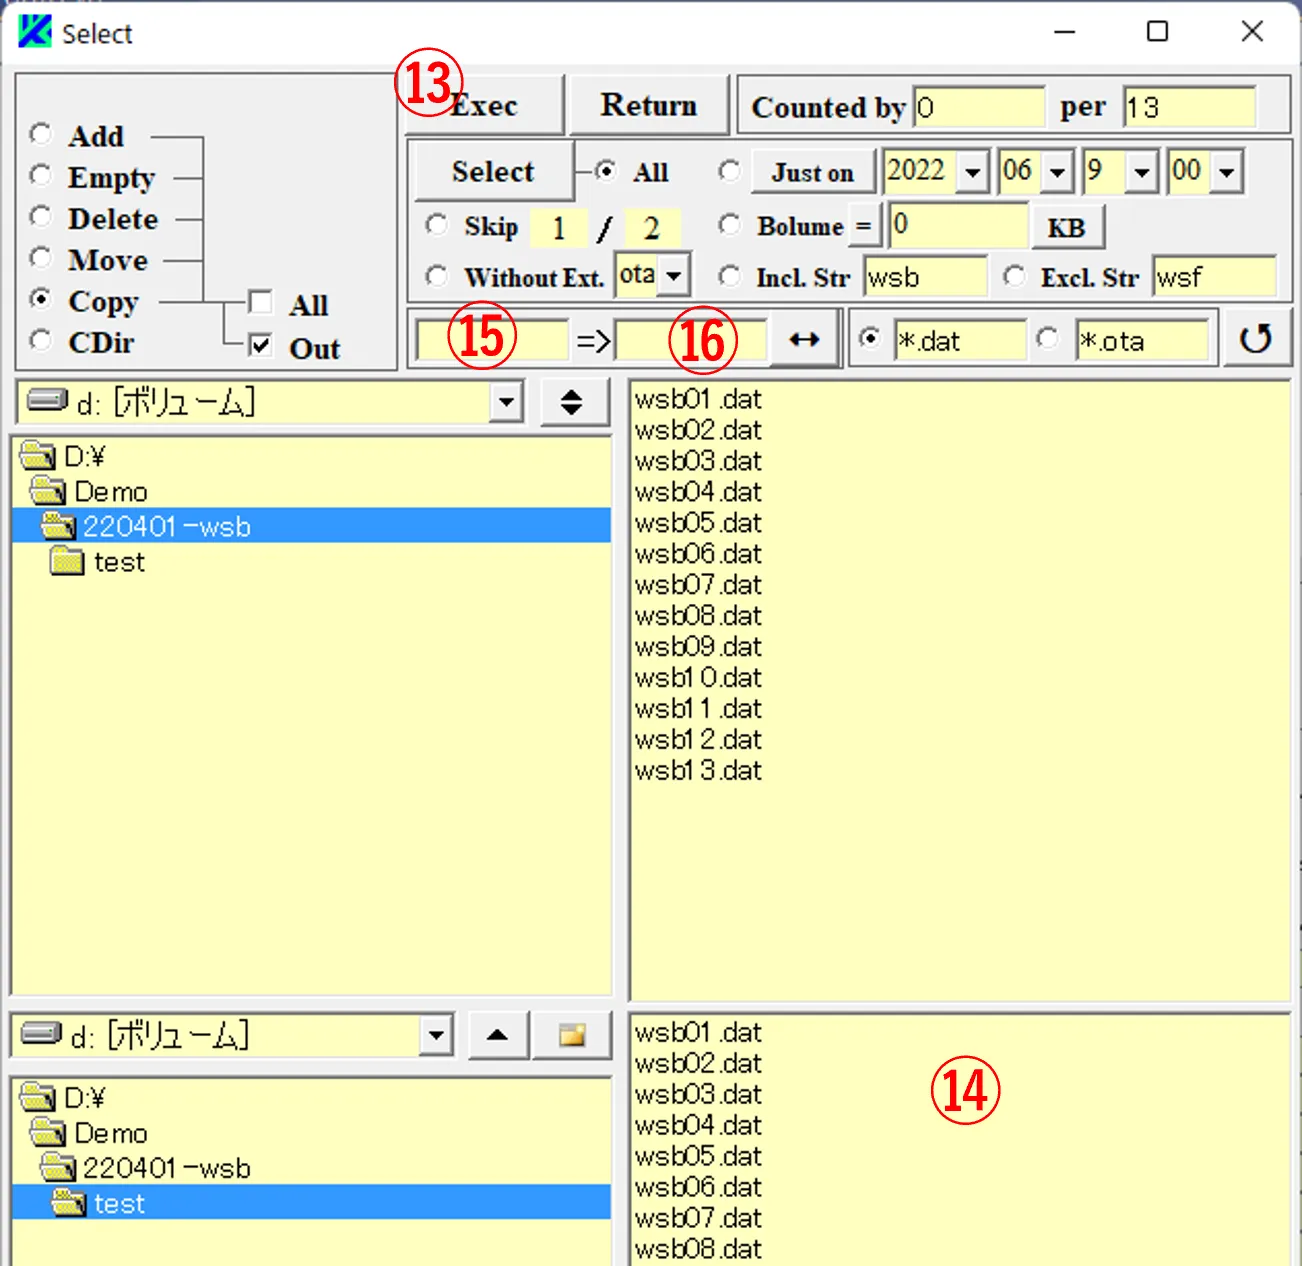
(3) By being dragged files in the right box ③ or clicking the Select button ⑪, files ⑫ to be copied are selected.
(4) By clicking the Exec button ⑬, the files ⑫ are copied to the destination folder ⑭. If you enter strings in boxes ⑮ and ⑯, the files are renamed and copied.
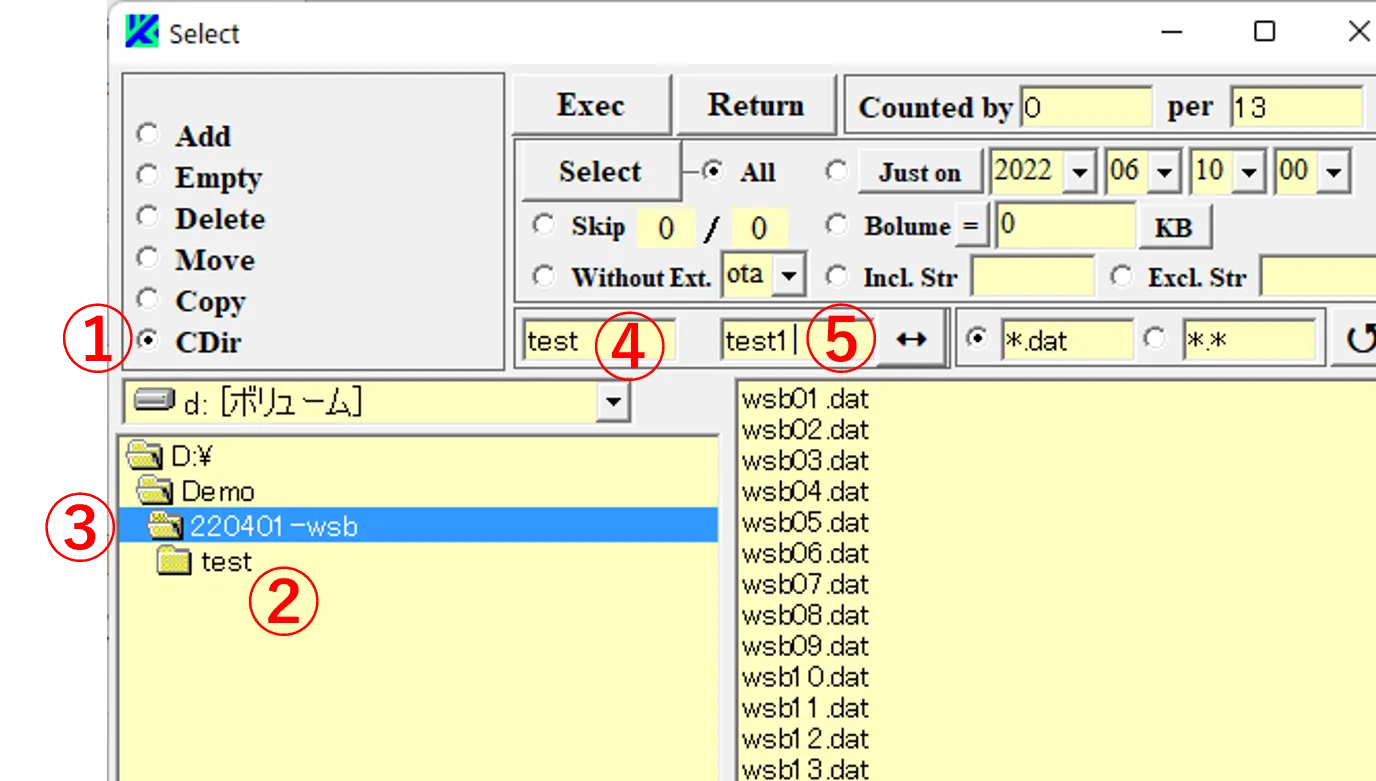
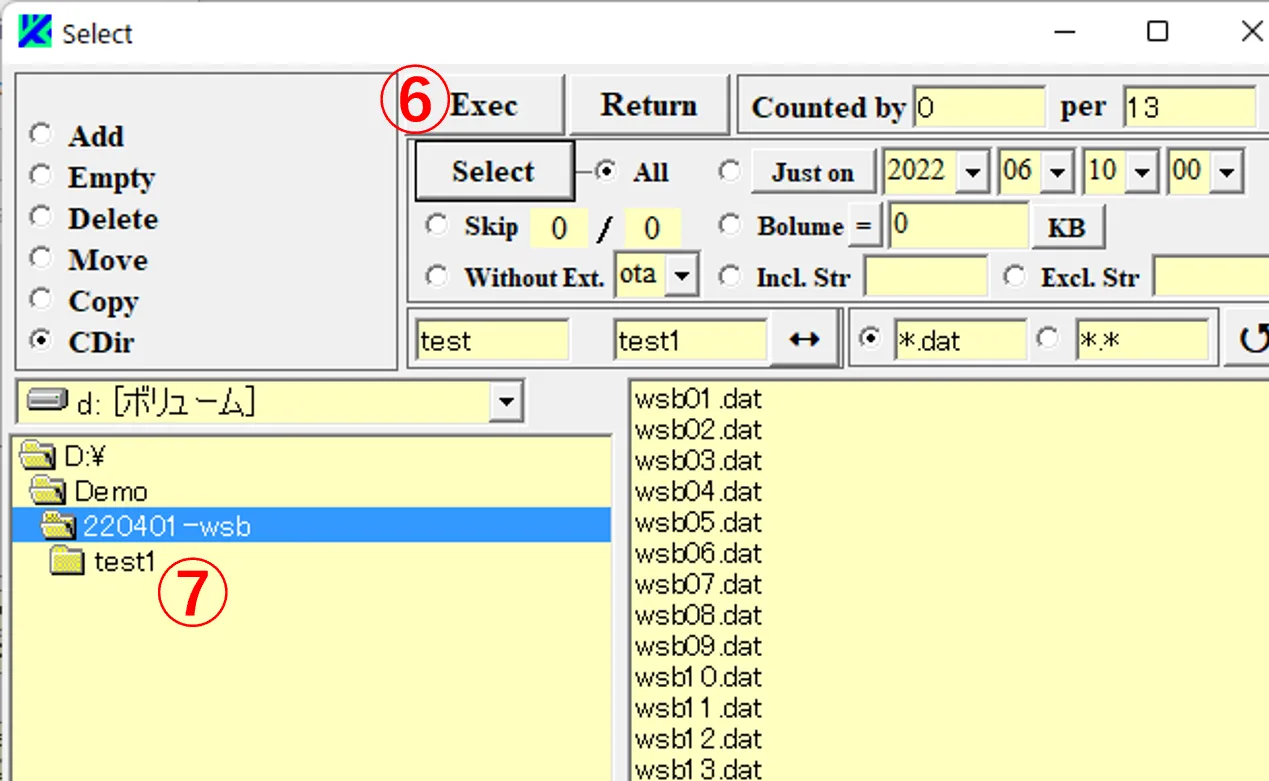
(2) By clicking on the Exec button ⑥, the directory is renamed from ② (test) to ⑦(test1).
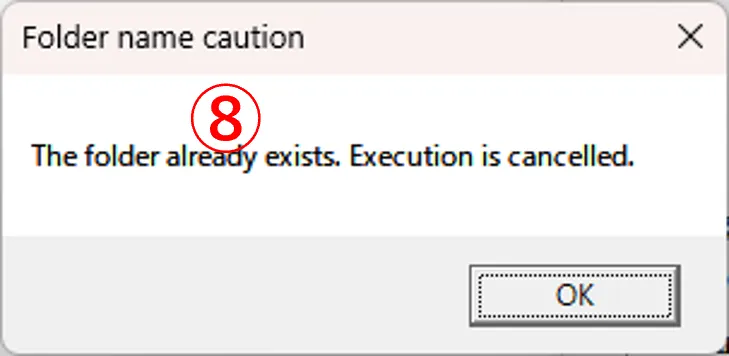
(3) If the directory to be renamed already exists, the caution window ⑧ appears and the operation is canceled.
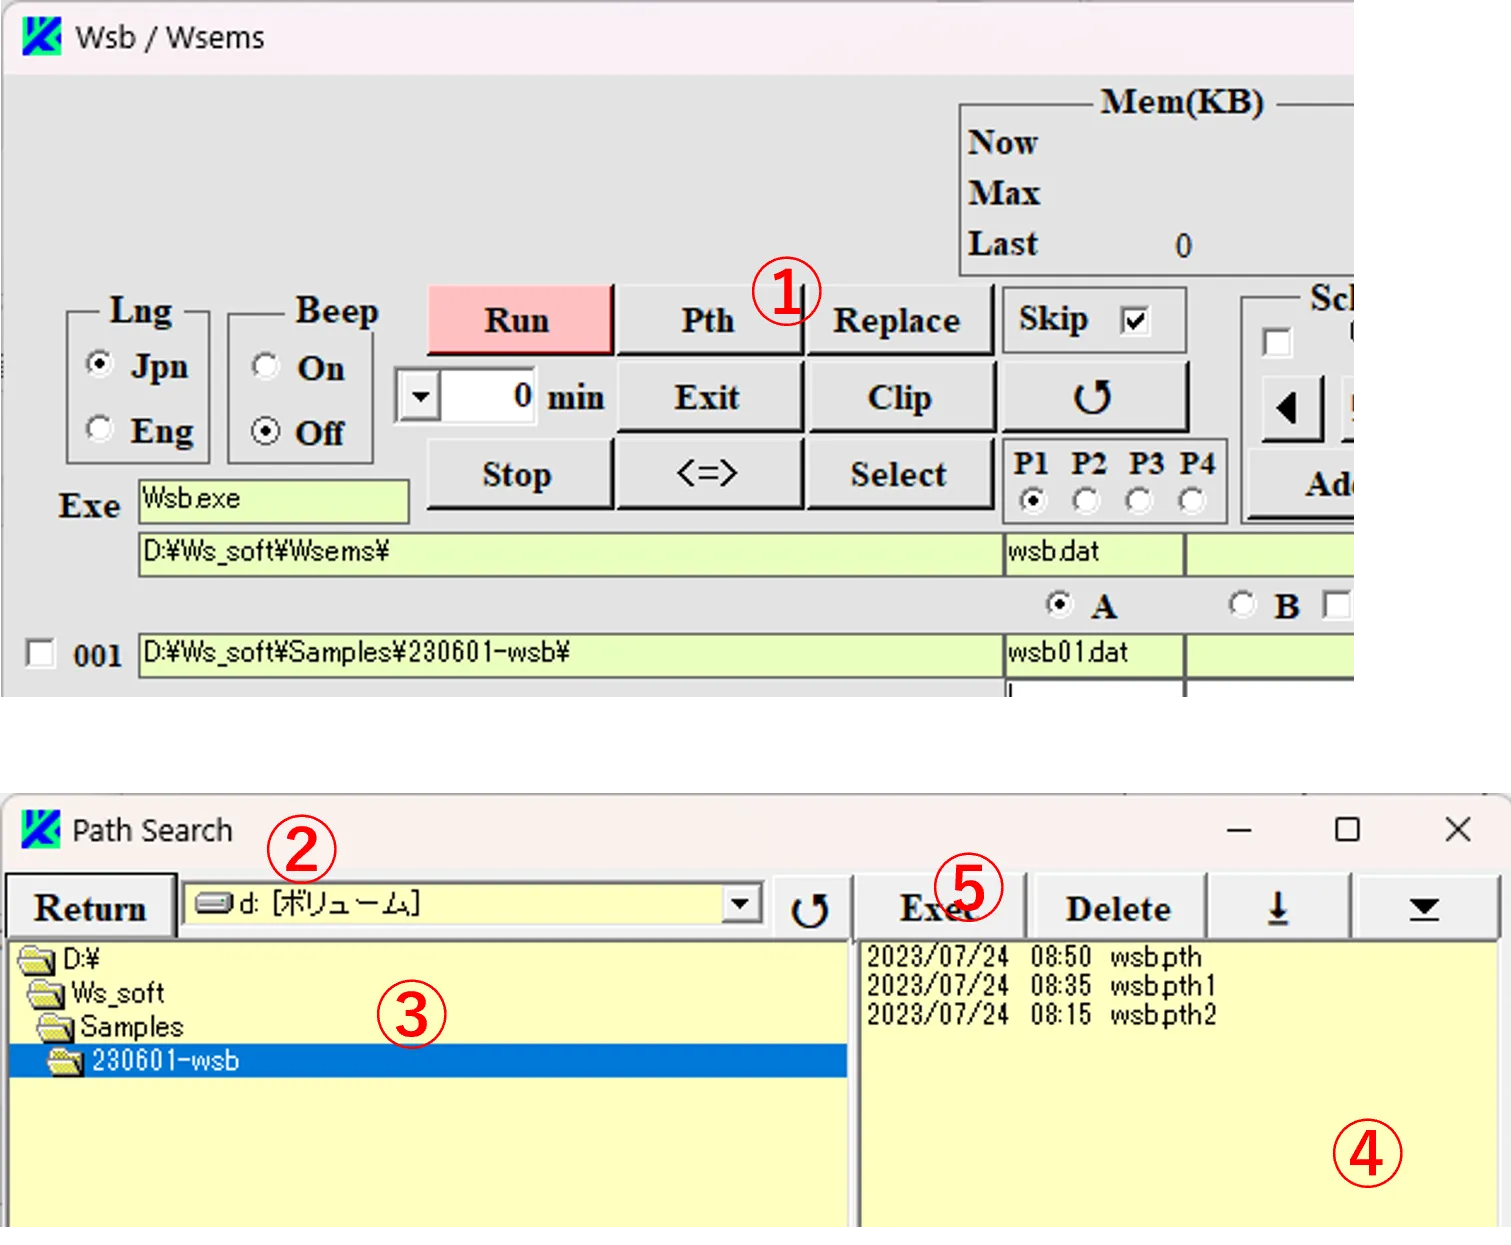
(2) Select one of them (a file name of ws? or wsbch) and click the Exec button ⑤, and the caution window ⑥ appears. If you select Yes button ⑨ on caution window ⑥, the main window ⑧ executed in the past appears. If you select No button ⑨, Path_Search window ② is closed.
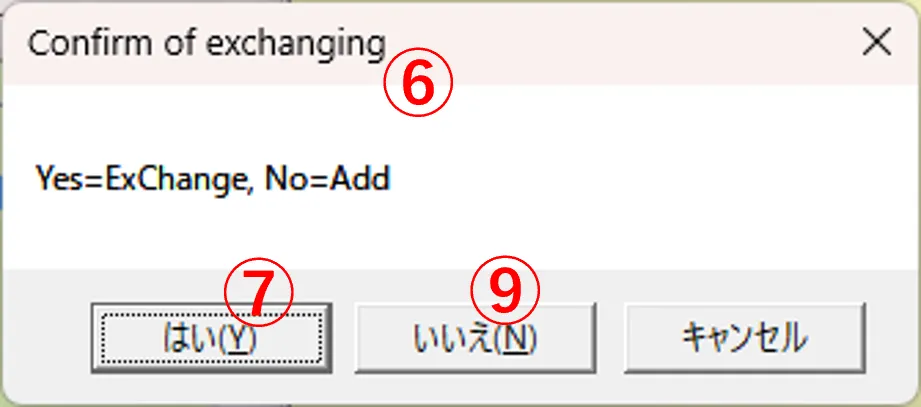
(3) If the pth file is selected from a name of ws?, the executable file of the main window becomes ws?.exe. However, If it is from a name of wsbch, the executable file is unclear until it appears. In the case of checked Exec button ⑩, each time the Run button ⑪ is clicked, the pth file is stored in the folders indicated in boxes ⑫ and ⑬ with a combination of the file name (“wsb”) listed in the exe box and the extension “pth”, and they are also stored in the folder including wsbch.exe with a combination of the file name “wsbch” and the extension “pth”. The ready-made pth files are saved with the extension of pth1, pth2, and so on (the last number is sequentially moved up and later files of pth9 are deleted). In the main window performed by Schedule operations, the pth file is stored with the extension as “pth-001”, assigned by the Schedule number.
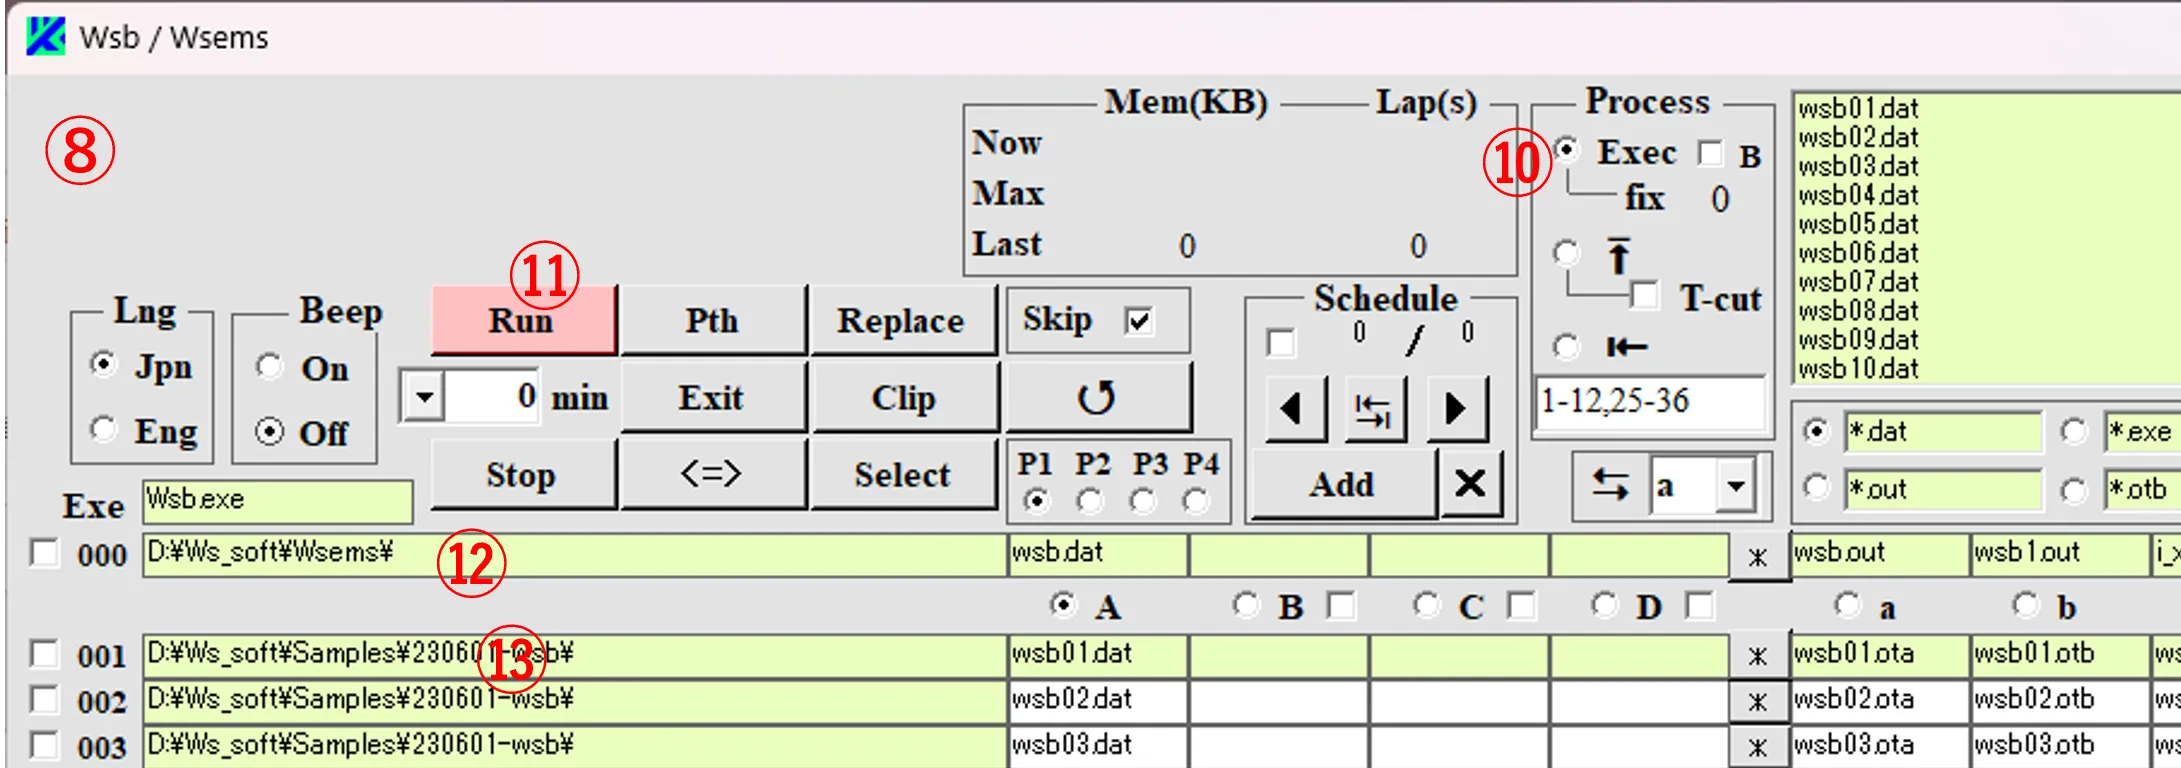
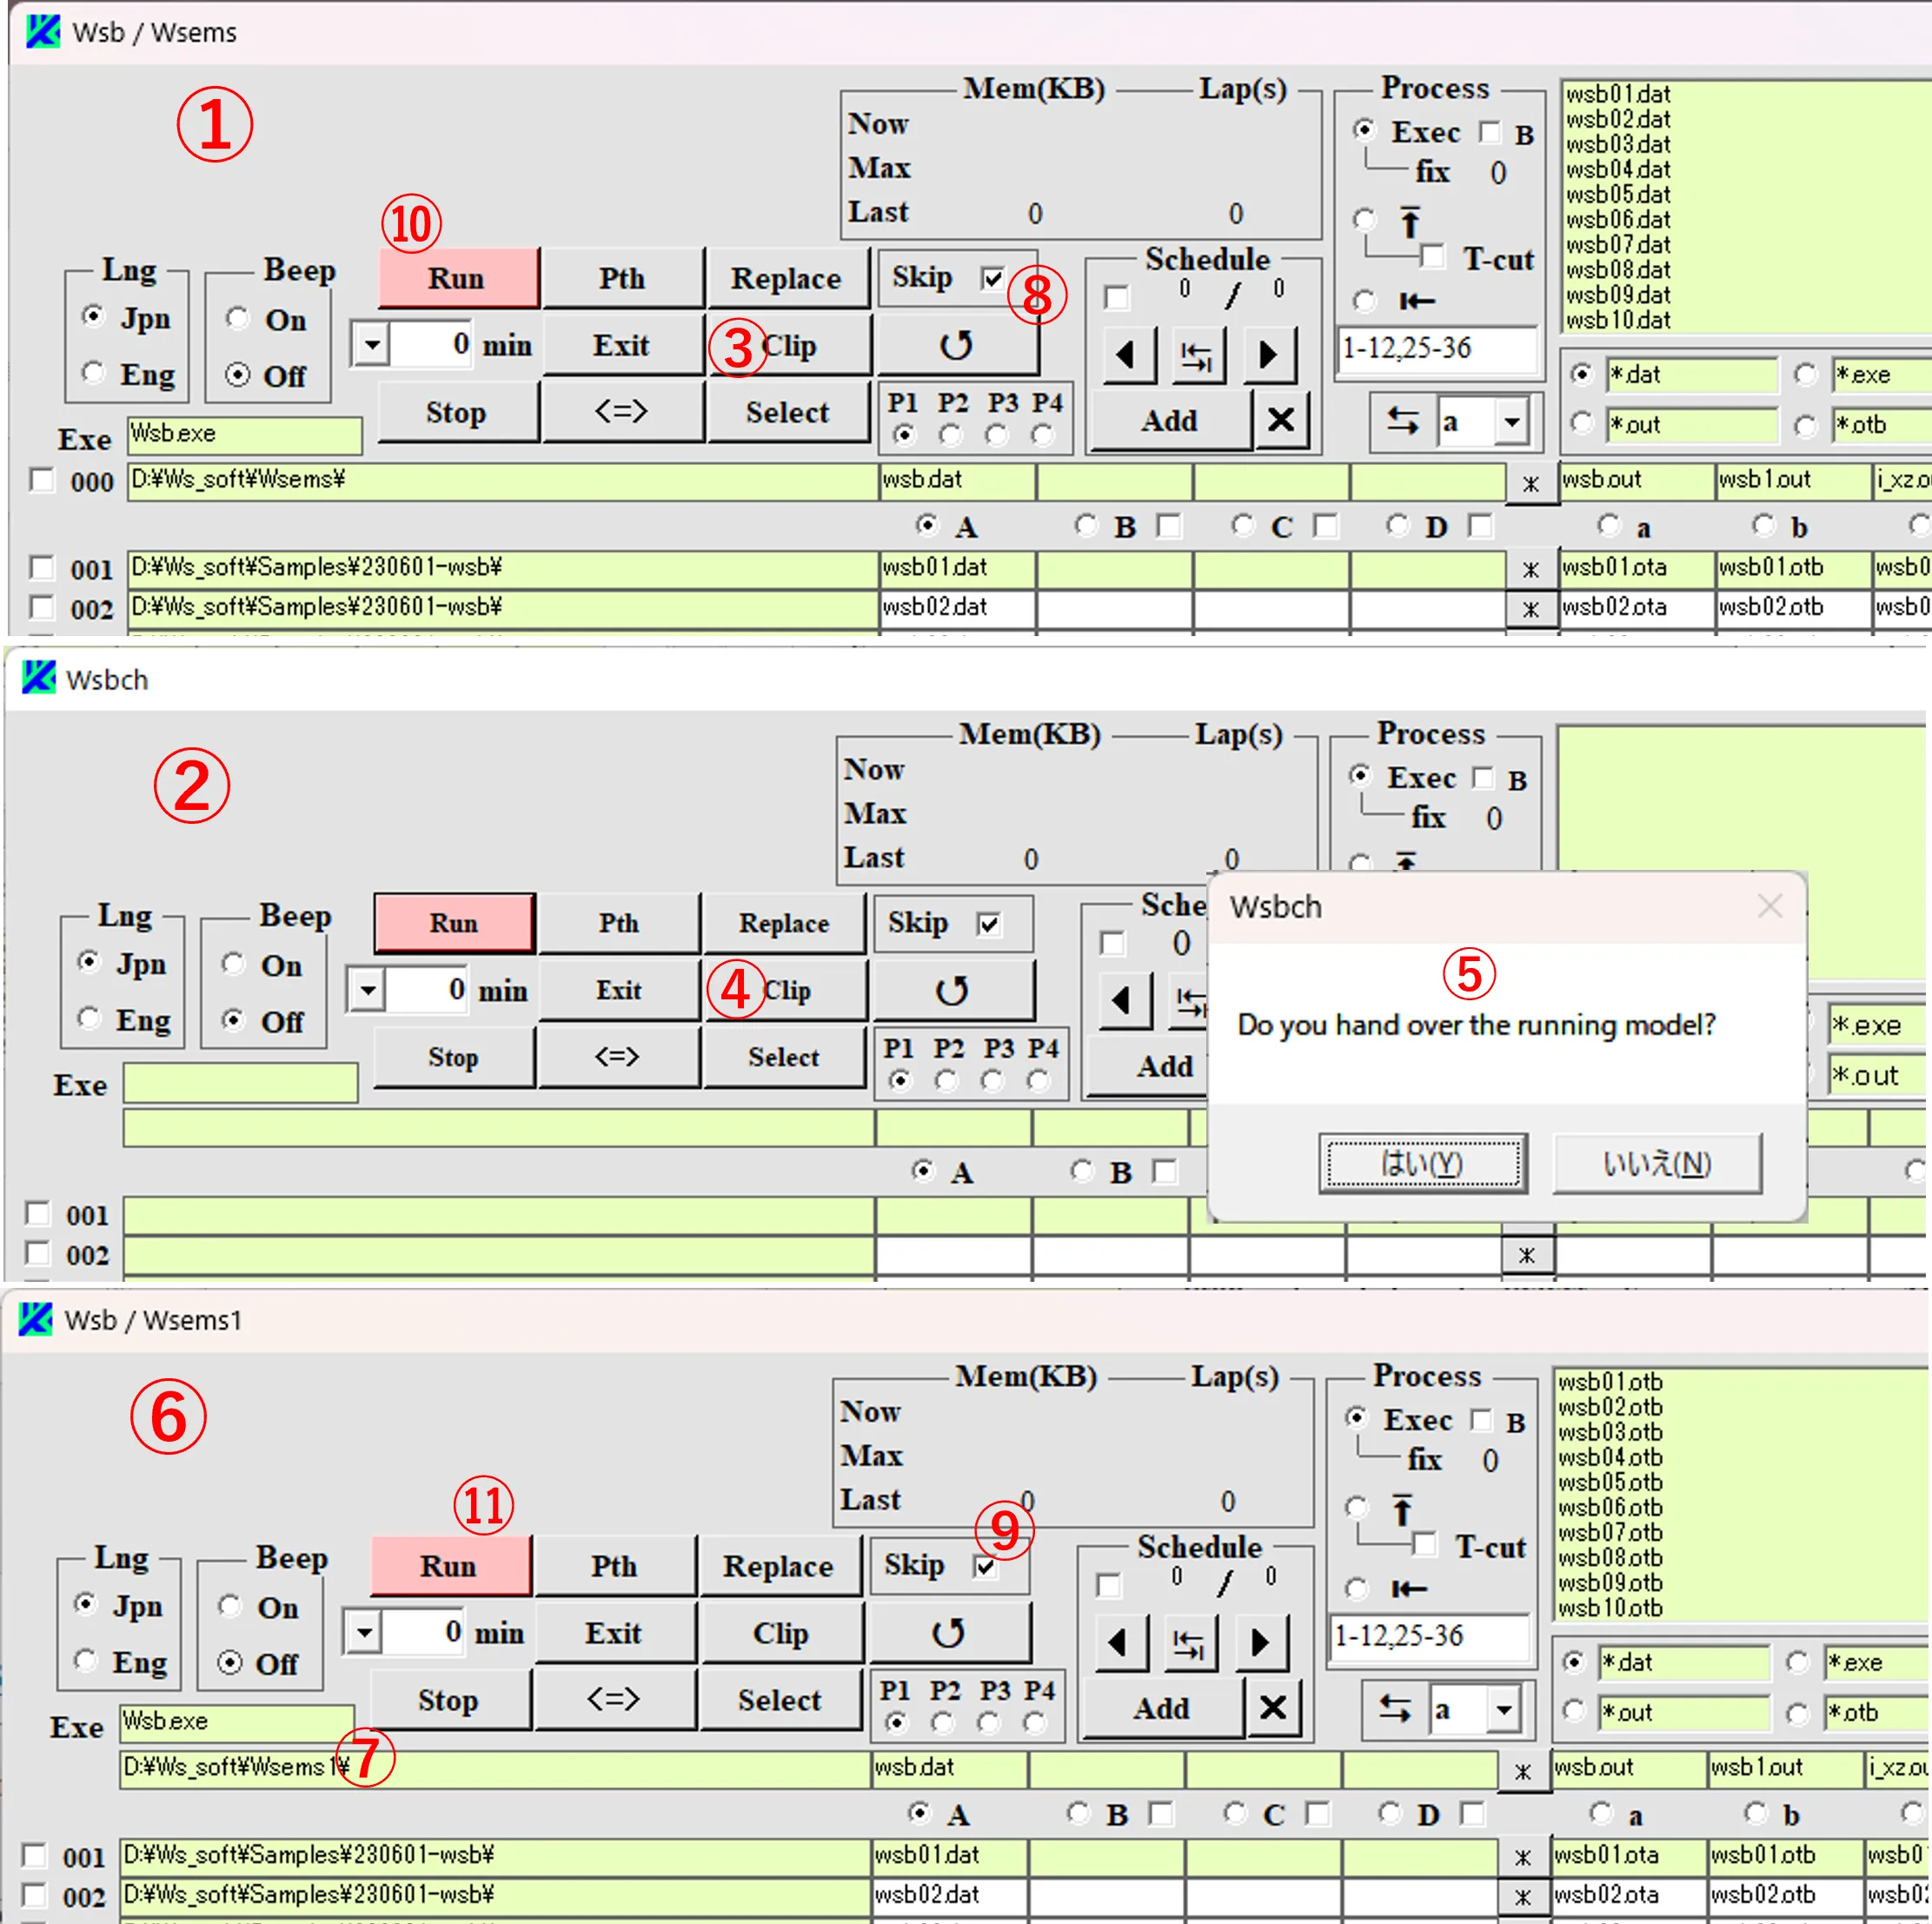
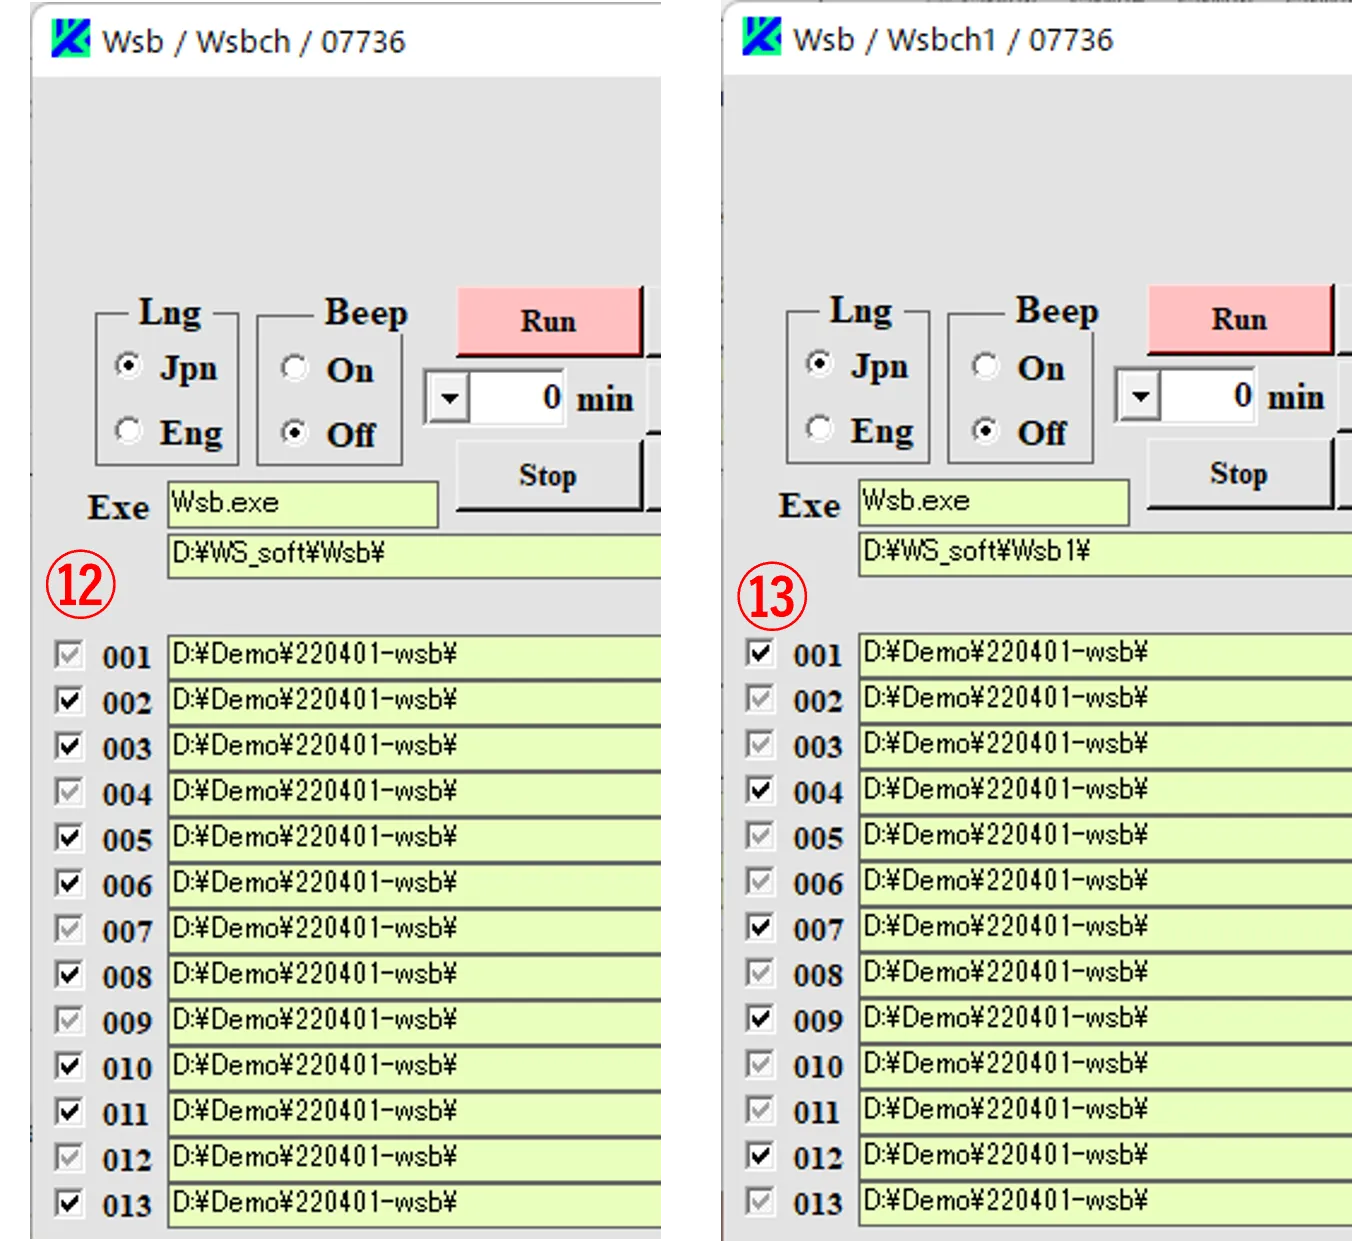
(2) If the Skip buttons ⑧ and ⑨ are checked, by simultaneously clicking the Run buttons ⑩ and ⑪ on windows ① and ⑥, the same input files are read alternately by each window, and calculations are performed without duplication as shown in ⑫ and ⑬ (the gray check marks indicate skipping of calculations).
(1) By clicking the Run button ①, calculations are performed sequentially as shown in ②.
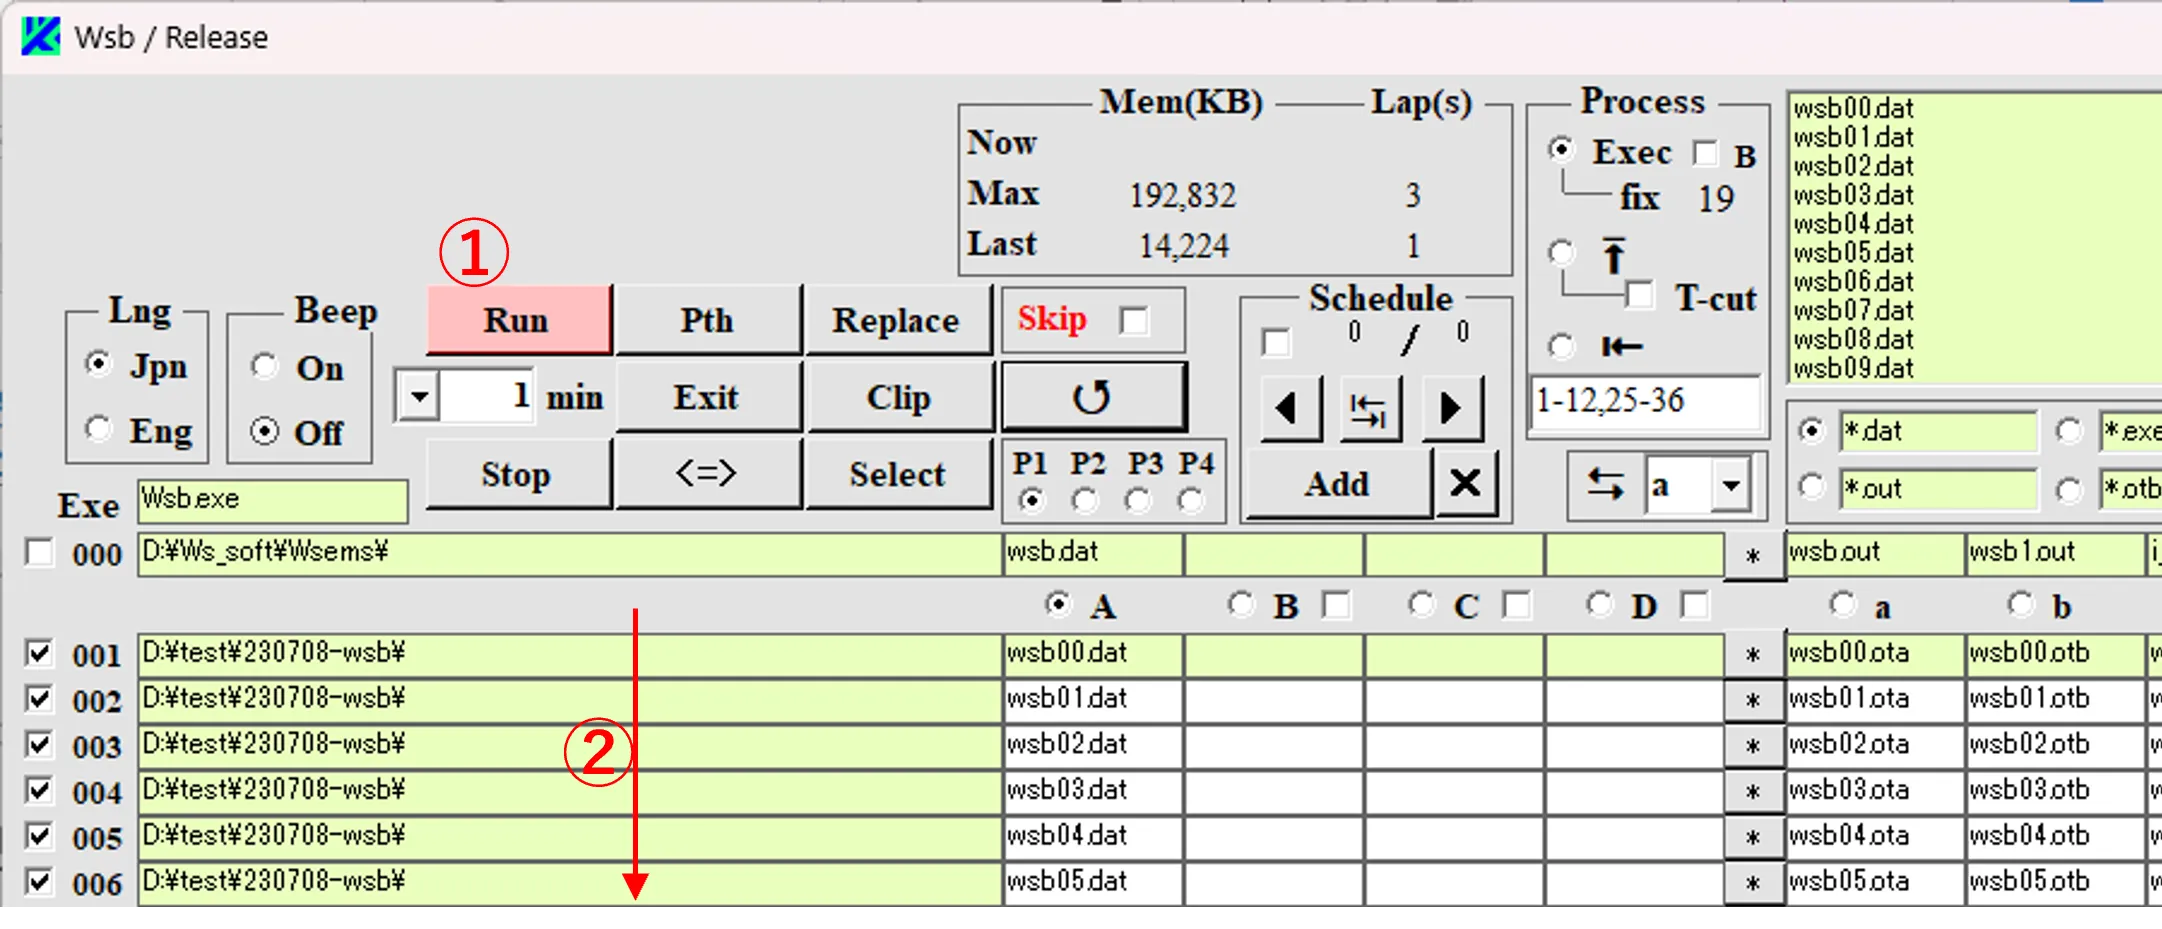
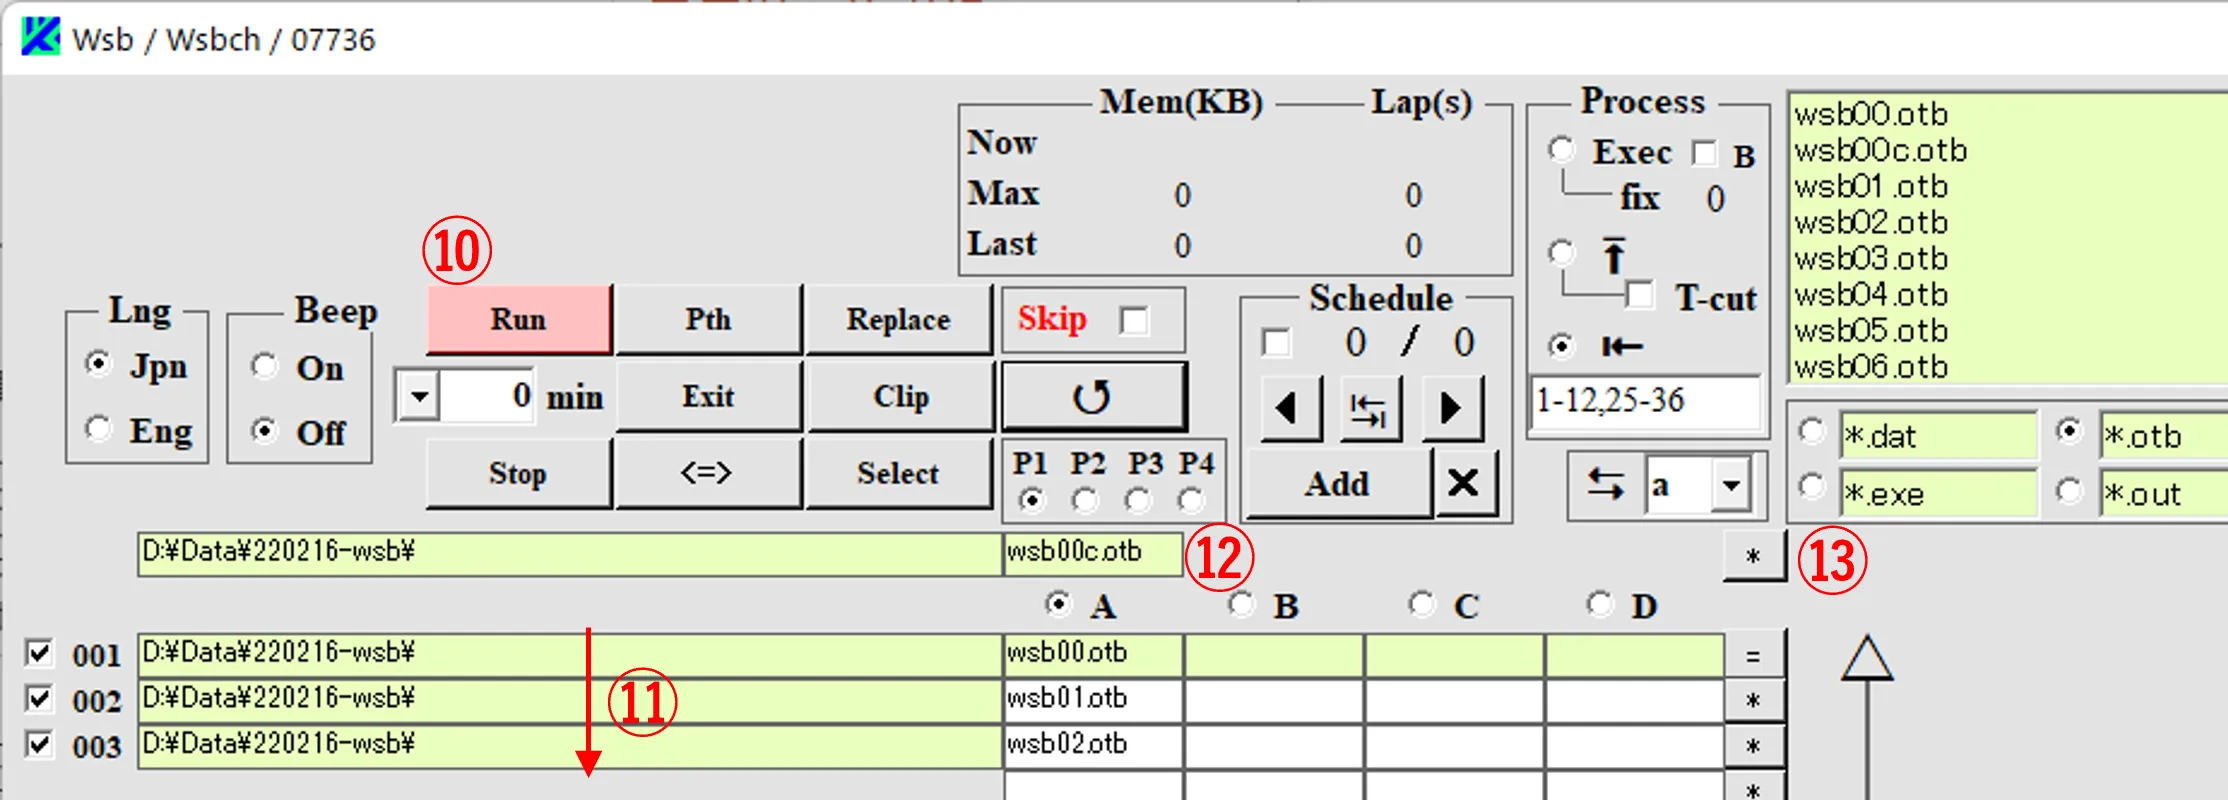
(2) After the calculations are completed, check the button ③ contained in the Process box, confirm whether the T_Cut box ④ is checked in, and select “*.otb” for a file pattern ⑤. Click input box ⑥ and press Enter key to list all files contained in file box ⑦ into column A boxes as shown in ⑥’. ⑧ is the contents of the first file expressed by the Edit window that appears by clicking the button ⑨. If the Run button ⑩ is clicked, a file ⑪ appending “c” to the end of the file name listed in the top box ⑥ is created in the same folder, where the contents are extracted from all the files listed in the A column boxes and linked up.
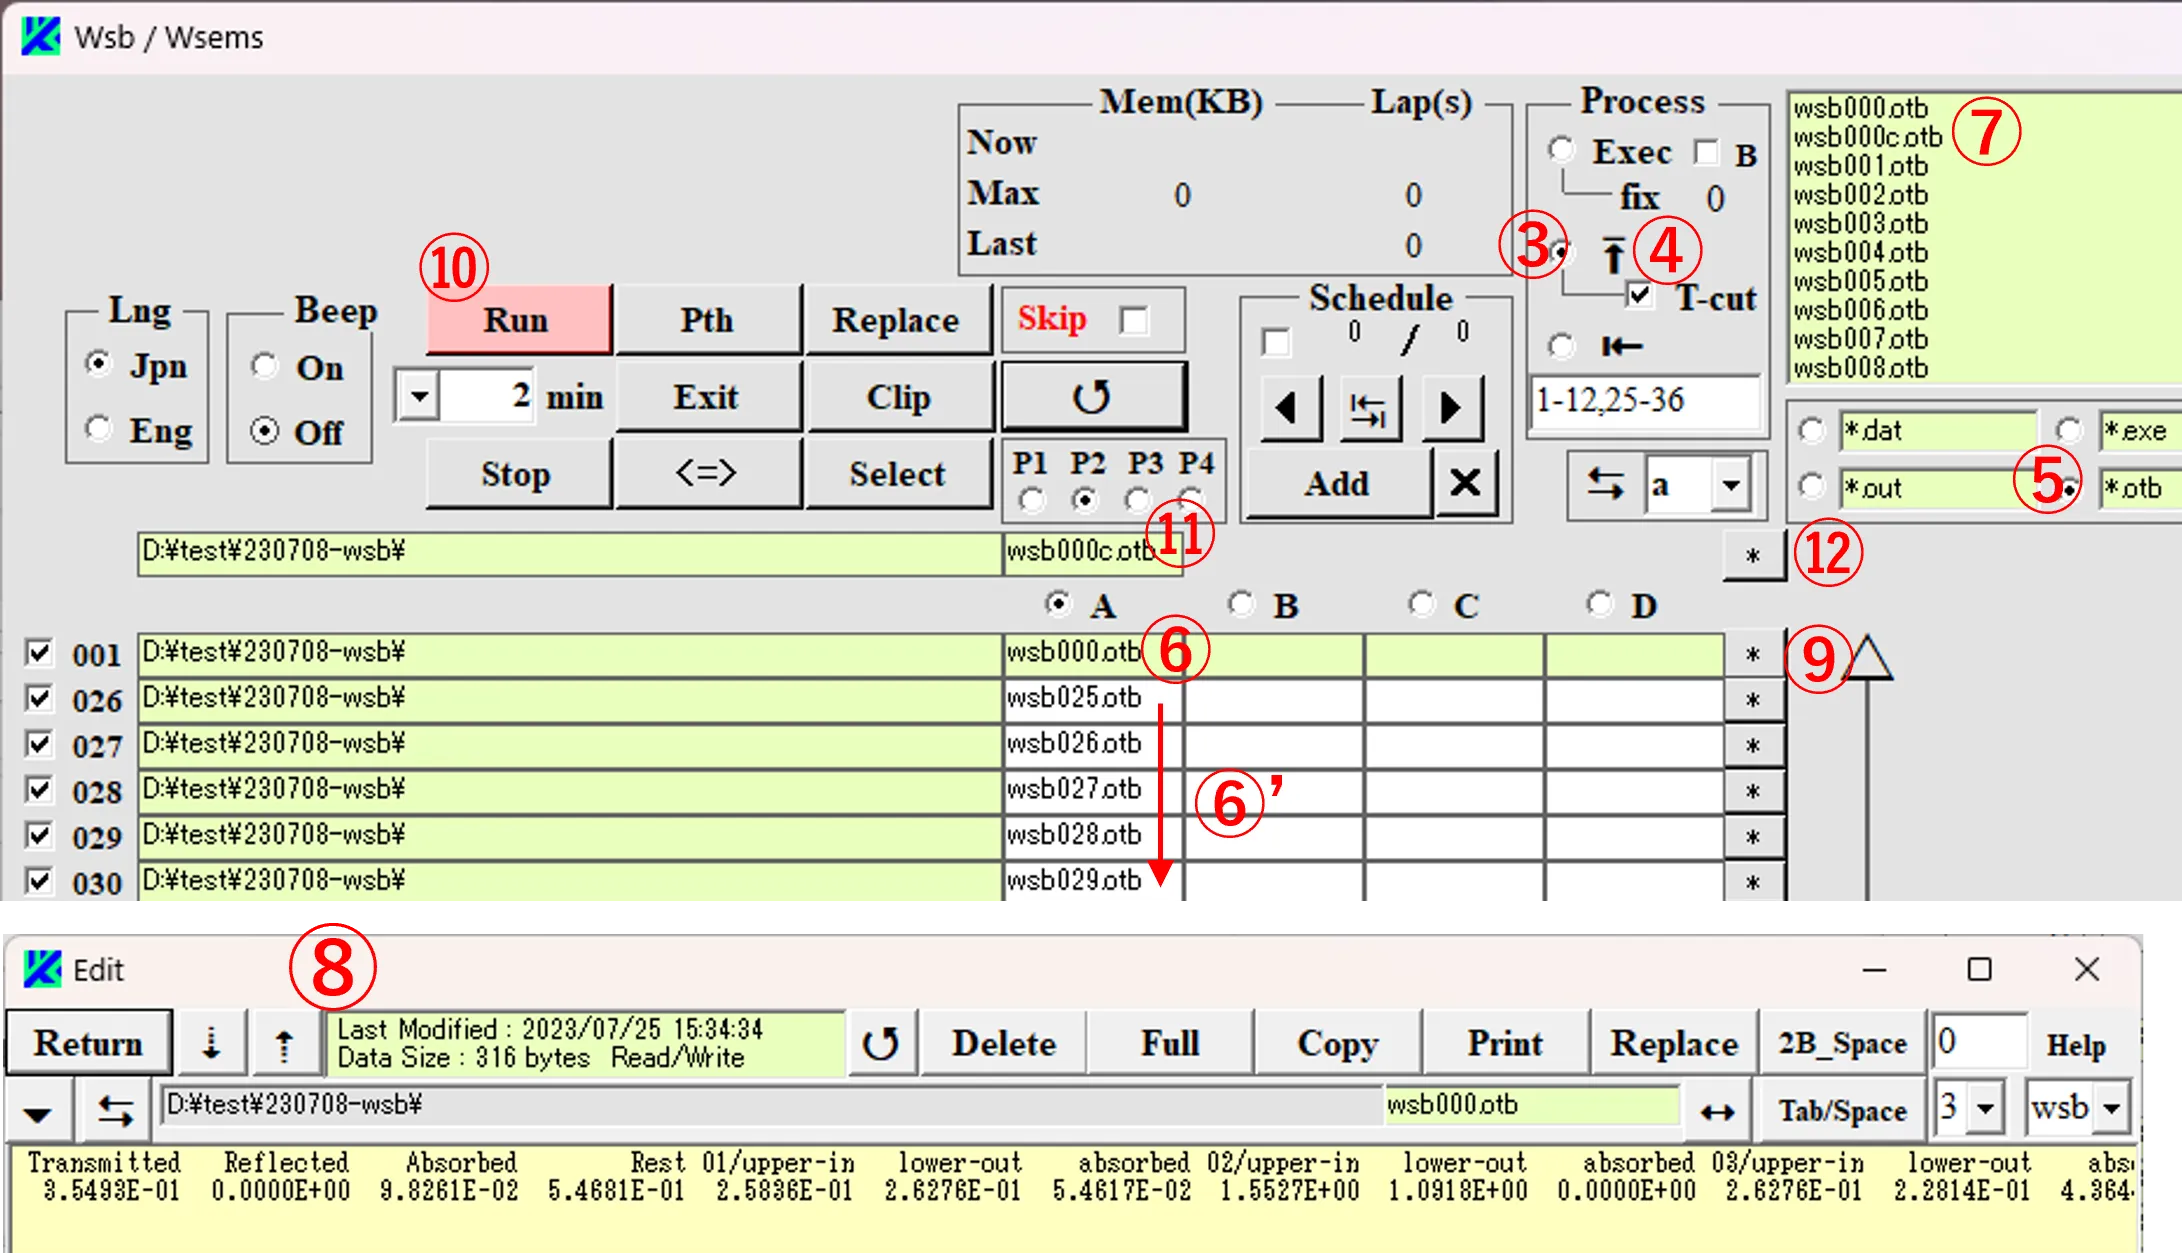
(3) Clicking the * button ⑫ displays the results of the concatenation on the Edit window ⑬, and the first lines (Transmitted, etc.) for the second and subsequent files are deleted and concatenated. The data can be easily graphed by clicking on the Copy button ⑭ and pasting it into Excel (by selecting the pasted data in the fixed length field and by aligning it to the right or left by spaces in the Text File Wizard).

(4) By the way, unchecking the T_Cut box ④ generates the concatenated result ⑮ without deleting the first line for each file.

● Horizontal concatenation
This operation uses the Linux command “Cut”, so Gow (https://qiita.com/mizuki_takahashi/items/01f597d9f193ffb549f7) must be installed beforehand.
(5) Check the button ① contained in the Process box, and describe the cutting range by the box ② like 1-12 or 25-36. Check button ③, select “*.otb” for the file pattern, and list the files contained in the file box ④ on column A boxes ⑤.
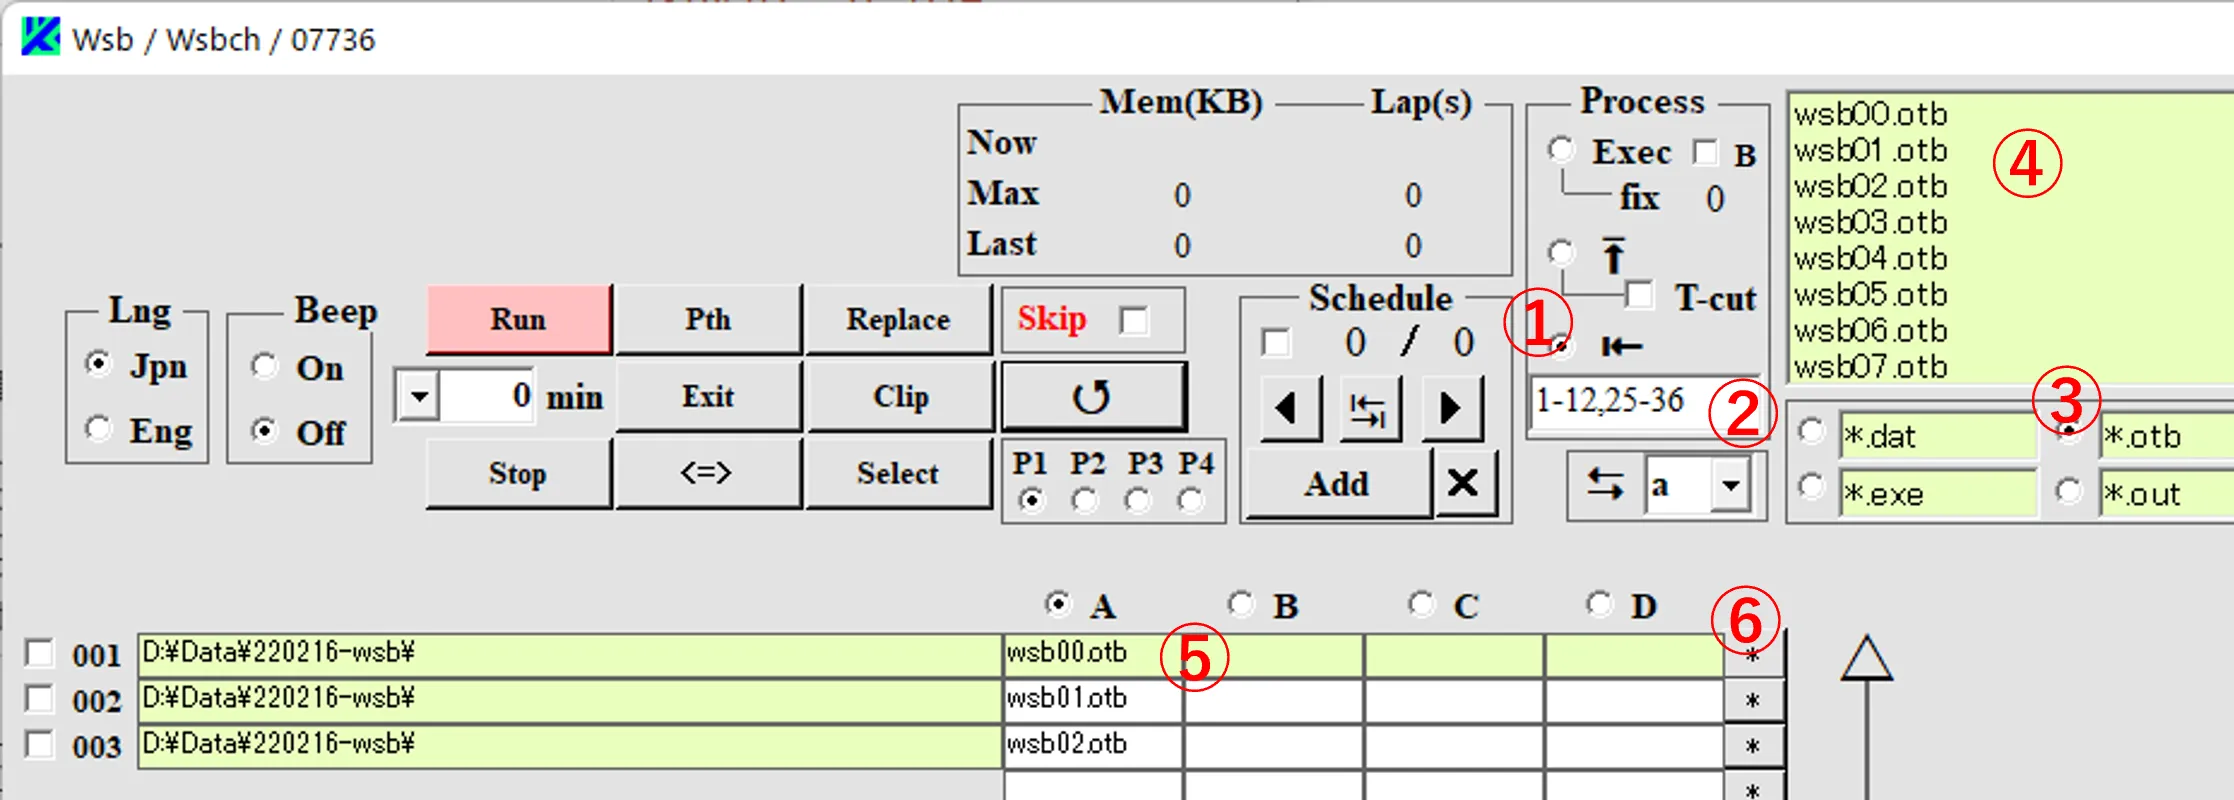
(6) Click the * button ⑥ to display the file edit window ⑦, where the columns 1-12 in box ② correspond to ⑧ and columns 25-36 to ⑨.

(7) Click the Run button ⑩ to perform horizontal concatenation in the order shown in ⑪, and the merged results are stored in file ⑫.
(8) Clicking the * button ⑬ displays the edit window ⑭, where the strings corresponding to columns 1-12 and 25-36 are listed as ⑮ and ⑯, and the strings of the next-line’s file are listed up to the right of them by the same rules.

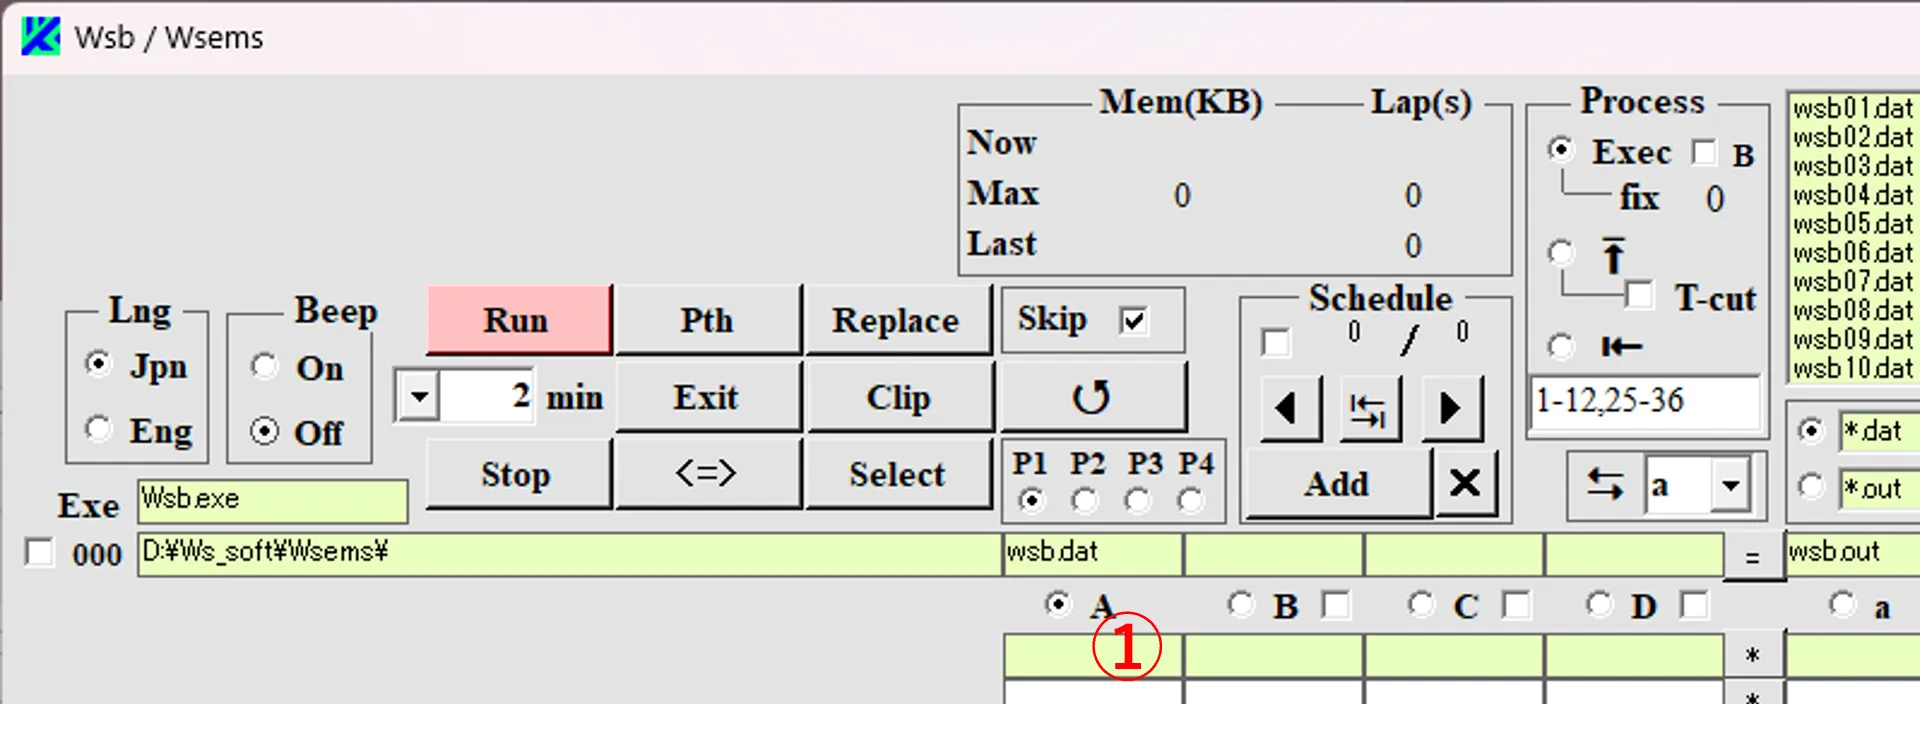
(1) By double-clicking a box ① of A-D columns, the color of the first file ② (or the file below the color-reversal line) in the file box becomes reverse , and the file is listed on the box ① as shown in ③.
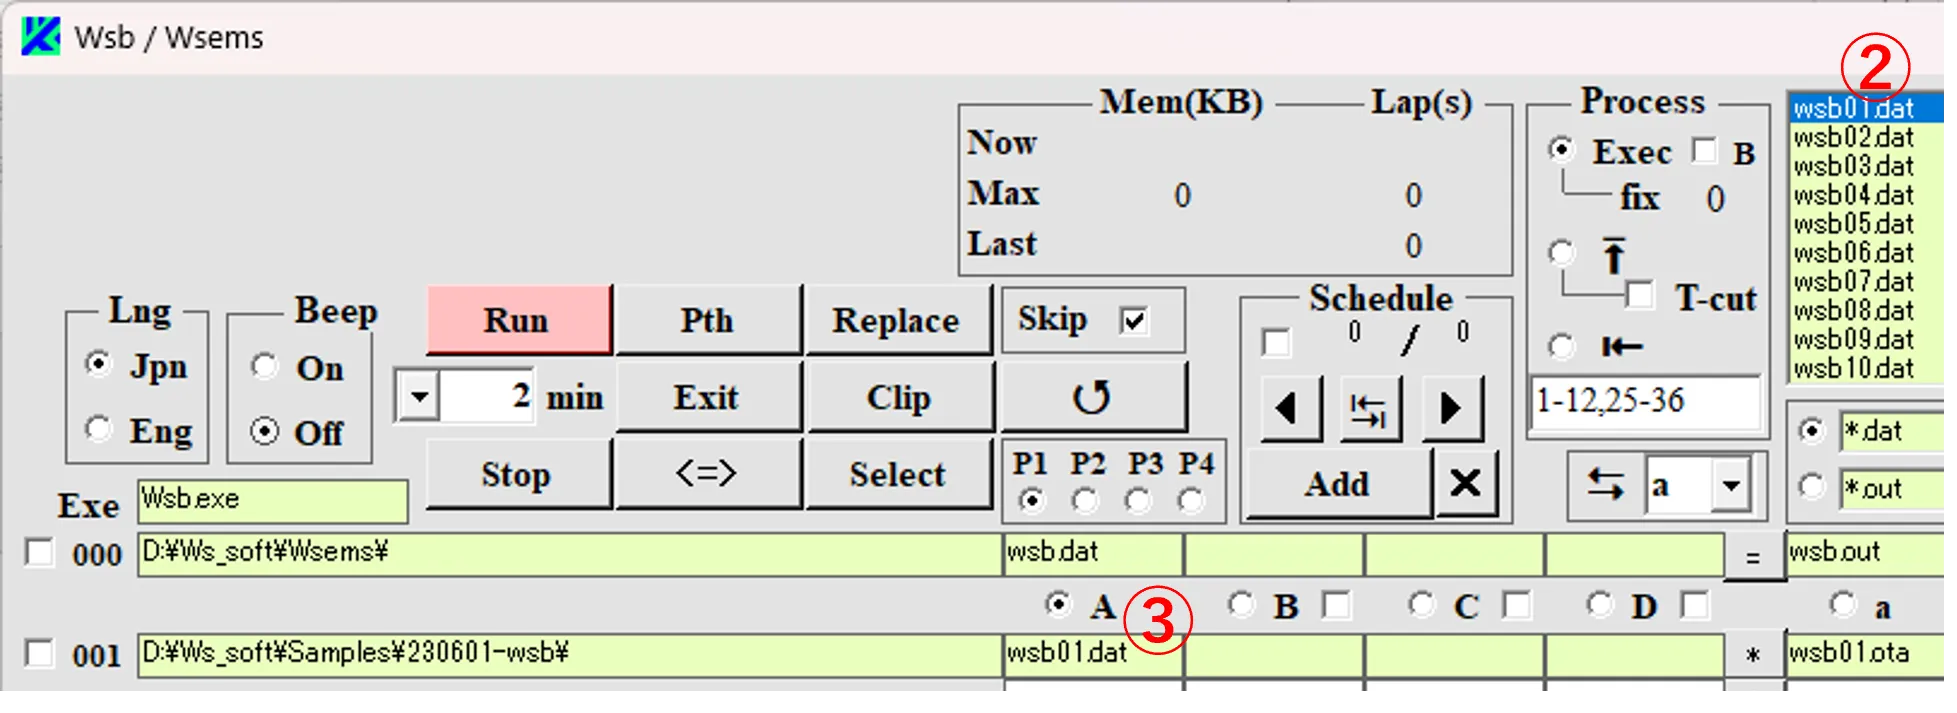
(2) If you click on box ① and press the Enter key, you can continuously list the files at or below the color-reversal line ② as shown in ④.
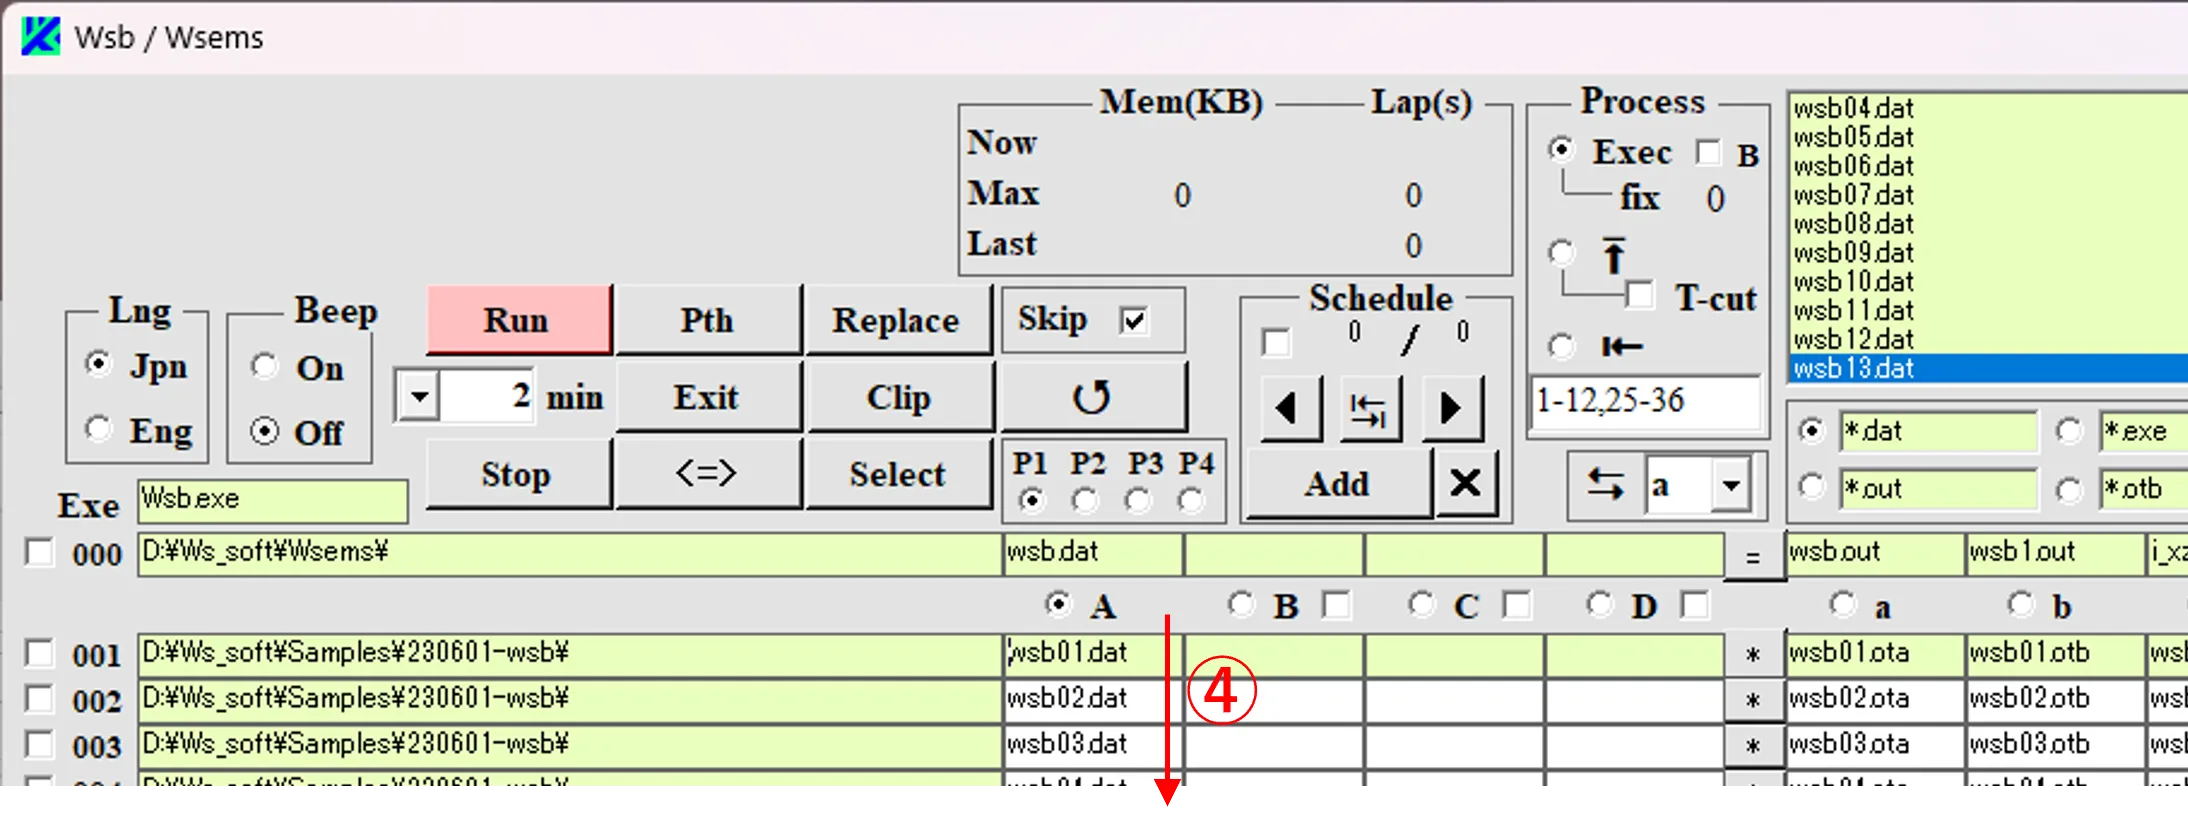
(3) If you click on one of column A boxes, its path and file name disappears as shown in ⑤.
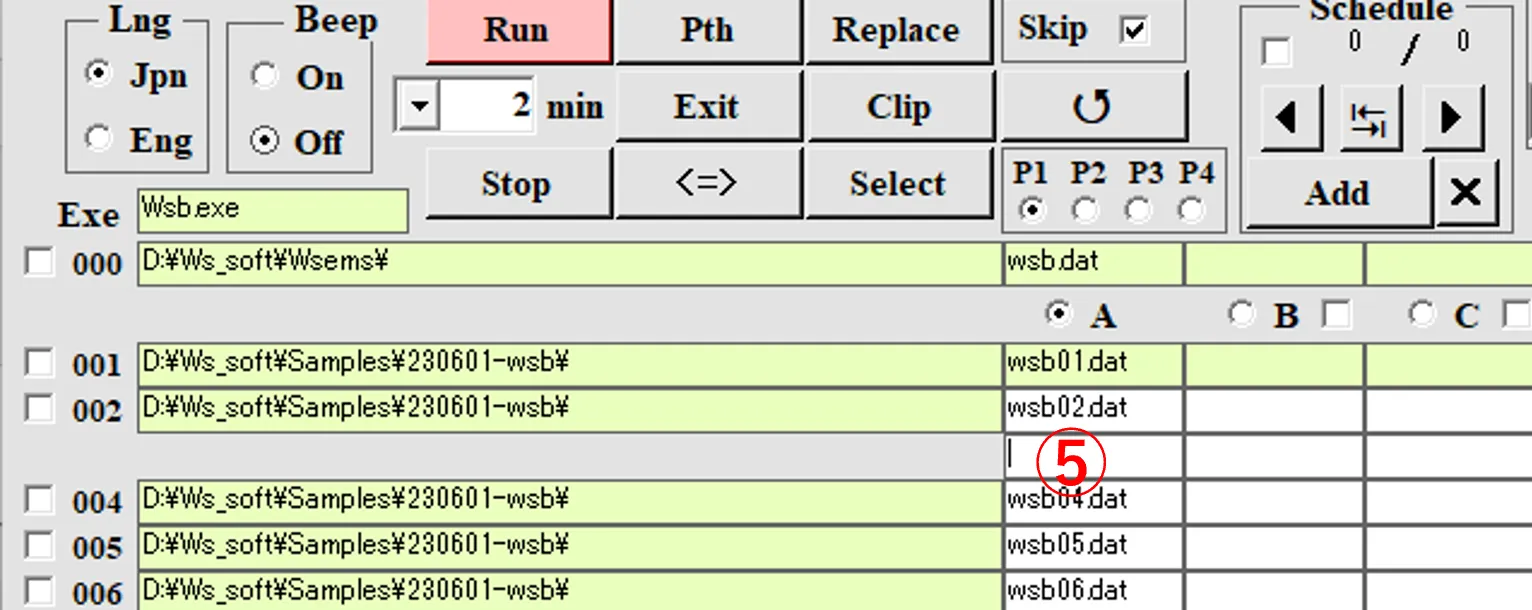
(4) If you press Del key there, the paths and file names lower the line disappear as shown in ⑥. If you press Back Space key there, the paths and file names upper the line disappear. If you press Ctrl key, only one file specified in the file box is continuously listed.
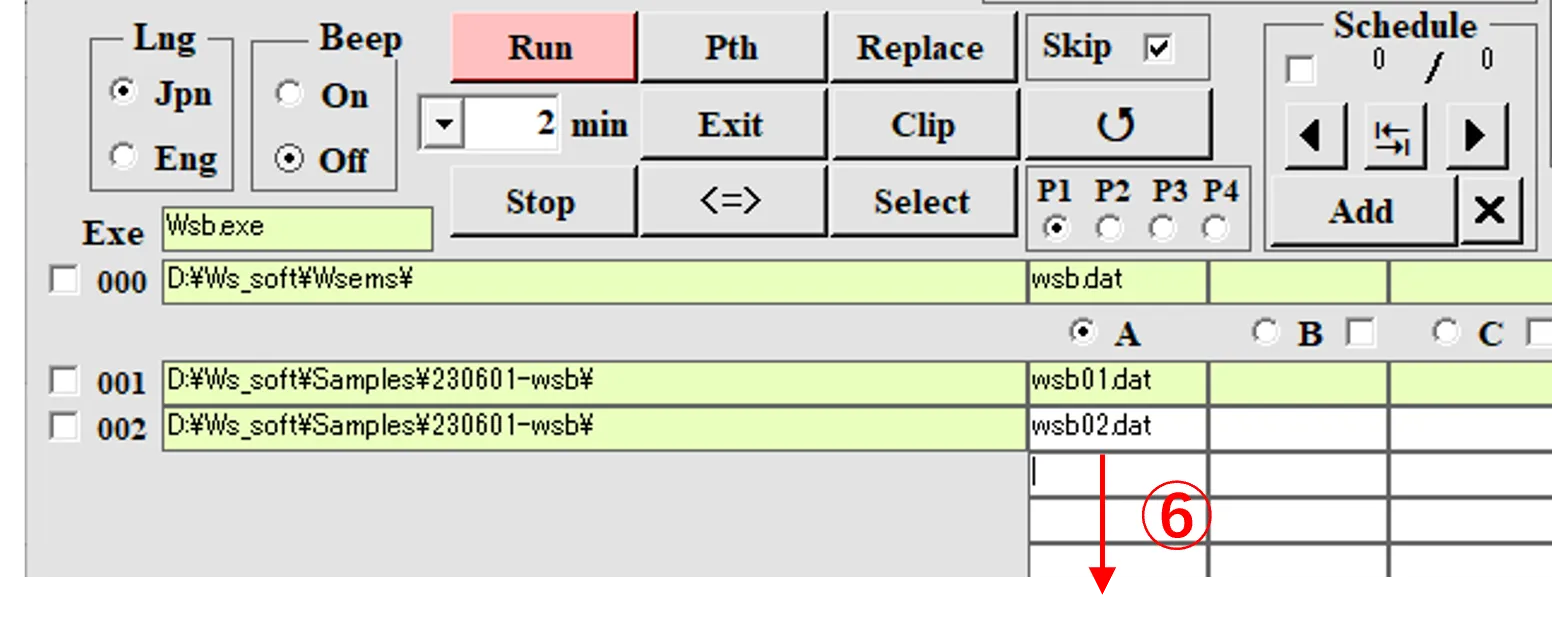
(5) If you double-click an Exe file box ⑦ on A-D or a-g column, all the boxes in the lower row become empty. If you right-click on one of the path boxes ⑧, the directory box ⑨ is changed to the path of the right-clicked box.

● About directory
(6) By right-clicking the box ①, it expands downward as shown in ②. By right-clicking again, it turns back. By right-clicking the box ③, it expands downward as shown in ④. By right-clicking again, it turns back.
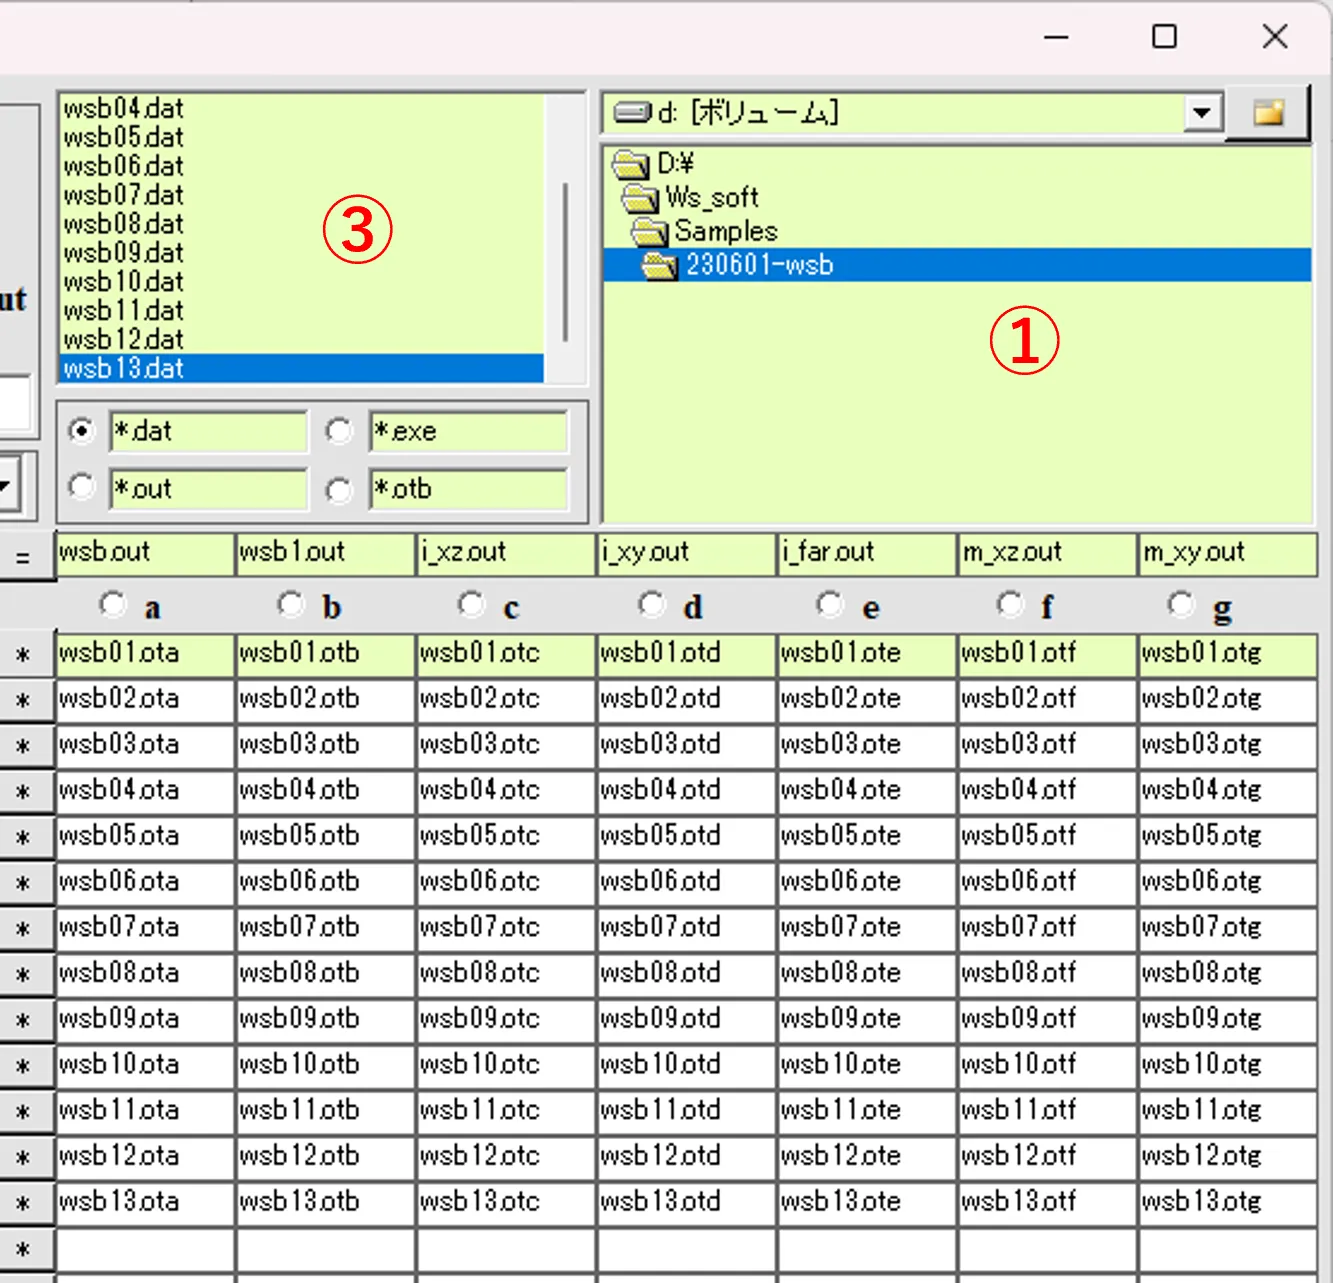
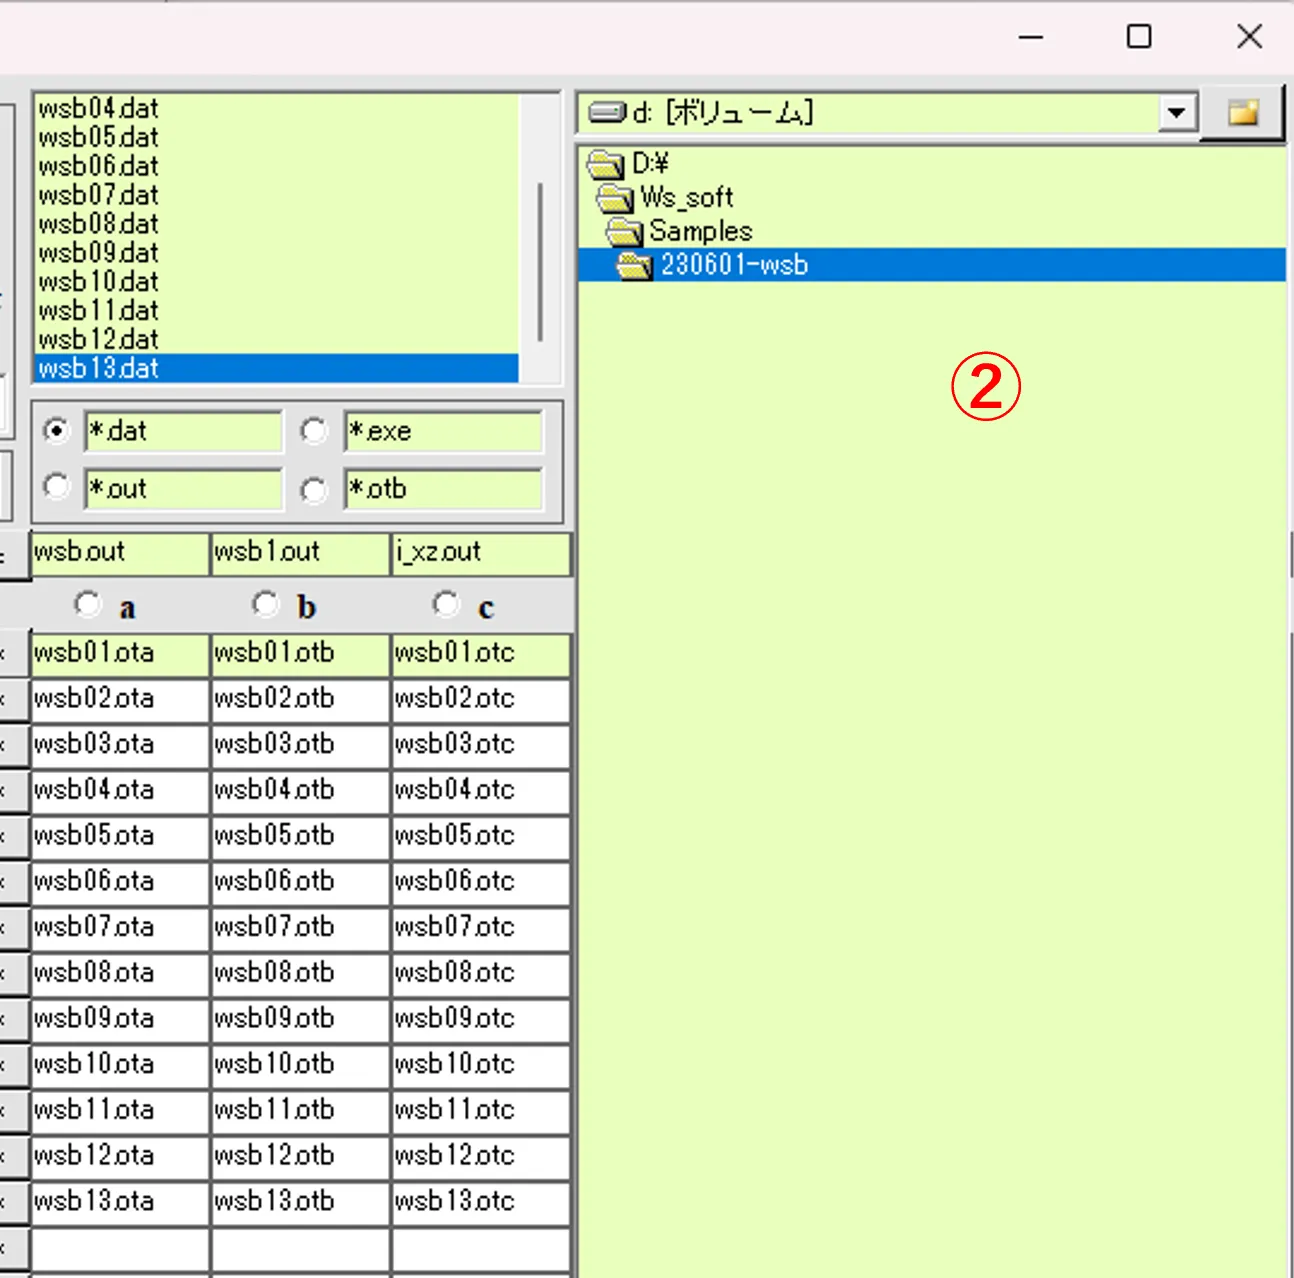
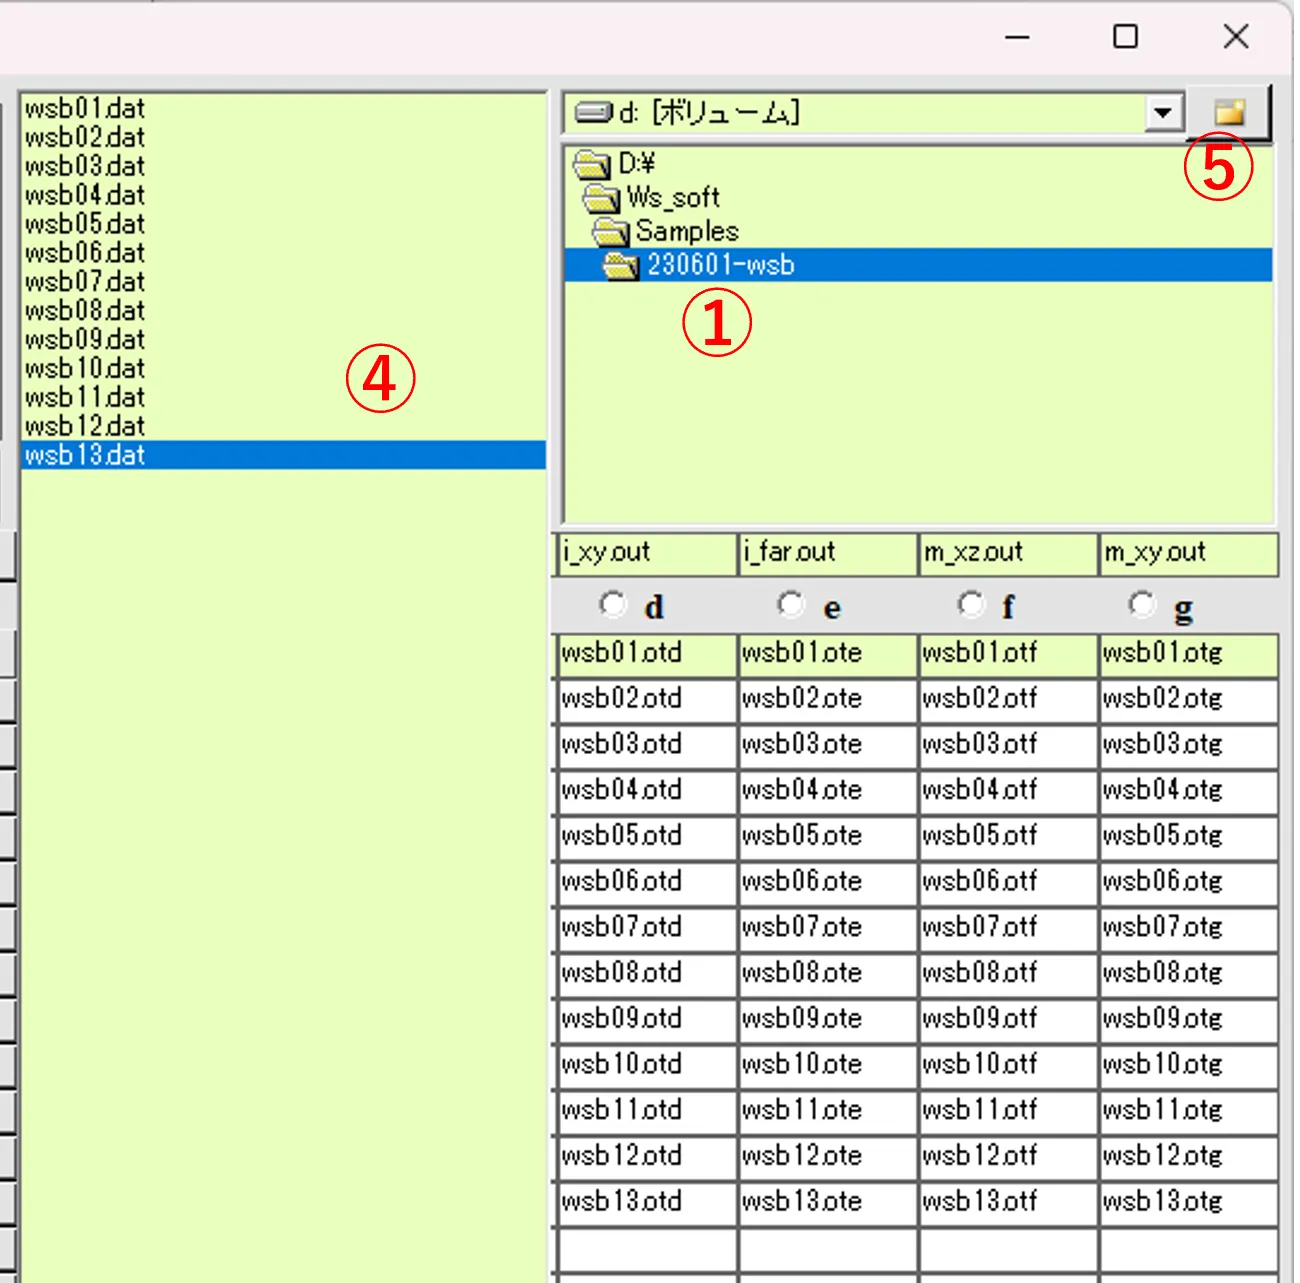
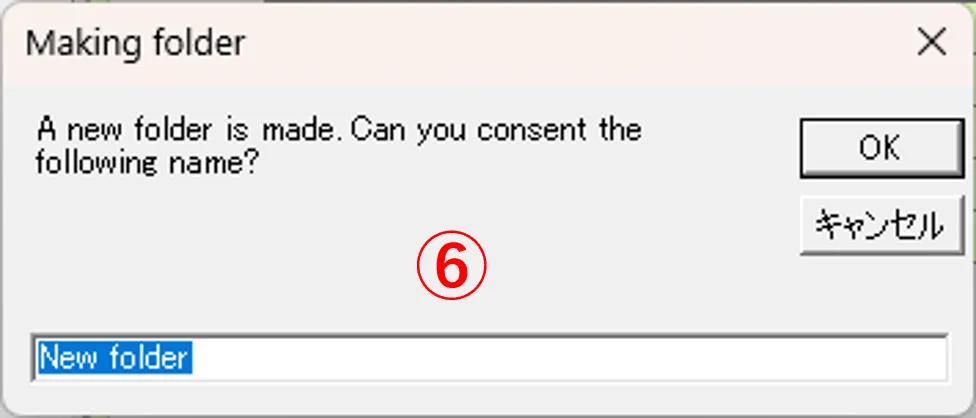
(7) Clicking the ⑤ button brings up the caution window ⑥. If you enter a folder name and select OK button , a new folder is generated under the directory specified in the box ①.
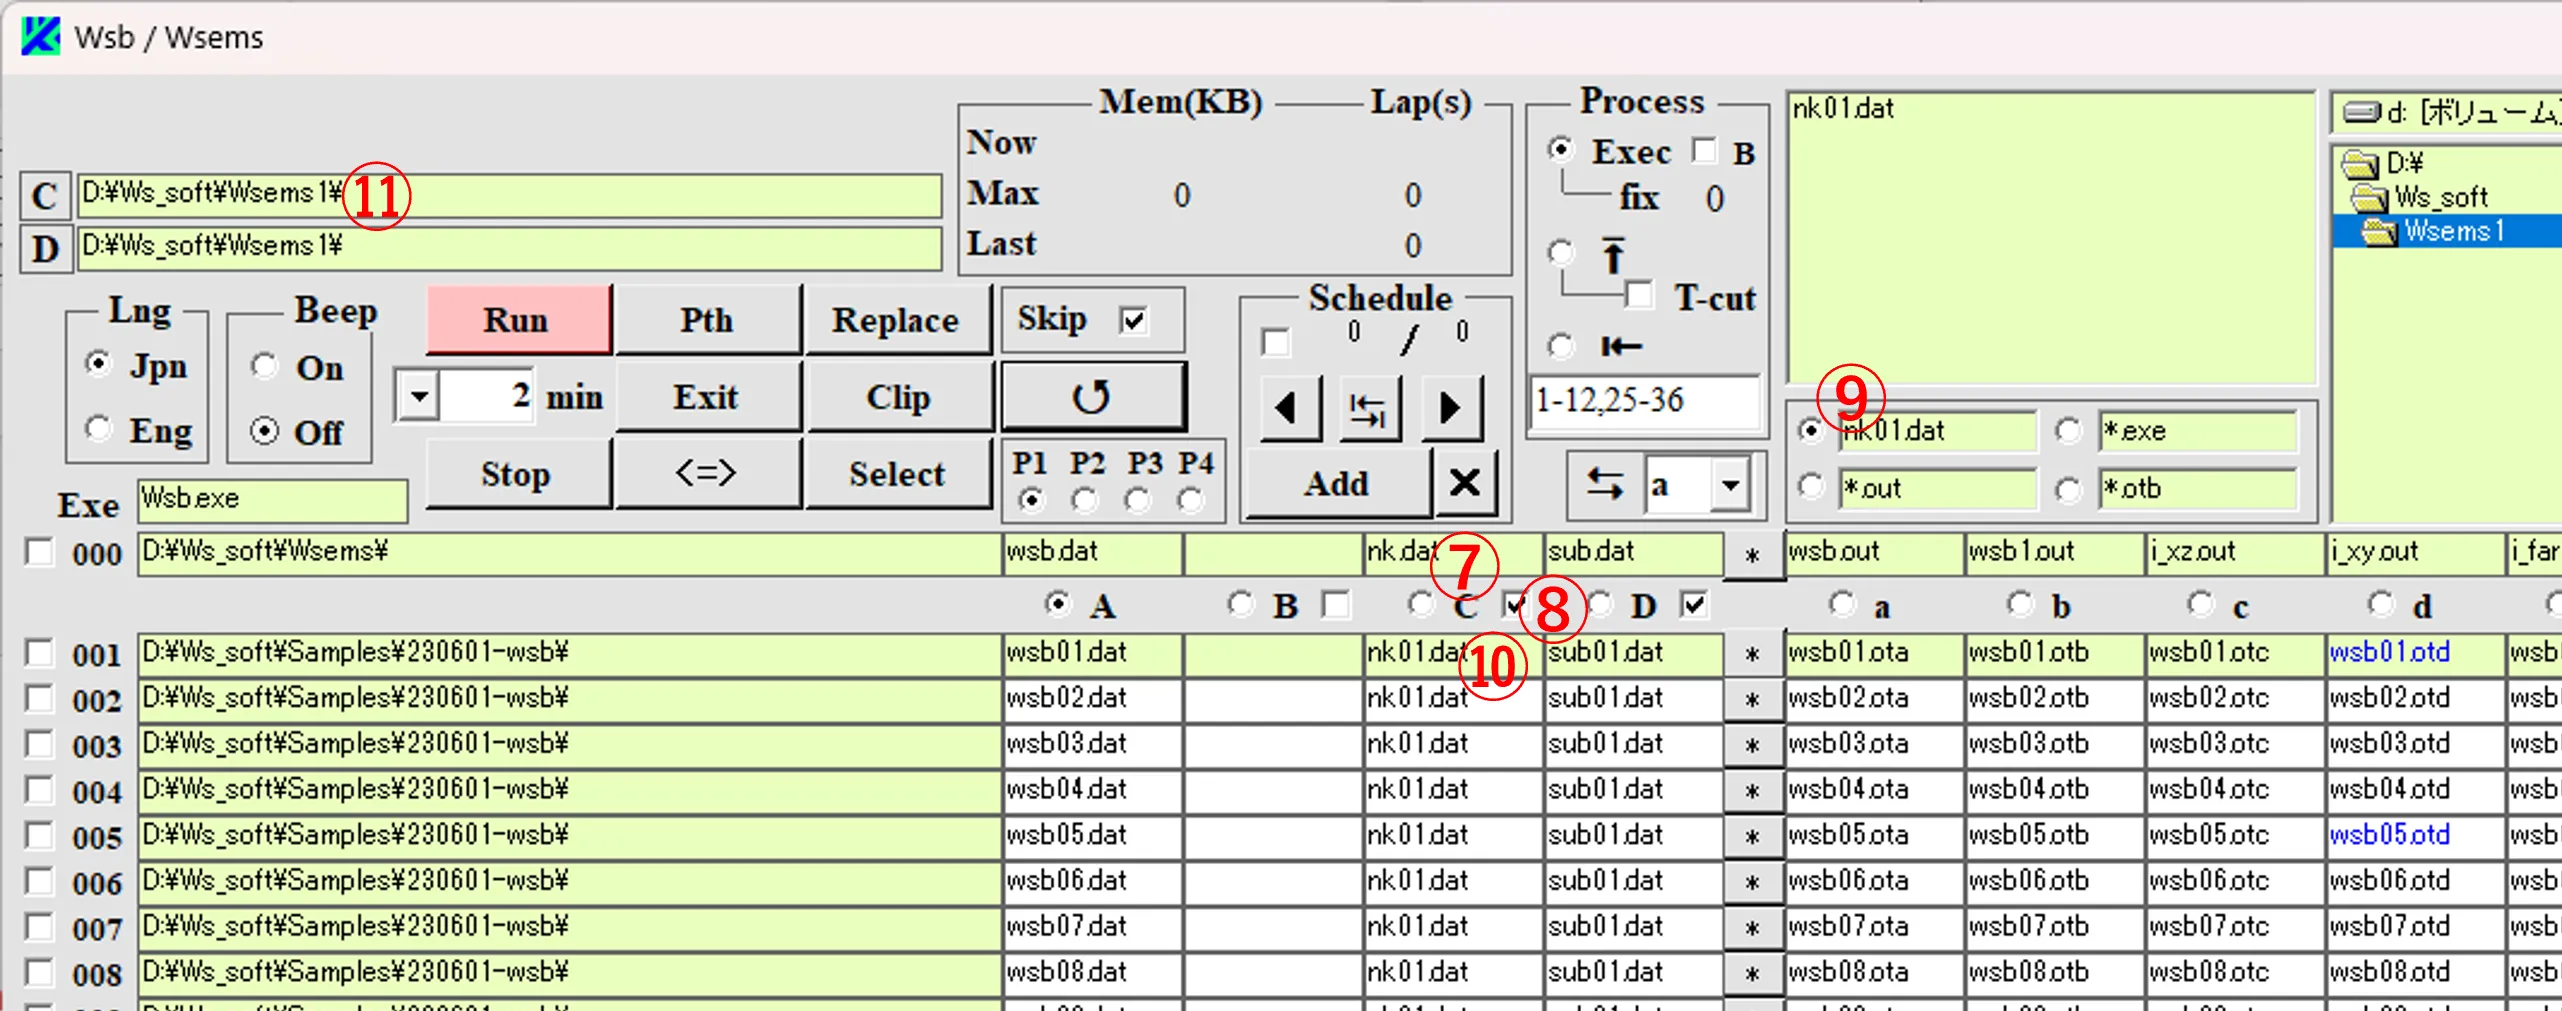
(2) Similarly, type nk.dat in the Exe input box ⑦, check the box ⑧, set the file pattern ⑨, click the box ⑩, and fill the same file name (nk01.dat) with all C column boxes by pressing Ctrl key. Since box ⑧ is checked, the path of filed in column C boxes is listed on ⑪. In the above settings, when the exe file is performed, the files of sub01.dat and nk01.dat stored in another folder (d:\ws_soft\wsems1\) are read and overwrite the sub.dat and nk.dat in the exe file folder.
(1) From the upper box of the Select window, select the folder ① where wsb12.dat is stored. Select the Copy button ②, check the Out box ③, and click the box ④ to create a new folder ⑤ in the lower box.
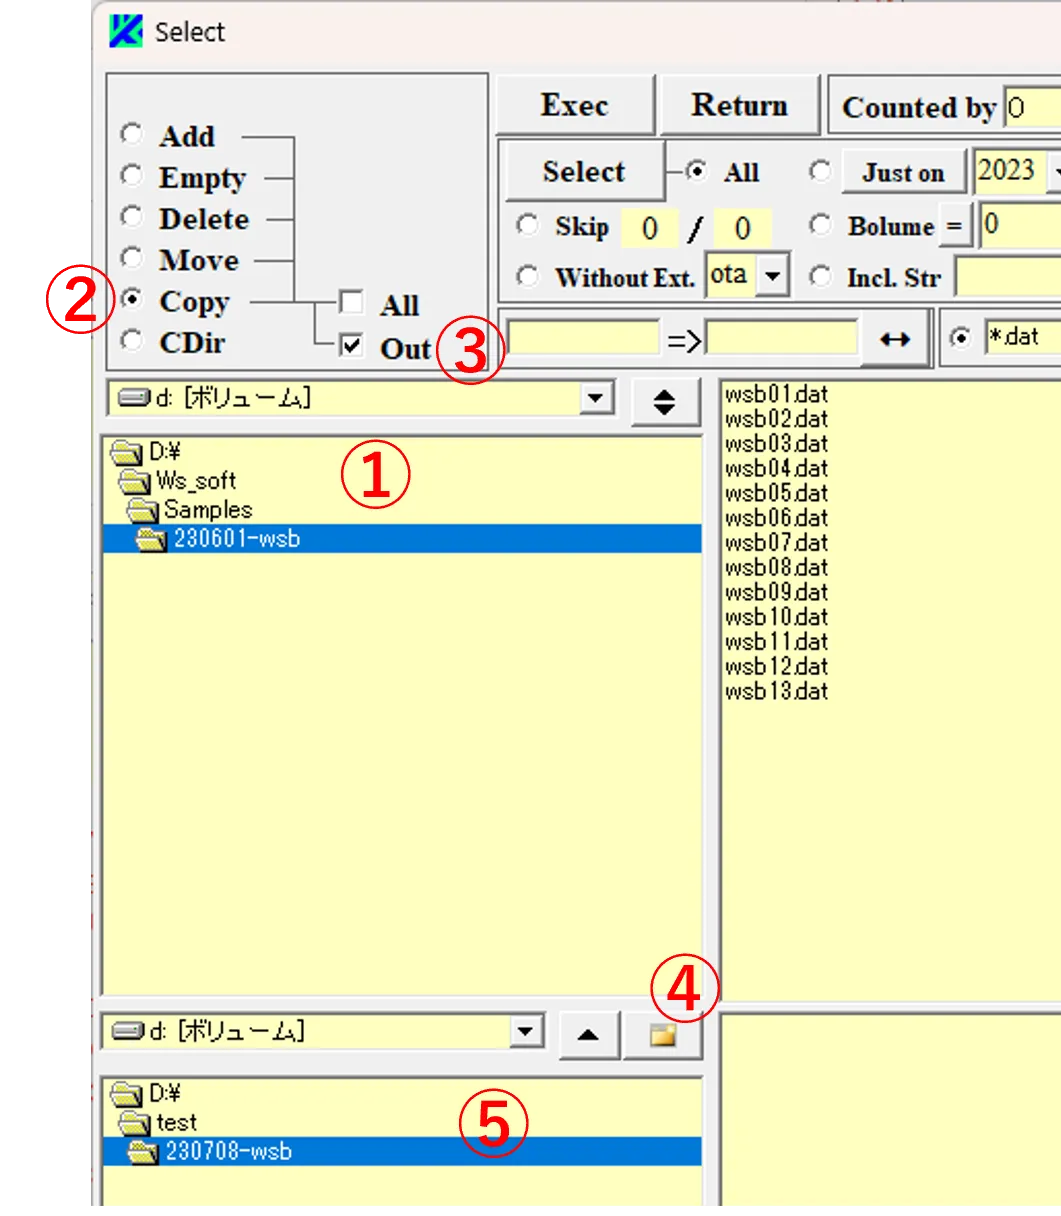
(2) Click the file (wsb12.dat) in the upper right box ⑥ and enter a string ⑦ (before the change)and a string ⑧ (after the change) in the respective boxes. Click the Exec button ⑨ to create a renamed file ⑩ (wsb00.dat) in folder ⑤.
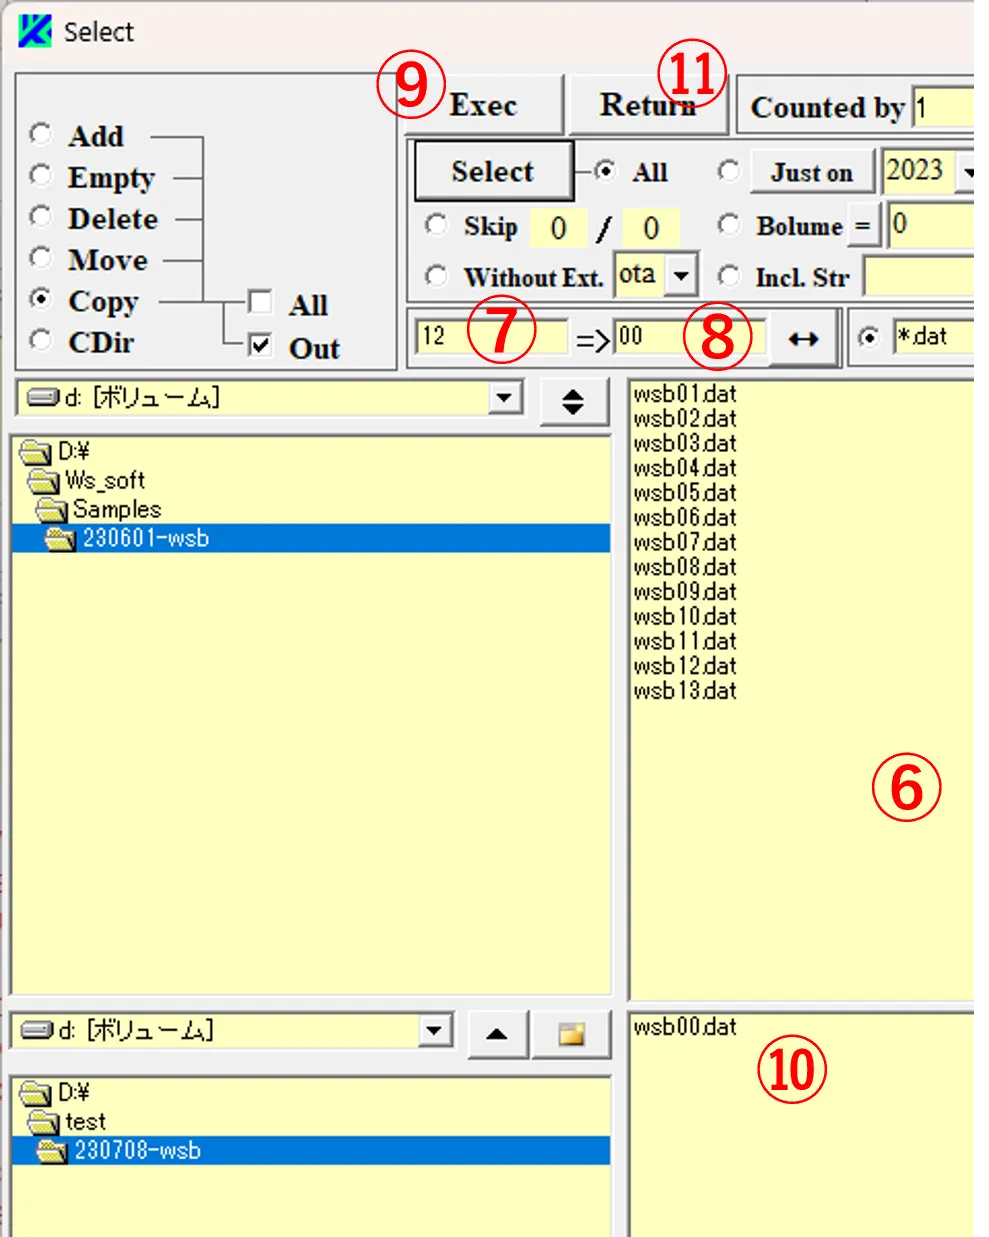
(3) Click the Return button ⑪ to return to the main window, specify the folder ⑫, click the A column box ⑭, select file ⑬ from the file list and list it on the box ⑭.

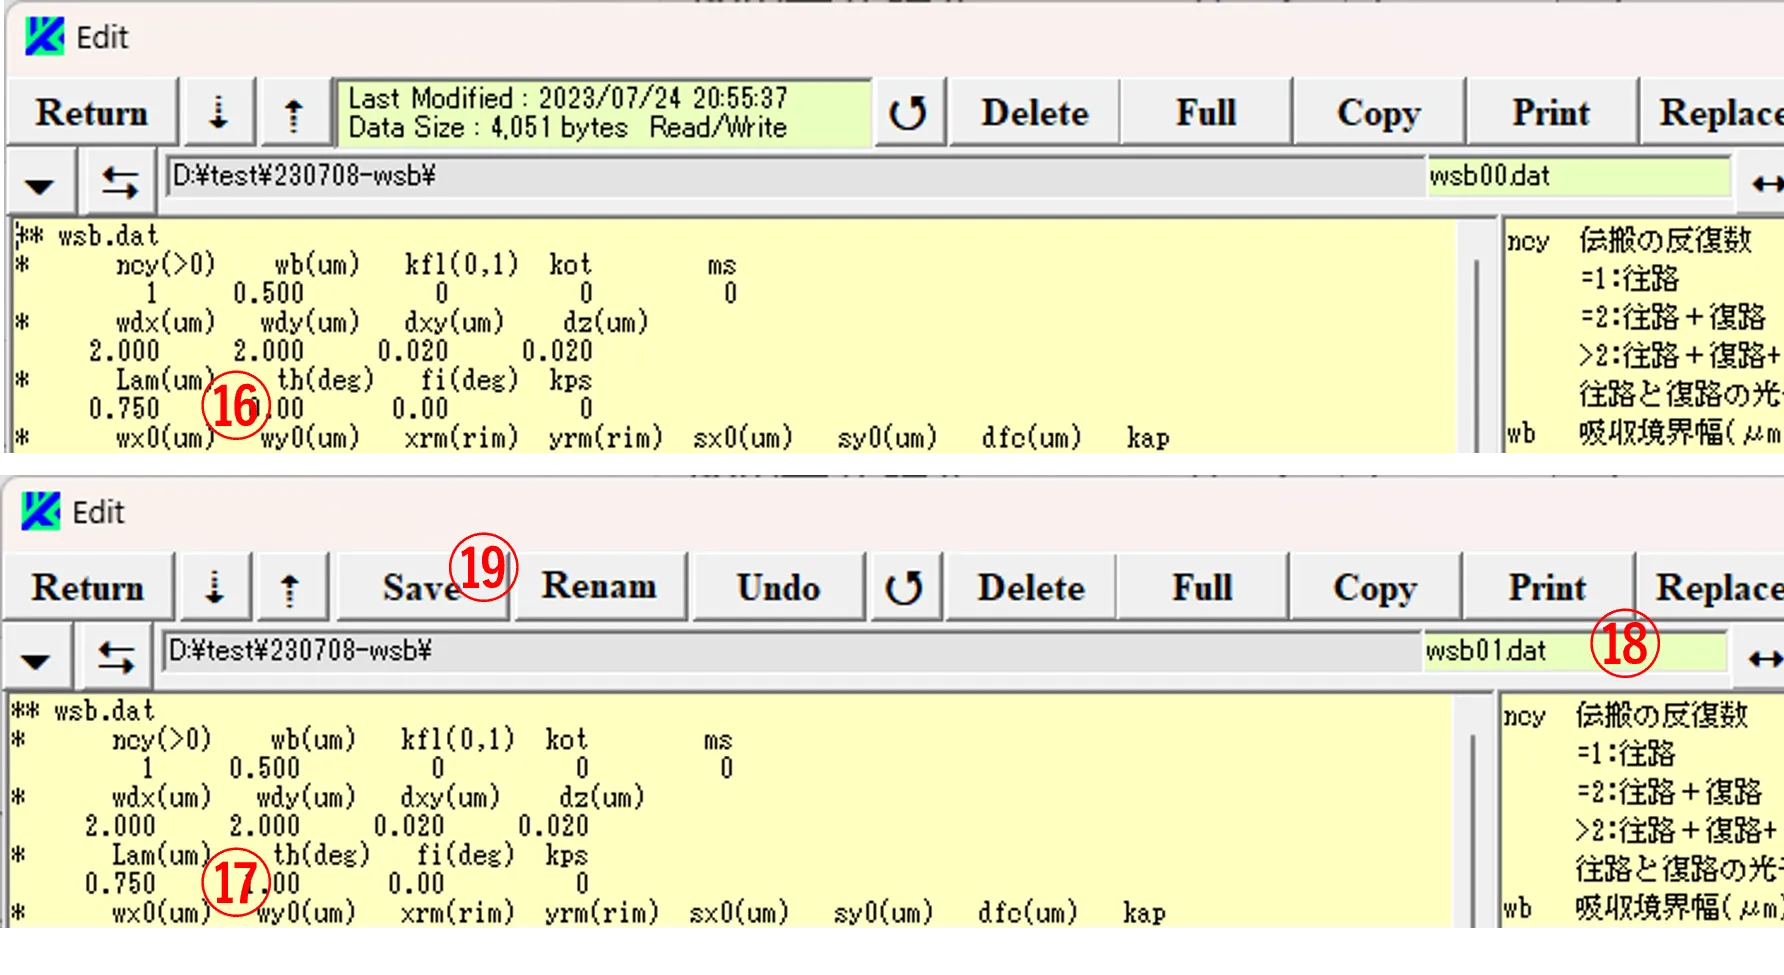
(4) Click the * button ⑮ to display the Edit window, change the value from ⑯ to ⑰, rename the file name from “wsb00.dat” to “wsb01.dat”, and click the Save button ⑲.
● Step 2
(5) Repeat the same procedure 9 times on the Edit window. Finally change the value to ①, change the file name to ②, click the Save button ③, click the Return button ④ to return to the main window, confirm that 10 files have been generated in t he list box ⑤, and click the Select button ⑥ to display the Select window ⑦.
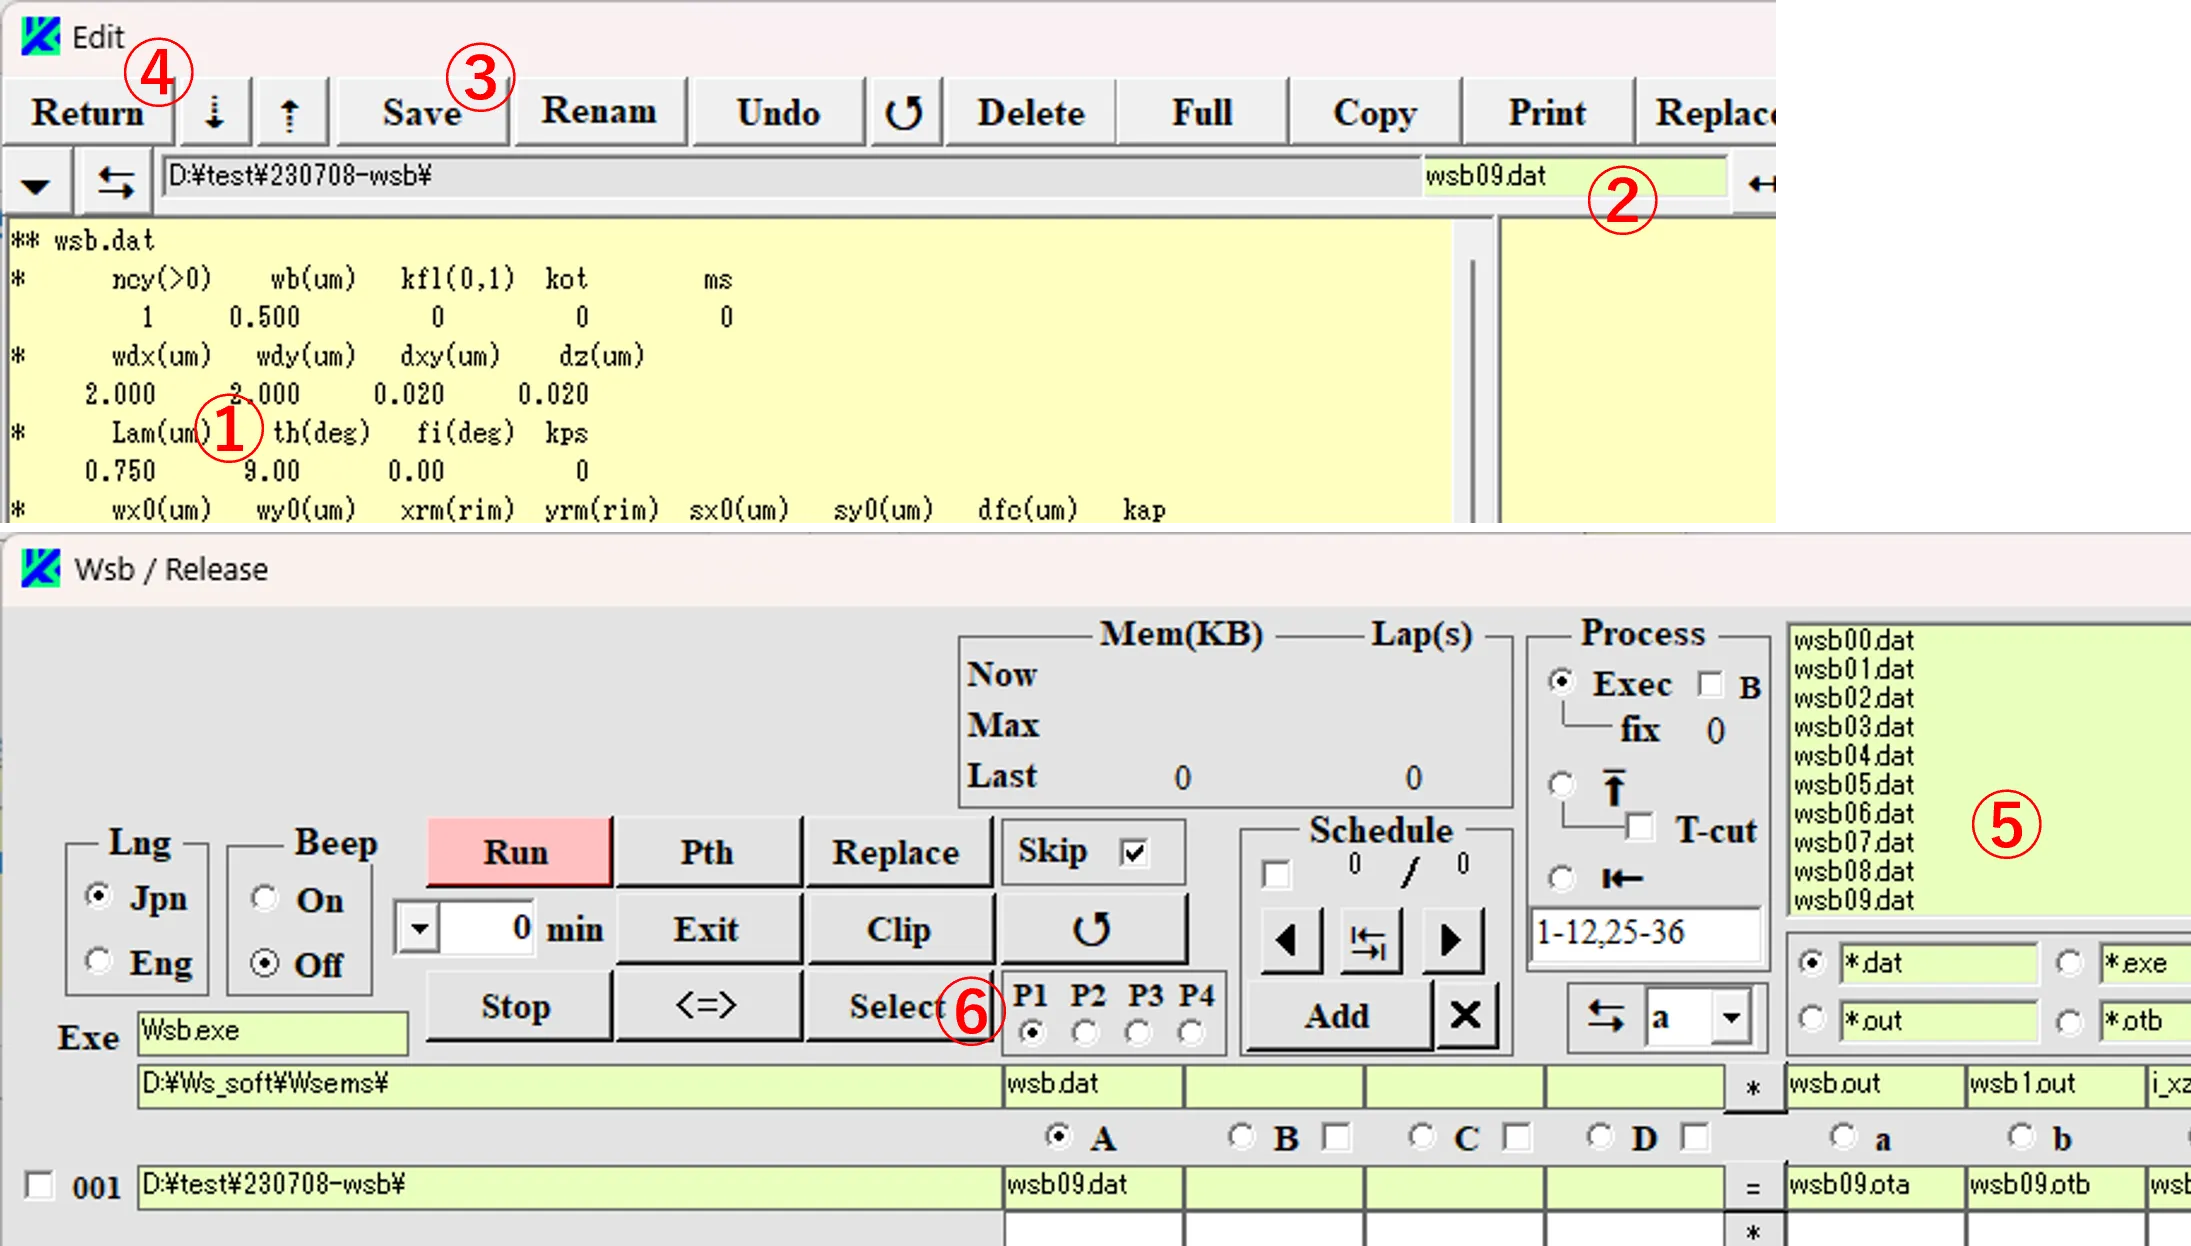
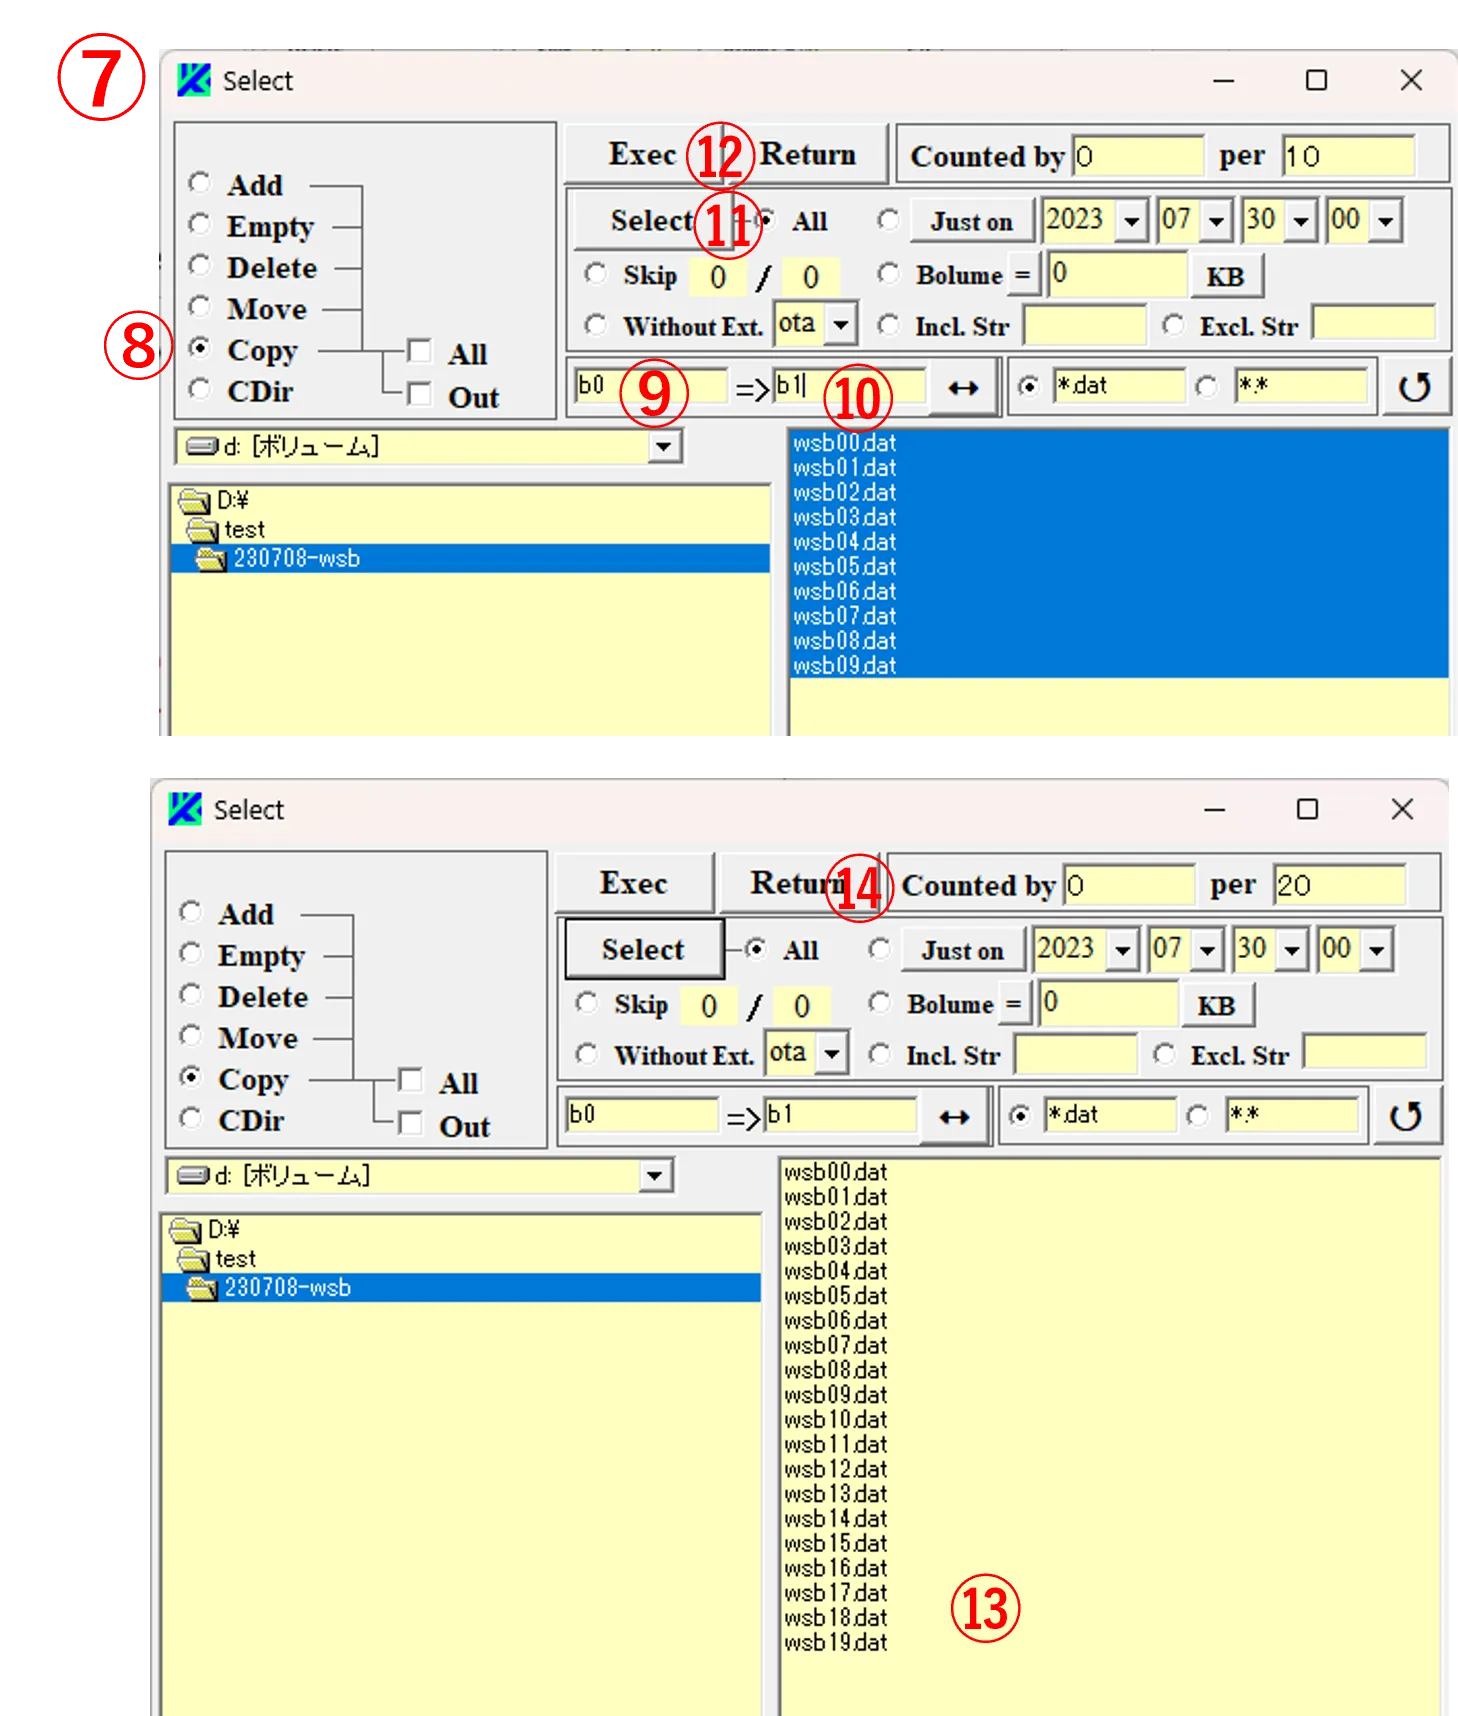
(6) Check the Copy button ⑧ on the Select window ⑦, and enter a string ⑨ (before the change)and a string ⑩ (after the change) in the respective boxes. Click the Select button ⑪ to specify all files, and click the Exec button ⑫ to add the renamed file ⑬ in the folder. In the box ⑩, change “b1” to “b2” or “b3”, and repeat the same procedure to generate files named as wsb00 - wsb39, and then click the Return button ⑭ to return to the main window.
● Step 3
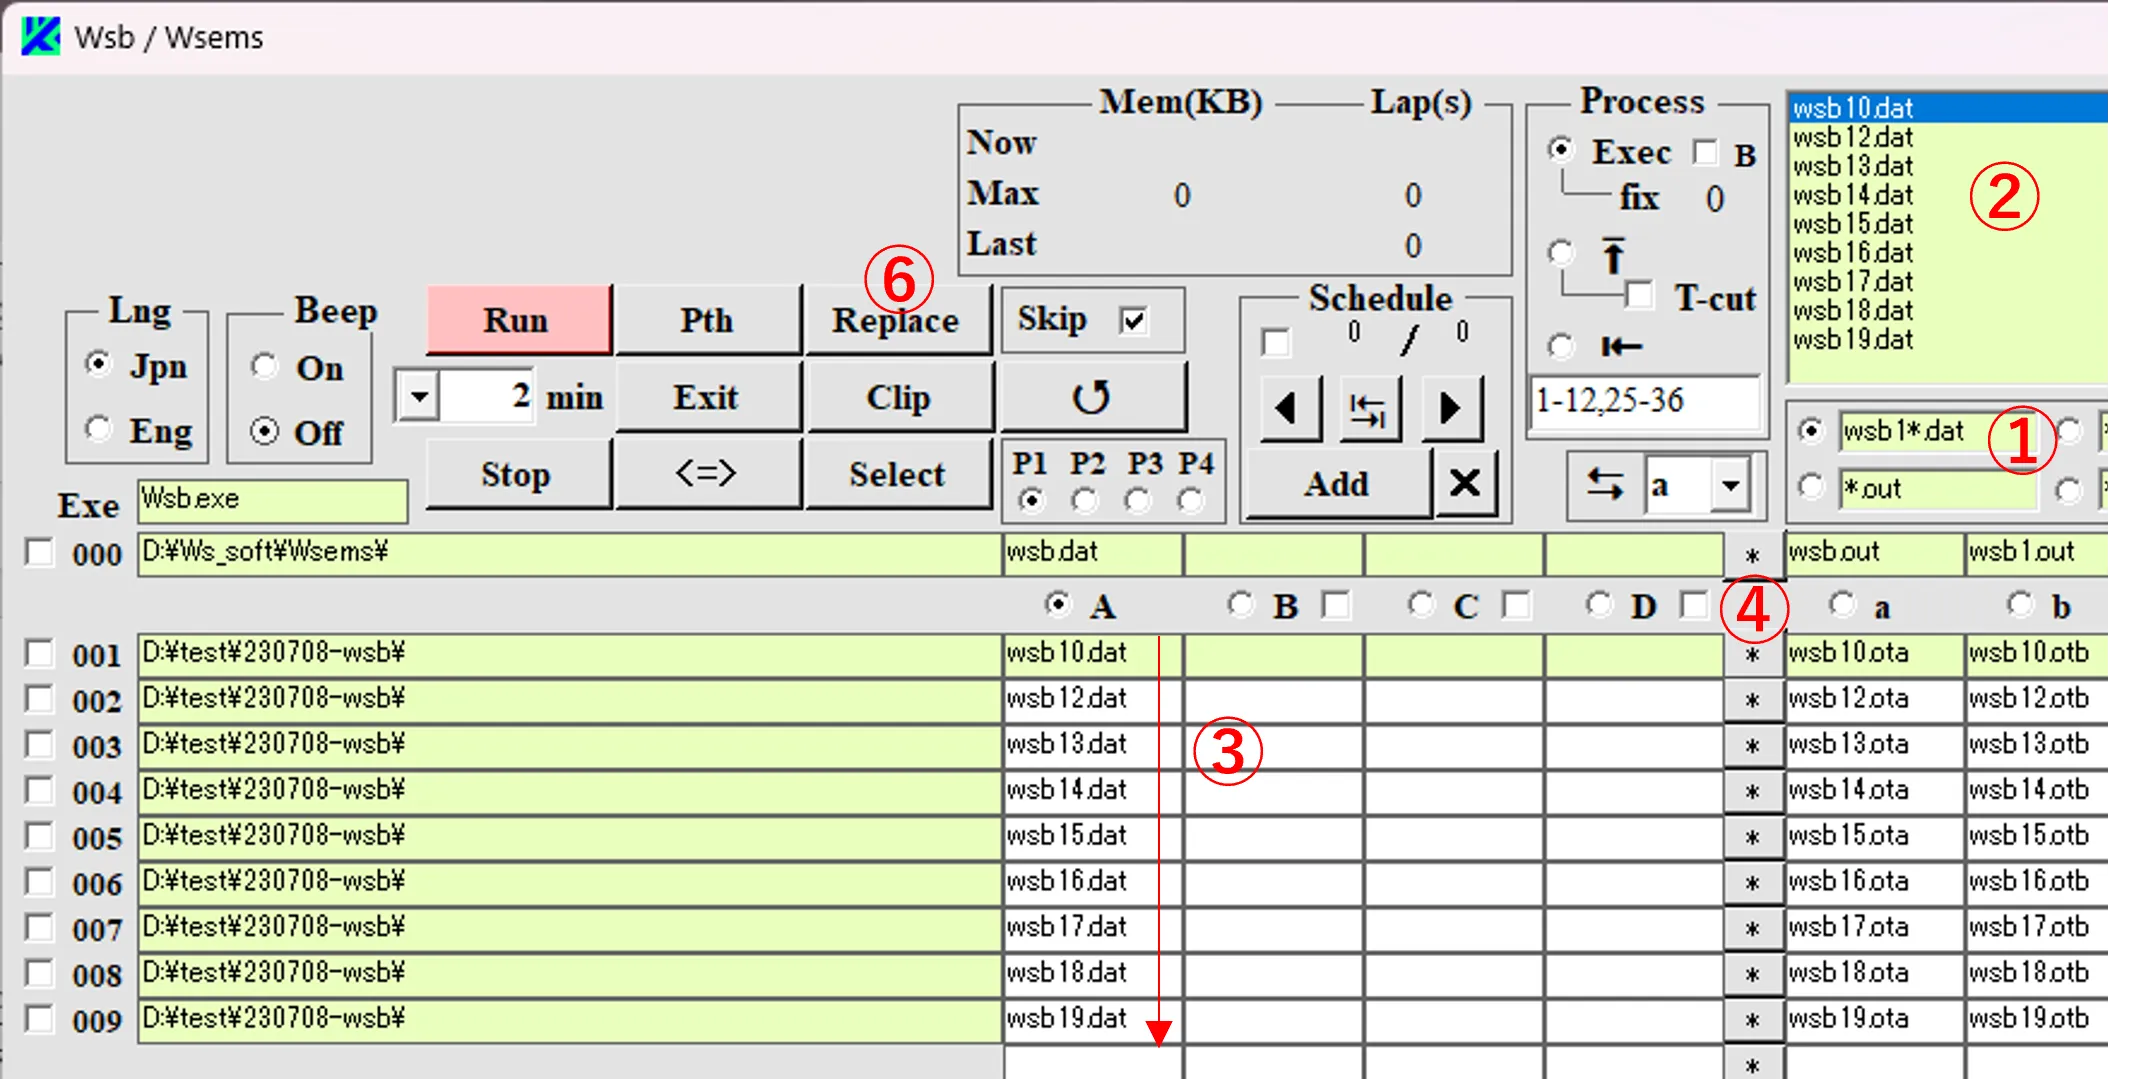
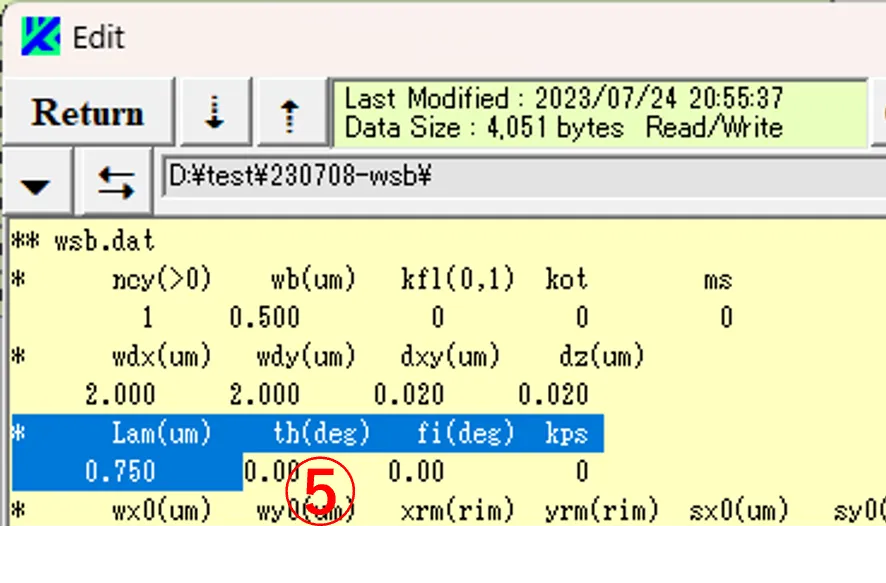
(7) On the main window, change the file pattern to ①, and list all files of the file list ② on column A boxes ③ (by clicking the top of column A box and press the Enter key). Click the * button ④ to display the file contents by the Edit window and specify the range highlighted in blue as shown in ⑤ and copy it. Click the Replace button ⑥ on the main window to display he Replace window and paste the copied one into the upper box ⑦ on the window.
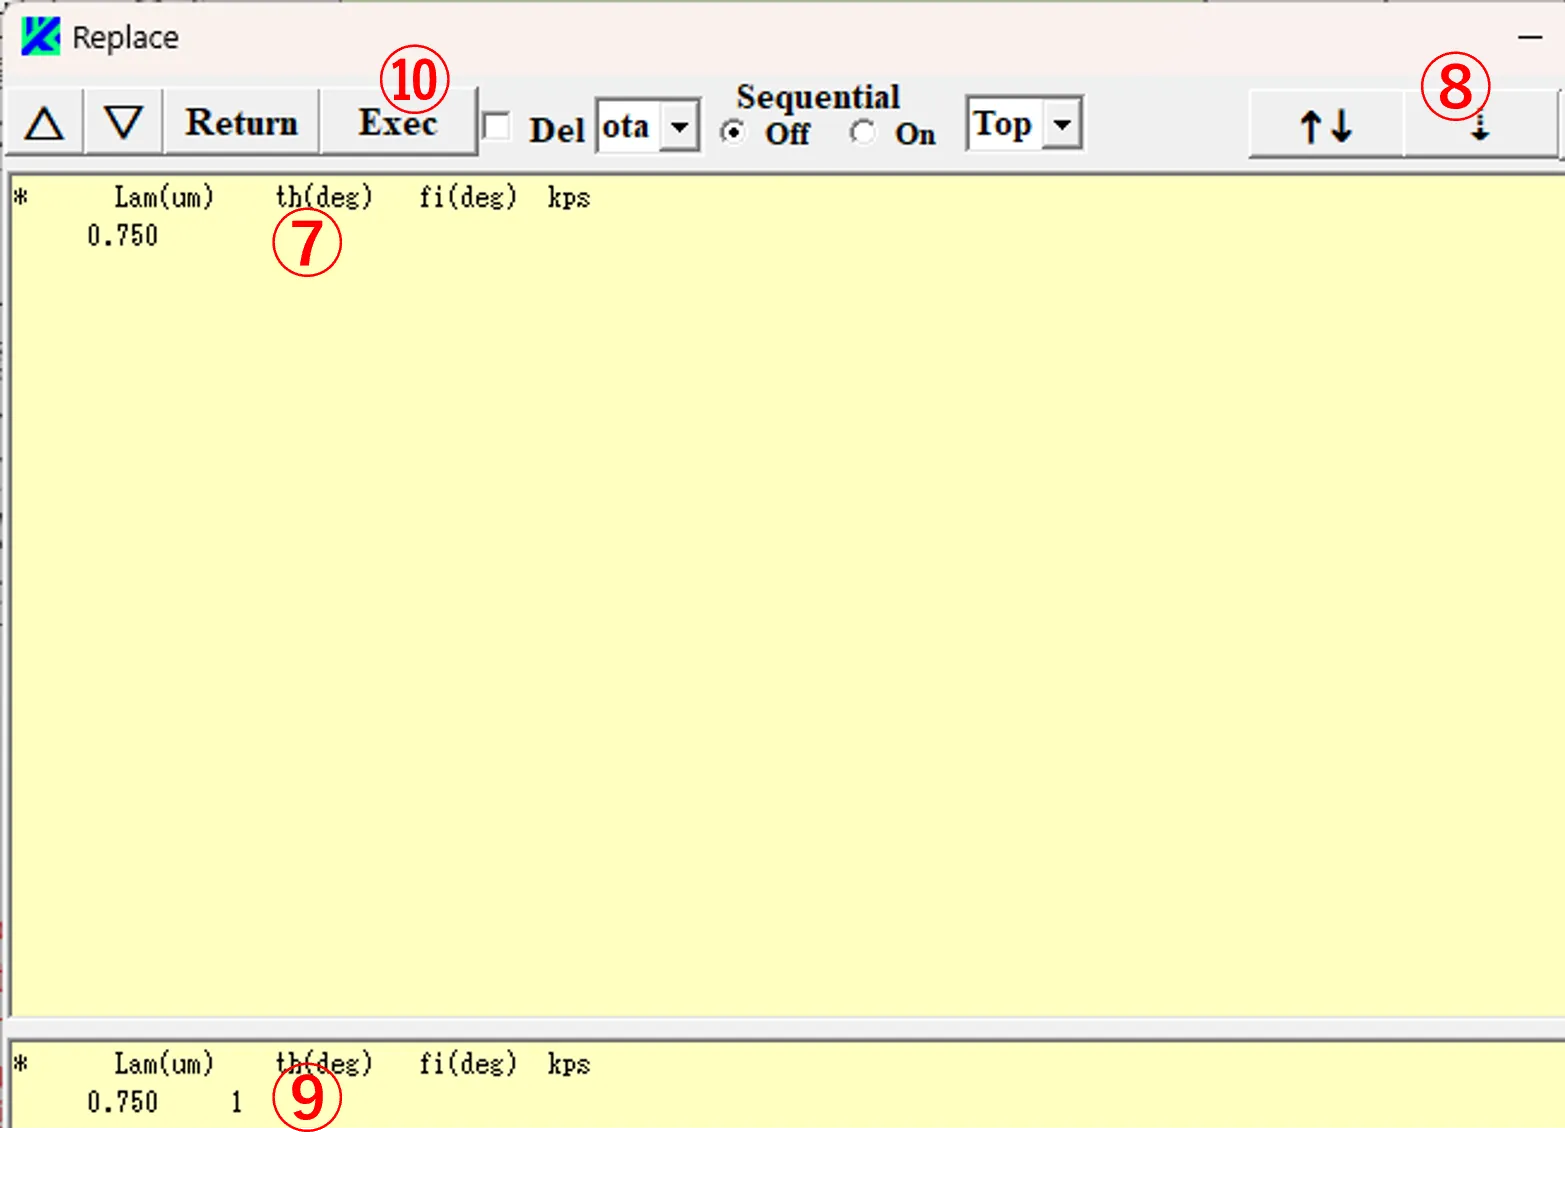
(8) Click the ↓ button ⑧ to copy the contents of the upper box into the lower box and then change the last column ⑨ of the lower box to 1. If you click the Exec button ⑩, contents (i.e., the values corresponding to angle th) for all files ③ listed on column A boxes of the main window, are converted as th becomes 10.0, 11.0, ‥, and 19.0. Change the label “1” of “wsb1” to the label “2” in file pattern ① and change the last column ⑨ of the lower box to 2. By repeating the same procedure, data from wsb00 to wsb39 where the angle parameter is changed can be generated.

(2) Press the * button ⑤ to display the Edit window ⑥.
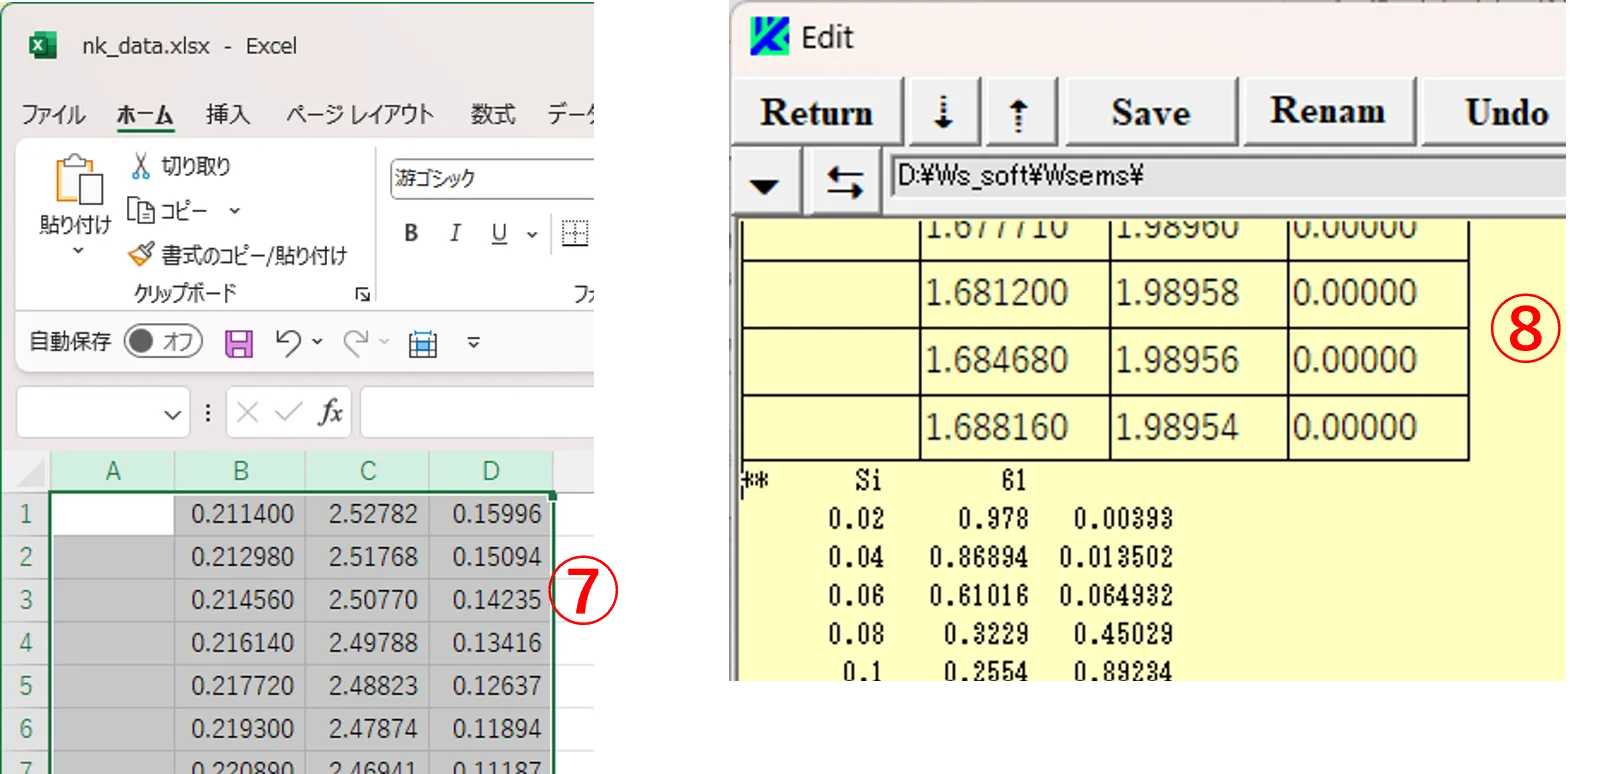
(3) Edit Cvs data (https://refractiveindex.info/?shelf=other&book=SiN&page=Vogt-2.13) by Excel. That is, insert an empty cell in the first column, set the second column (wavelength) to 6 digits after the decimal point, the third and fourth columns (n and k) to 5 digits after the decimal point, specify the range from 1st to 4th column as shown in ⑦, and paste it into the box on the Edit window as shown in ⑧.
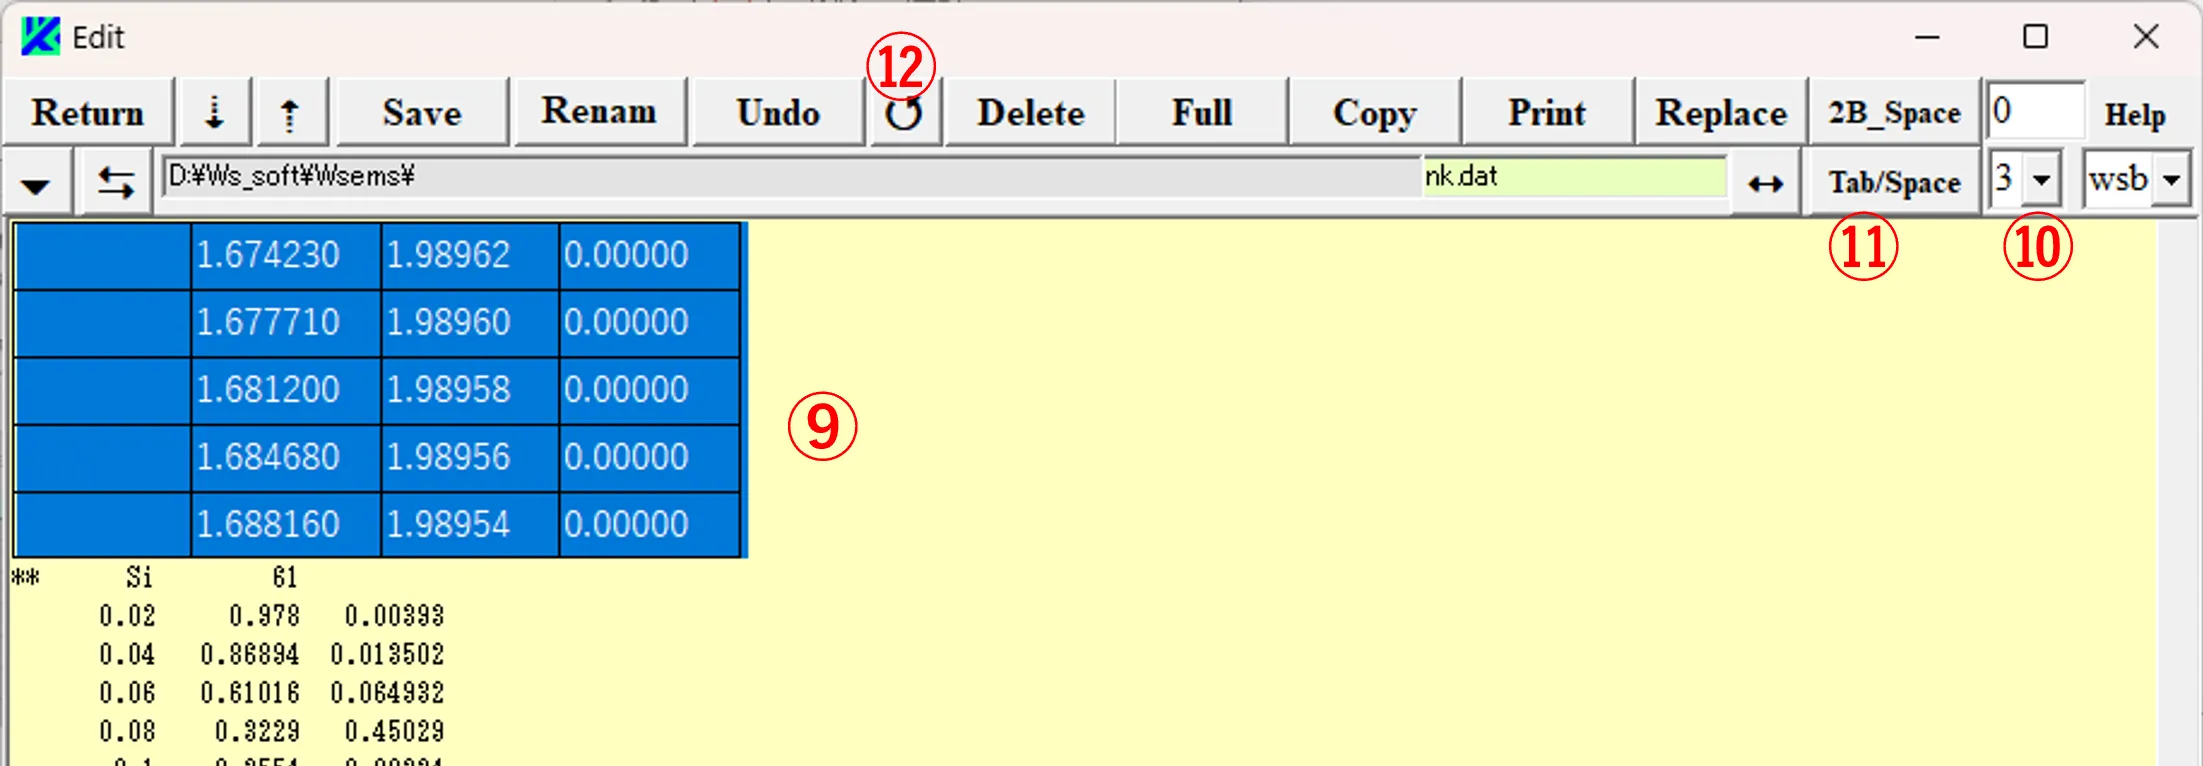
(4) Specify the pasted area ⑨ with a number m of lines to turn to blue-color reversal, and set the box ⑩ to 2, and click the Tab/Space button ⑪. After clicking the ↺ button ⑫ to reset Font, return to the first line of the pasted area.
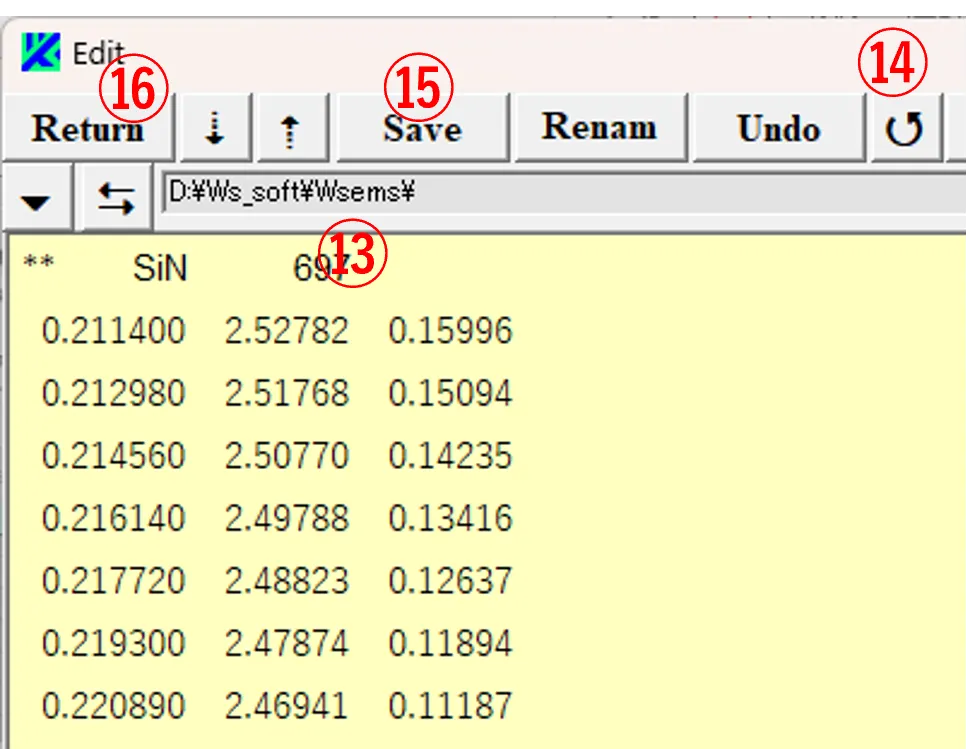
(5) Slightly modify a column position of the line and insert a line with the material name and the line number m ⑬ on the top of the line. Click the ↺ button ⑭ again to reset Font, confirm that the material name and the line number end at 10th and 20th column. Finally, click the Save button ⑮ and Return button ⑯ to complete addition to nk.dat.
(1) If there is a mistake in the input data, by clicking the ↺ button ① after the calculation is completed, an empty output file may be displayed with a blue-color text as shown in ②. The empty file has a file size of zero, but the file exists, so if the Skip box ③ is checked, the calculation is skipped when it starts by clicking the Run button ④. If there are only a few empty files, you can delete them individually and press the Run button ④, but if there are many, it is troublesome. In this case, the solution is as follows. Click the Select button ⑤ to open the Select window.
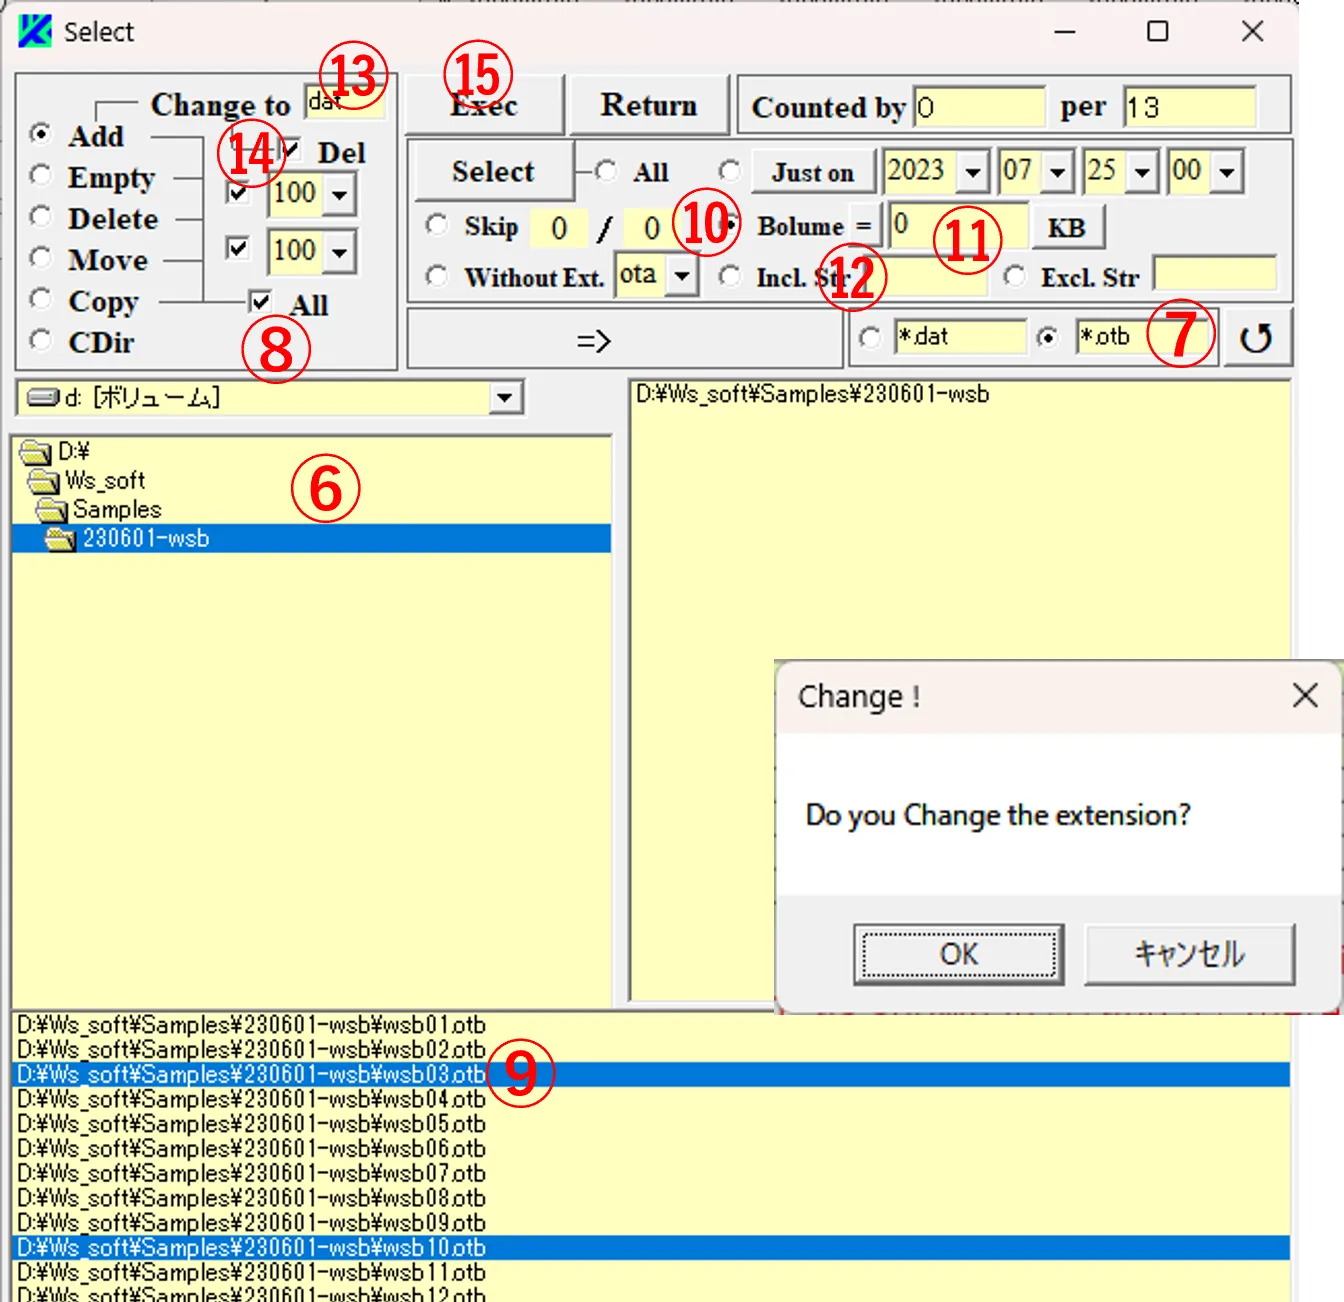
(2) Select the folder ⑥ where the calculation was performed, set the file pattern ⑦ for the empty files, and check the All box ⑧ to list all corresponding files on the lower box ⑨. If the “Bolume” button ⑩ is checked, box ⑪ is set to 0, and button ⑫ is set to =, only the empty files are displayed with color reversal in the lower box ⑨. Type “dat” in box ⑬, check the Del box ⑭, and click the Exec button ⑮.
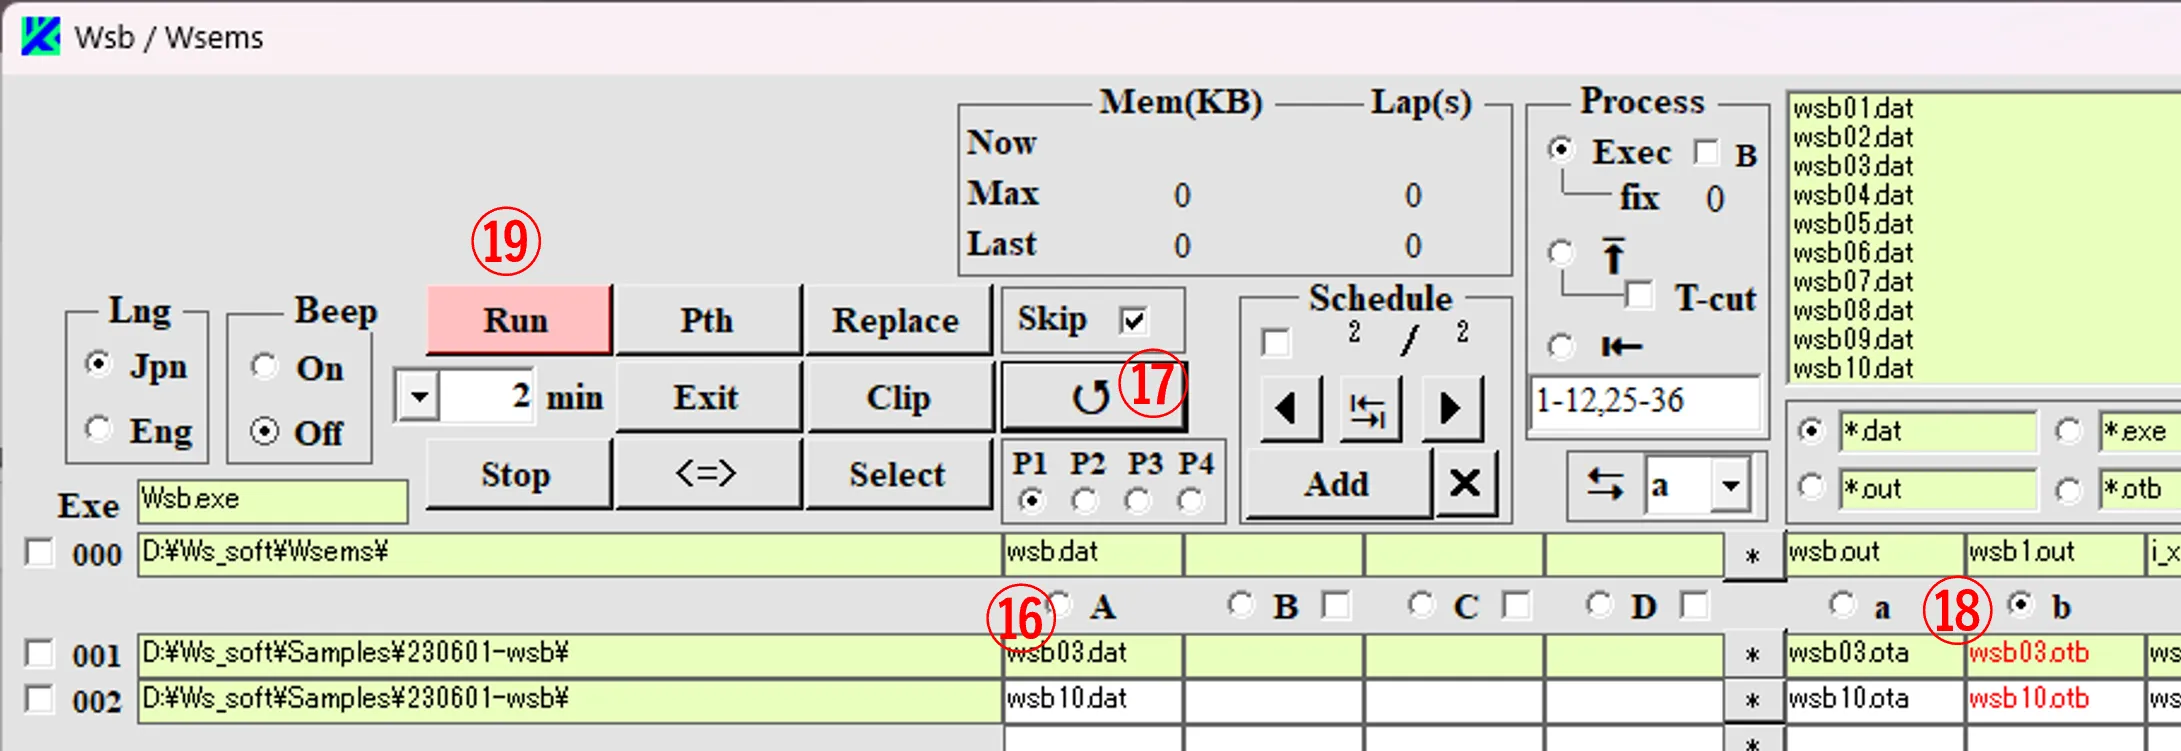
(3) A new Schedule is added on the main window, and files ⑯ whose extension “otb” for the color-reversed files ⑨ is changed to “dat” are lined on the input boxes of column A. By clicking the ↺ button ⑰, it can be confirmed that the original empty files ⑱ are deleted and displayed in red text. Therefore, by clicking the Run button ⑲, only the incorrectly calculated files can be recalculated.
● In the case of execute miscalculations
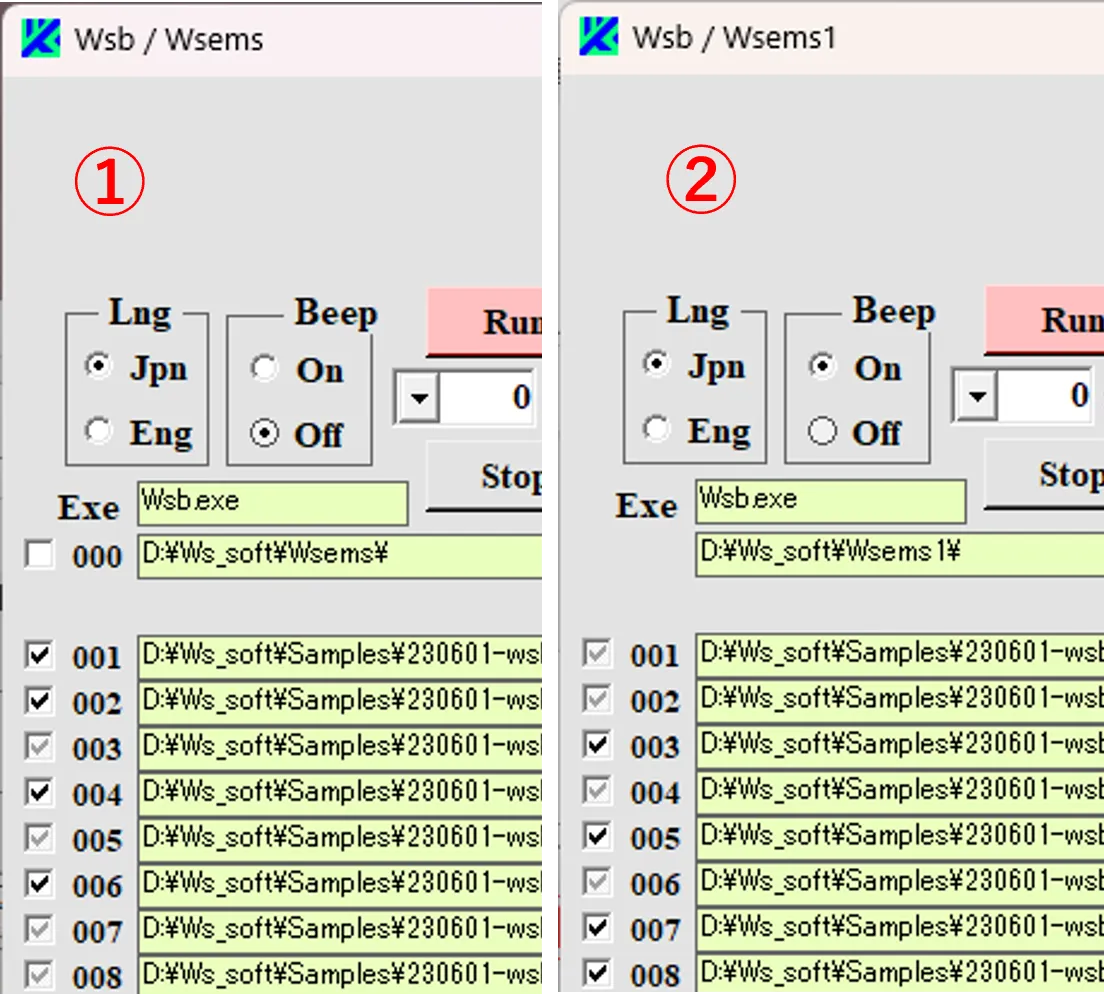
(4) After completing the parallel calculations shared by wsbch and wsbch1 as shown in ① and ②, there may be a case that only the results calculated by wsbch1 should be recalculated due to a setting error (e.g., the inadequacy of sub.dat or nk.dat, etc.) on the wsbch1 side.
(5) In this case, open the Select window, click the Select button ⑤ to specify the files ④ of the file pattern "oth" in the folder ③ where the calculation results were stored, and click the Exec button ⑥ to display the caution window ⑦.
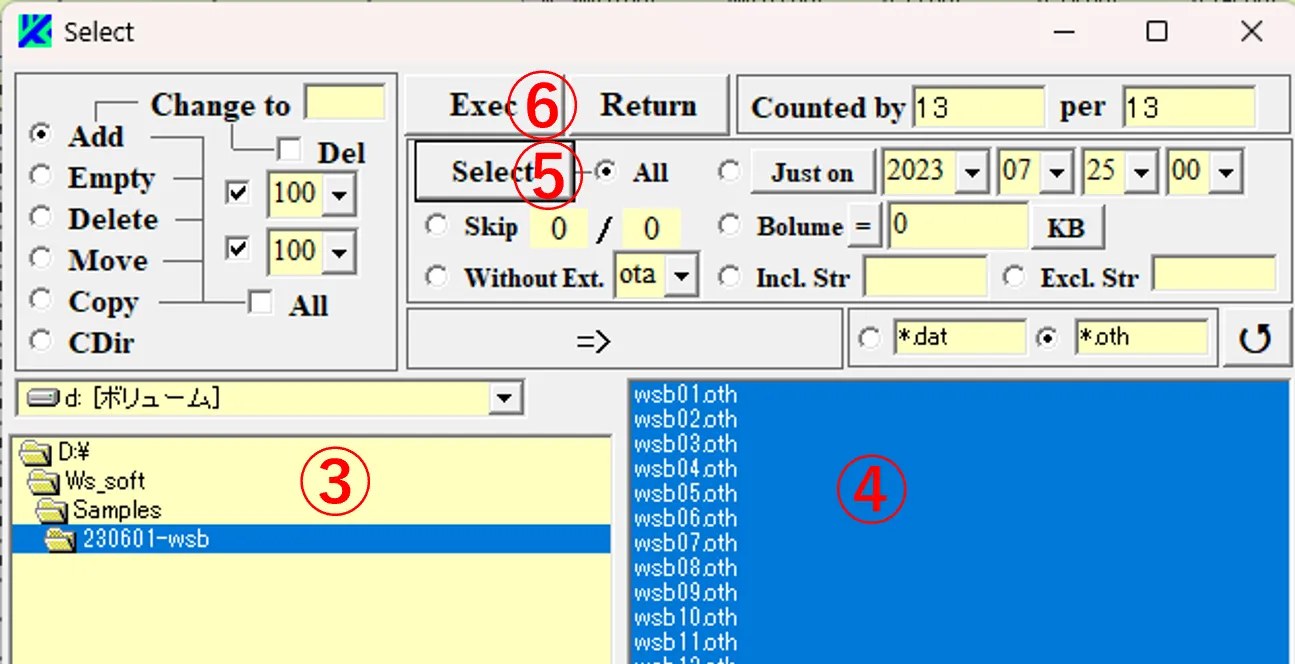
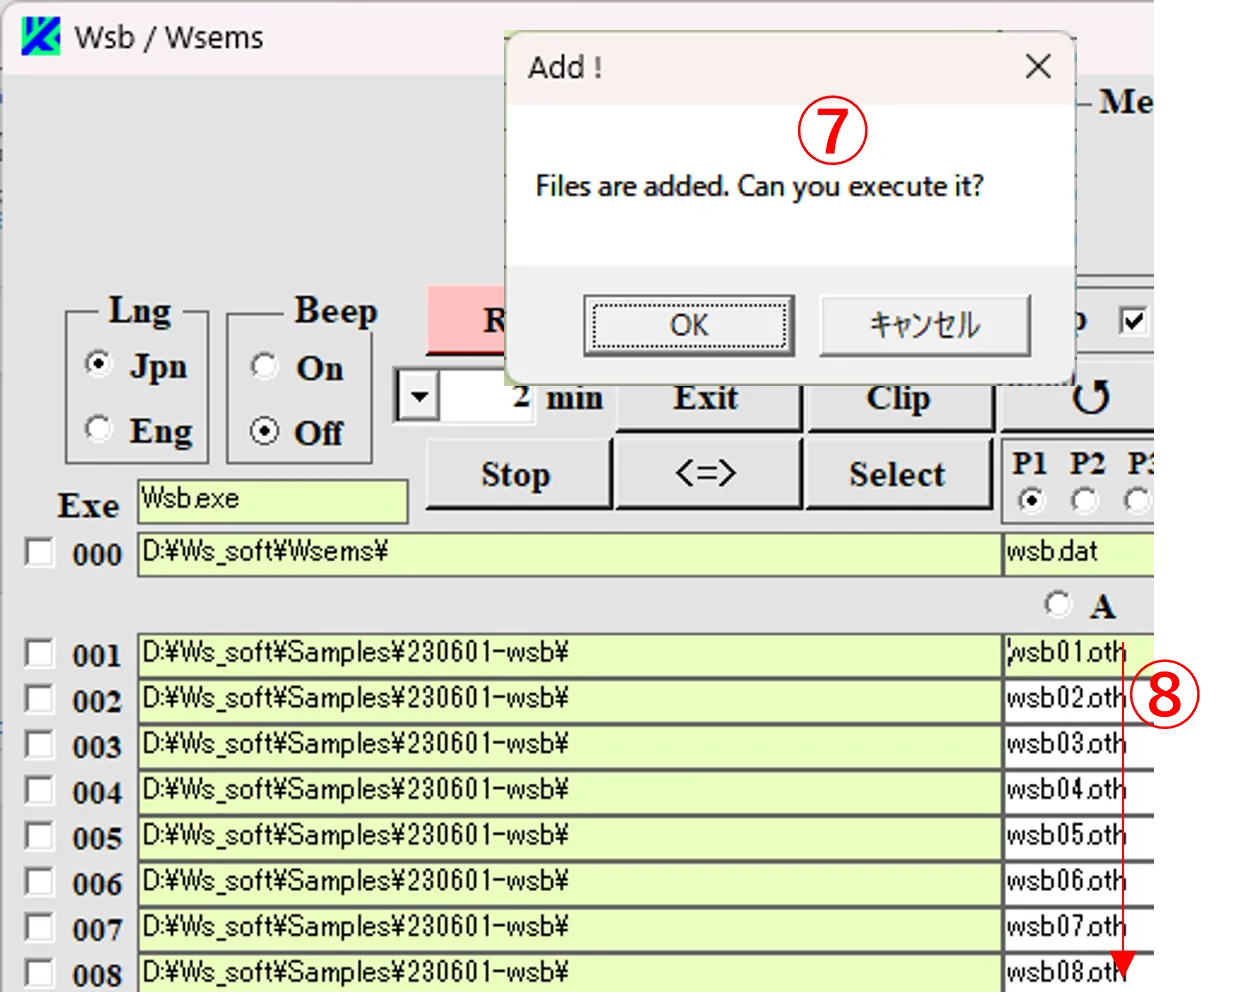
(6) By clicking Yes button there, the files of extension “oth” are listed on the A column input boxes ⑧ of the main window.
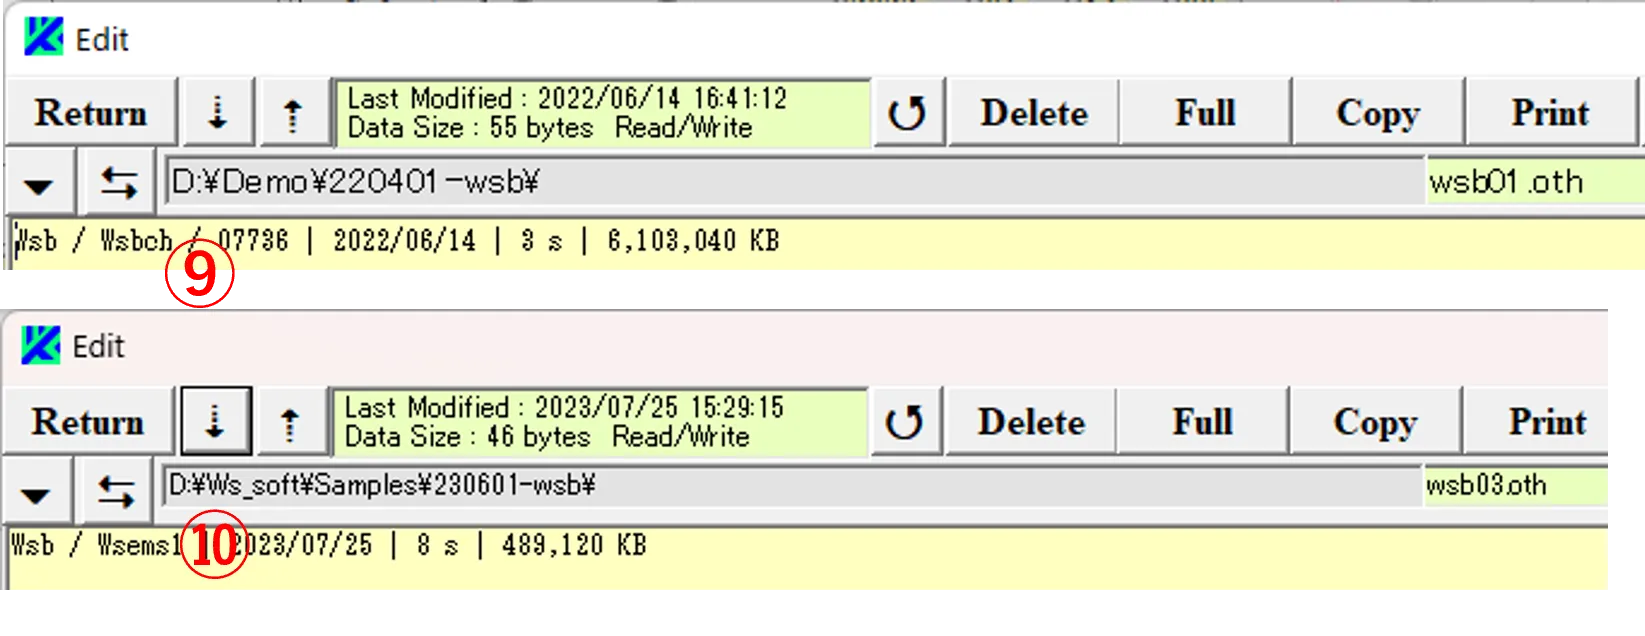
(7) The files of extension "oth" contain contents of title bar of wsbch.exe, creation date, computing time, and memory consumption, as shown in the Edit windows ⑨ and ⑩, and they also contain the folder information where wsbch.exe is stored.
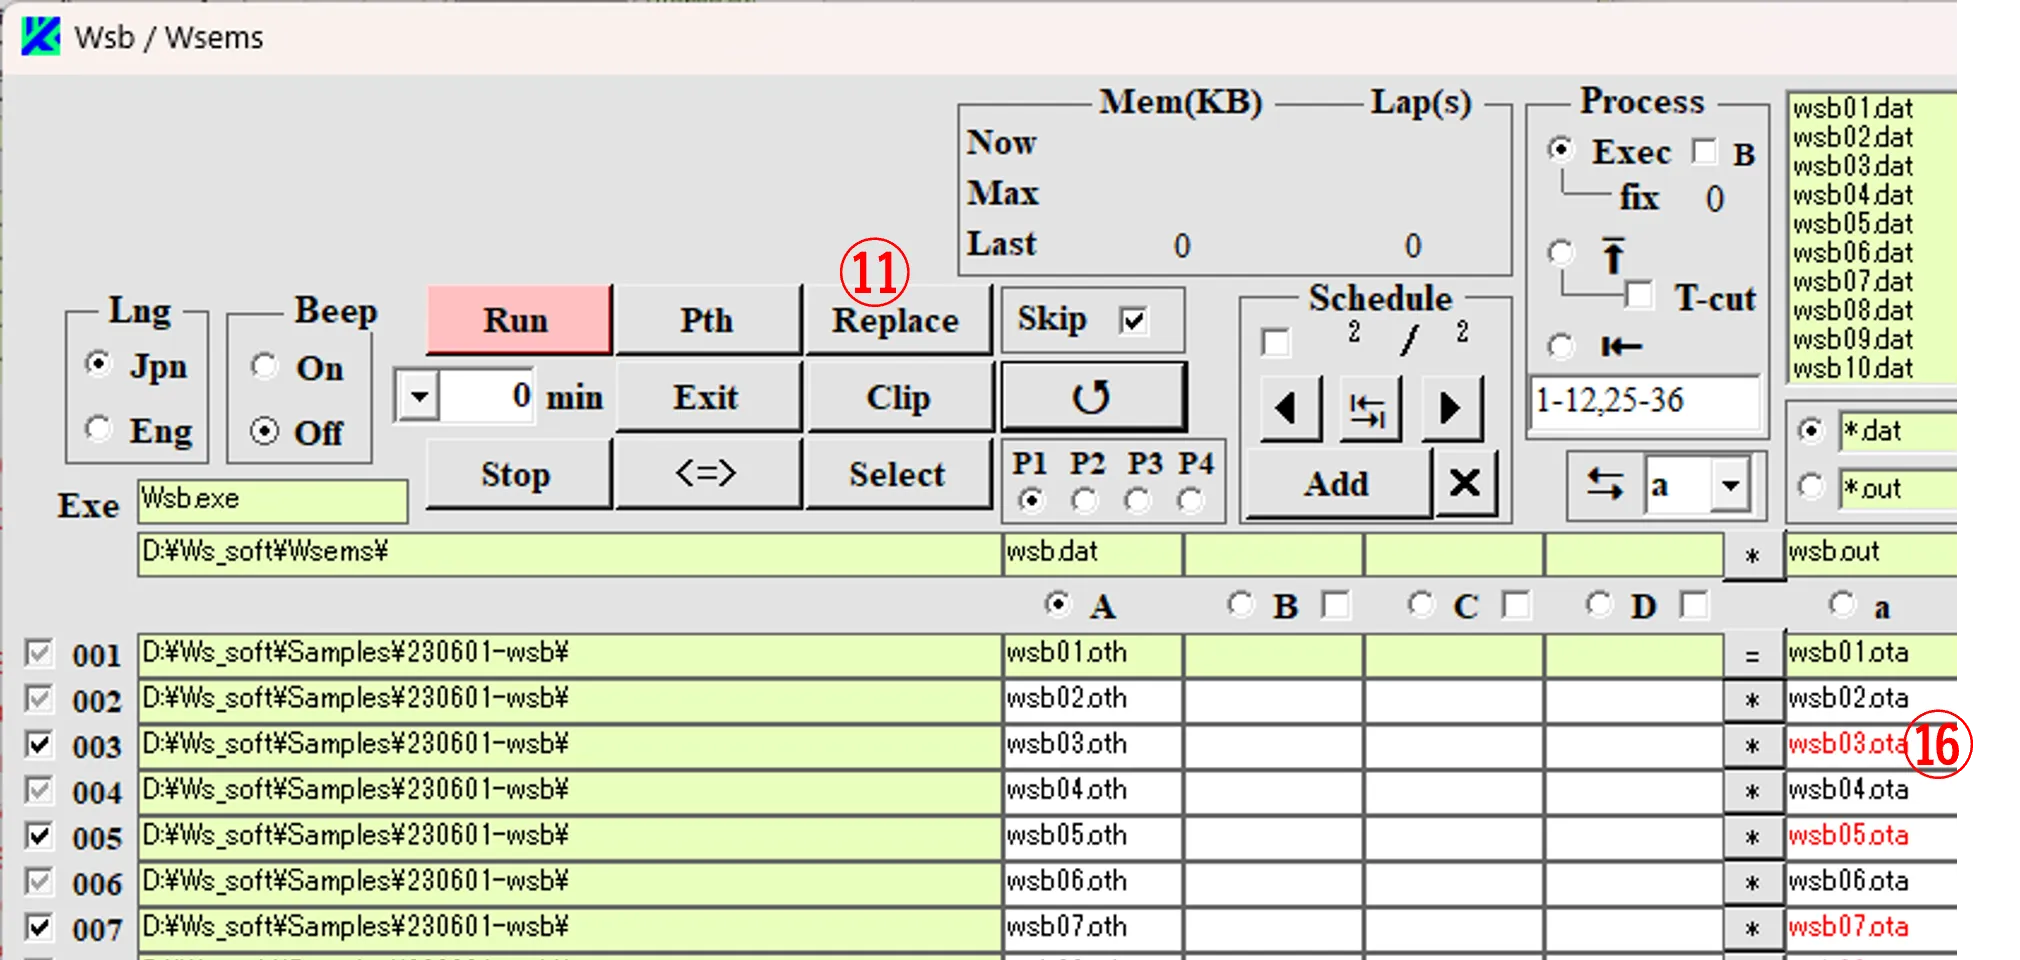
(8) Therefore, click the Replace button ⑪ to display the Replace window, check the Del box ⑫, enter the strings ⑬ and ⑭ in the upper and lower boxes. By clicking the Exec button ⑮, the files of extension "ota“ which were performed by wsbch1 are deleted in the main window as shown in ⑯. After that, correct the setting errors and go back to the parallel calculation of ① and ②, and only the deleted files will be recalculated.
(2) When parallel calculations are performed by specifying Wsbch.exe in the same folder, each calculation is interrupted and may move on to the next without waiting for calculating termination. The Wsbch.exe used in parallel calculations should be stored in a different folder.
(3) When multiple Wsbch are launched for parallel computation, if the CPU or memory utilization exceeds 100% for an extended period, the computation may be interrupted and moved to the next without waiting for calculating termination.
(4) Note that if the file lines exceed 2000 on the Edit window and it hadn’t been for pressing the Full button, the edited file is saved under the line limit.
(5) If files such as *.ota are listed on the A input column and the Run button is click by mistake, the file names in the output file boxes are rewritten as *x.ota to prevent overwriting.
(6) When Wsbch.exe is performed, Wsbch.cpn is generated in the same folder as wsbch.exe and it contains information about the title bar of Wsbch.
● 2. Starting Calculation
● 3. Performing and Completing Calculations
● 4. Serial calculation
● 5. Edit window
● 6. Edit Replace window (Replacing in file)
● 7. Replace window (Cross-file replacement)
● 8. Adding files using the Select window
● 9. Deleting files using the Select window
● 10. Renaming files using the Select window
● 11. Copying files using the Select window
● 12. Renaming a folder using the Select window
● 13. Reproducting past execution formats using the Path window
● 14. Duplicating executable format using the Clip button
● 15. Concatenating files using the Process box
● 16. Shortcut operation
● 17. How to input auxiliary data
● 18. Creating 40 data with an angle parameter from wsb12.dat
● 19. Converting CSV data and adding to nk.dat
● 20. How to deal with miscalculations
● 21. Precautions
Performs serial calculation of the executable files based on multiple input data and edits the input and output data. Normally, it is automatically started and configured by Wsems, but here we will explain how to operate it manually.
1. Executable file and I/O files settings ▲top
(1) ¥Click Wsbch.exe in the Wsems folder to display the main window ① (if there is no registered USB, a caution window ② appears, and there press OK button). Select the drive and directory ③ where Wsb.exe is stored. Edit the file pattern ④ to *.exe and select it (“*” or “?” is a wild card for arbitrary characters or a single character). Click Exe box ⑤ and select Exe file ⑥ (Wsb.exe) in the file list box to fill Exe box ⑤ and Exe path box ⑦.
(2) Click A in the Exe input file box ⑧ and type an input file name (wsb.dat). Click the Exe output file boxes a - g respectively, and type in the necessary output file name (e.g., wsb.out) as shown in ⑨ - ⑮. The paths of Exe input/output files are the same as the Exe file path ⑦.
(Note) : If not registered, Exe file ⑤ is limited to Wsb.exe, Wsf.exe, Wsr.exe, Amp.exe, and Cvt.exe; otherwise, the caution window ⑯ appears and a force-quit occurs.

2. Starting Calculation ▲top
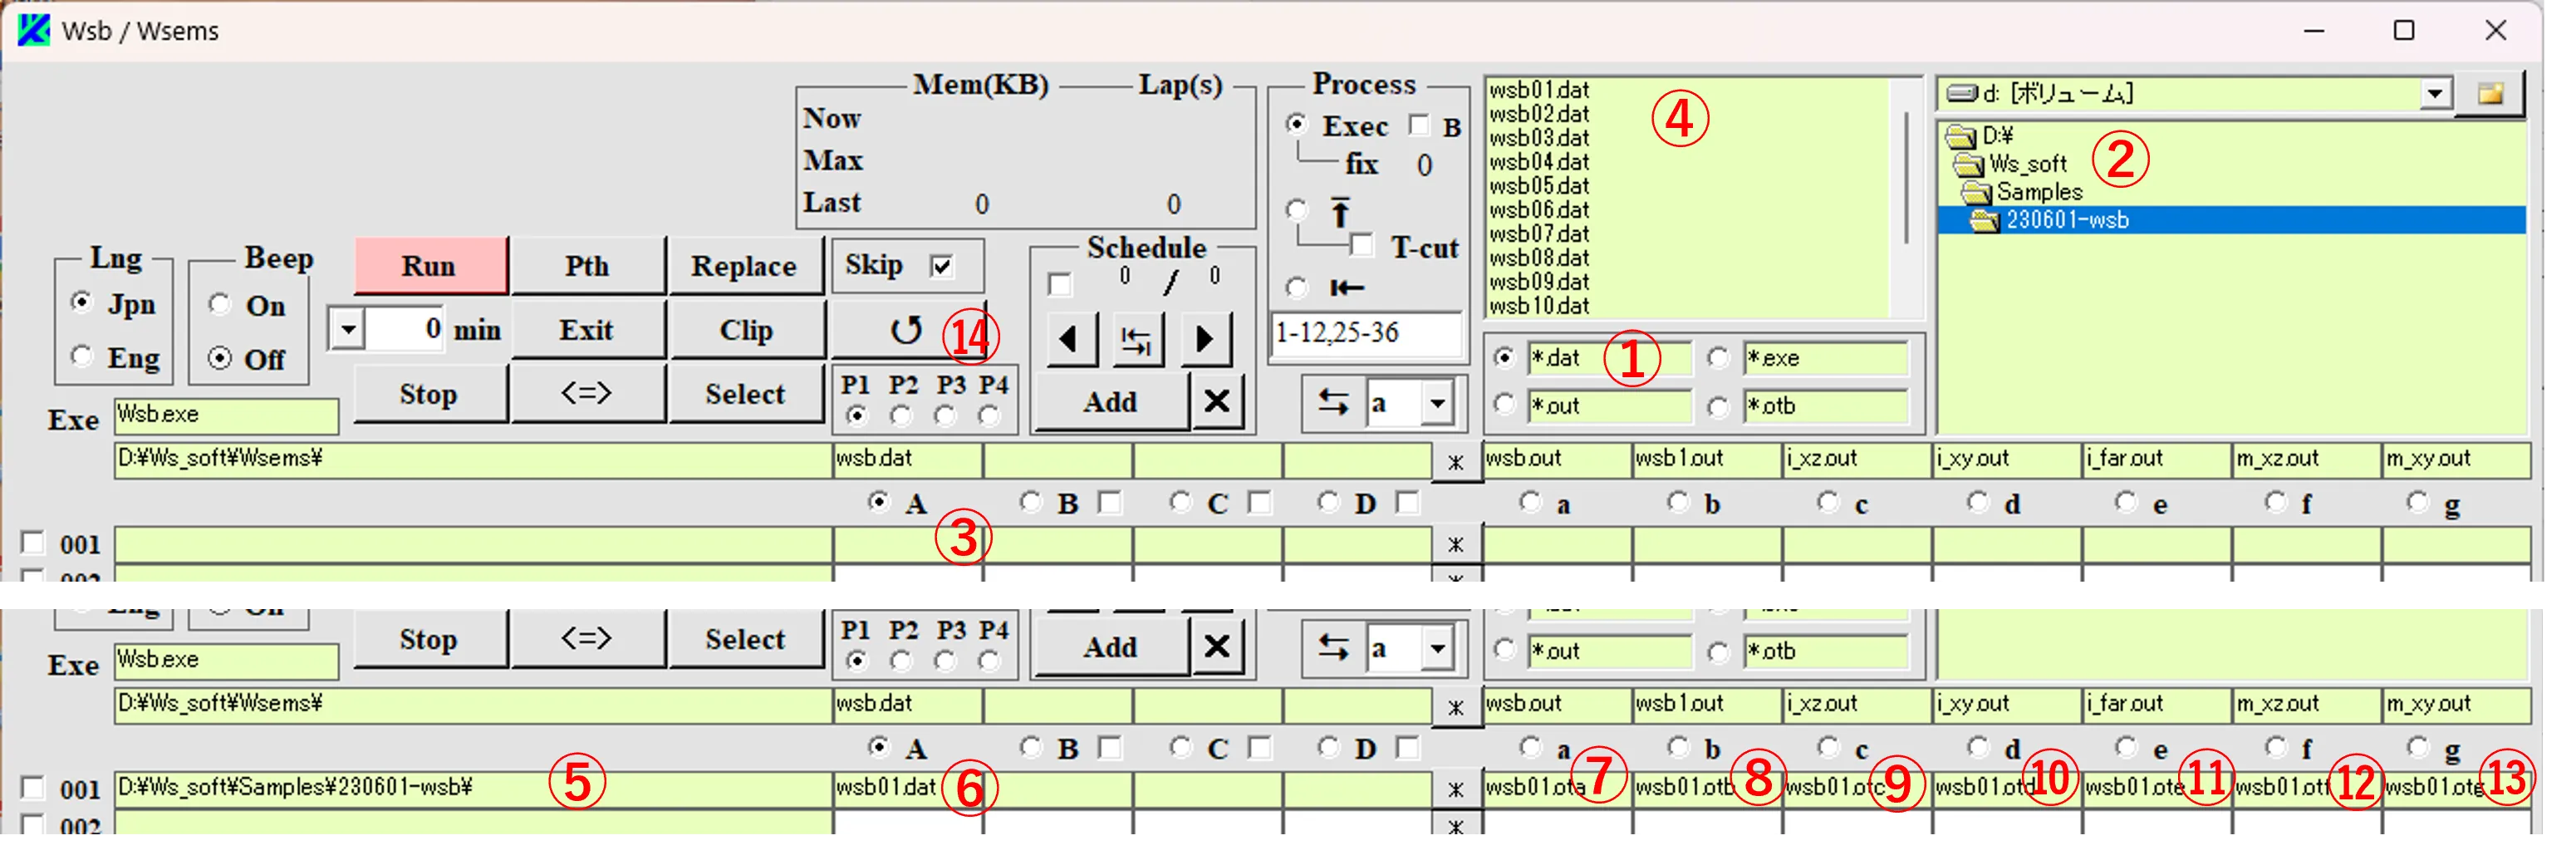
(1) Fill “*.dat” in the file pattern ① and select it. Select the drive and directory ② where the calculation files are stored. Click the box ③ in column A of the input file and select one ④ in the file list, and the path box ⑤ and file box ⑥ are filled with the same path and name. At the same time, output file boxes a - g on the same row are automatically filled with the same file name and the extension ota - otg as shown in ⑦ - ⑬. If an Exe output file box is blank, output file boxes of the same column also become blank. Their paths are the same as in ⑤, and whether the files exist or not can be checked by clicking the ↺ button ⑭ (i.e., the label color becomes black if the file exists, blue if it exists but is empty, and red if it does not exist).
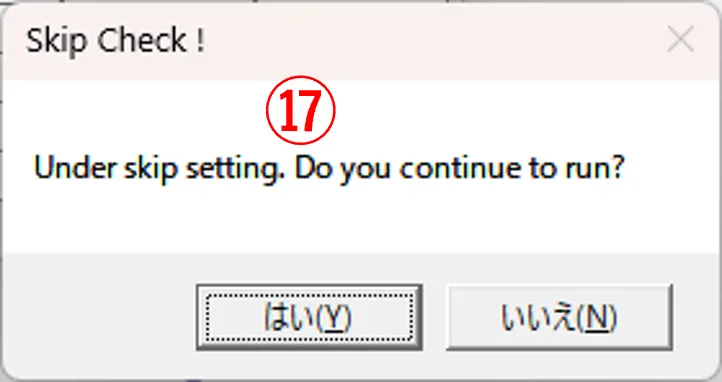
(2) If the Skip box ⑮ is not checked, clicking the Run button ⑯ performs the calculation unconditionally. If checked, the caution window ⑰ appears. If Yes is selected, the calculation begins, and if all files in the output boxes a – g are existing, the calculation skips to the next line. If No is selected, the calculation is canceled. If you want to leave some time before the calculation starts, you can set a waiting time in minutes in ⑱, and if not set, an elapsed time from the calculation start is displayed there. In the calculation flow, the input file (wsb01.dat, etc.) is copied ⑲ to the Exe input file (wsf.dat) in the Exe folder, and the Exe output files (wsb.out etc.) generated by the execution of the exe file (wsb.exe) in the same folder are copied ⑳ to the output files (wsb01.ota etc.) in the output file box. Button ㉑ is for selecting whether the caution windows etc. are in Japanese or English, and button ㉒ is for whether or not a beep sound is emitted at the completion of each calculation.


3. Performing and Completing Calculations ▲top
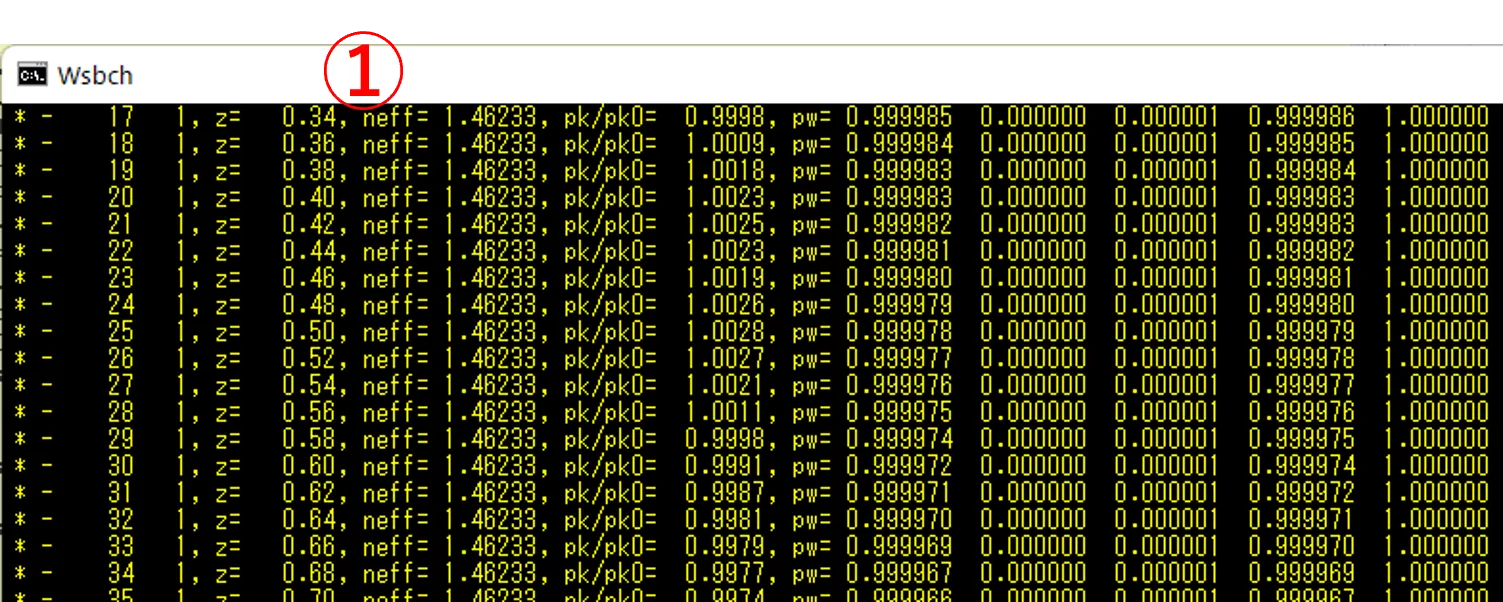
(1) When a calculation starts, the DOS window ① appears and buttons ② such as Run button temporarily disappear to prevent duplicate operations. If you want to prevent a bust state due to opening windows, you can hide the Dos window by checking the box B ⓪ in Process box. The elapsed time and memory consumption for the currently performed calculation are shown in ③ and ④, and the calculation time and maximum memory consumption for the previous calculation are shown in ⑤ and ⑥. The maximum calculation time and maximum memory consumption from the beginning of calculation to the current calculation are listed up in ⑦ and ⑧.
The DOS window can be set up by left-clicking the icon on the left end of the title bar and by operating the getting pop-up menu.

(2) When a calculation is completed, the DOS window ① disappears, and after the box ⑨ is checked, the next row calculation begins. When all calculations are completed, the Run button and other buttons appear as they used to be. Under calculations, clicking the Stop button ⑩ forces termination of the calculating operations. If the DOS window remains, pressing Ctrl & C on the DOS window closes the DOS window. After the calculation is finished, click the ↺ button ⑪ to check the output status. Files whose data get dumped are listed by black color ⑫ and files whose data are empty are by blue color ⑬ (since wsb01.dat is the contents for a 2-D calculation, data for the 3-D output (i_xy.out) becomes empty).

By the way, if the Run button ② is clicked again in this state, box ⑮ is checked in gray and the calculation is moved to the lower line because the Skip box ⑭ is checked. If you want to perform the calculation for the current line, take the checkmark of Skip box off before starting the calculation or delete one of the output files like *.ota by clicking the * button ⑯ to open an Edit window and by clicking the Delete button there).

4. Serial calculation ▲top
● Step 1(1) Click the input file box ① in column A and select one of the files ② (wsb01.dat) in the file list to fill the path box ③ and file box ①. Next, click the box ④ in column A and select the next file ⑤ (wsb02.dat) (or double-click the box④) to fill the path box ⑥ and file box④. If the Run button ⑦ is clicked, the calculation is performed and boxes ⑧ and ⑨ are checked in the order of calculating completion. The elapsed time since the Run button was clicked and the number of files that have completed the calculation are shown in boxes ⑩ and ⑪.

(2) Some of *.out files in the folder where the exe file is stored can be visualized by Wscnt. If registered, the restriction on Wscnt is removed and output files such as *.otc can also be visualized by Wscnt.

● Step 2
(3) After selecting one of the files ① in the file list, click and hold on the input file box ② in column A and press the Enter key to list all files on the lower side of ① as shown in ③.

(4) Switching the page buttons ④, ⑤, ⑥, and ⑦ brings up columns composed of 25 lines each, and a total of 100 data is available to be listed on the column A boxes. If more calculations are needed, click the Add button ⑧, and the data set is counted as a new Schedule and displayed in ⑨. The number ⑩ is the total number of schedules planned. 999 schedules can be planned by defining arbitrary exe files and input/output files for each schedule. Clicking the × button ⑪ deletes the currently displayed Schedule, clicking the ◀ button ⑫ or the ▶ button ⑬ moves the Schedule back and forth, and clicking the ⑭ button moves the Schedule to the first or last position. Clicking button Run performs the calculation from the top line of column A box to the bottom with turn of a page like ④, ⑤, ⑥, and ⑦. A mark color for the check box ⑮ is changed at every clicking, like black, gray, and nothing. If there are some schedules and the box ⑮ is not checked, the calculation is performed from the beginning (i.e.,⑨ is set to 1). If the check mark is black, the calculation is performed for the current schedule only; if the mark is gray, the calculation is performed after the current Schedule.

5. Edit window ▲top
(1) Clicking the * button ① opens the Edit window ②, and the contents of the file are displayed in box ③. The file to be read is one on the same row with the column designation buttons (A - D, a - g) checked, and the file path is shown in box ④, and the file name is shown in ⑤. If the file contents exceed 2000 lines, the caution window ⓪ appears and the background of the Full button ⑥ turns pink. If button ⑥ is clicked, the entire contents are read, and the background of the button returns gray. Clicking button ⑦, ⑧, or ⑨ deletes the file, copies it to the clipboard, or prints it. If the file contains double-byte spaces, which cause erroneous calculations, clicking on button ⑩ replaces the double-byte spaces with ## as shown in ⑪, and the caution window ⑫ appears. If the OK button is pressed, ## is changed to the two single-byte spaces and changed number is counted by box ⑬.


(2) If CVS data is pasted into box ③, designating the pasted range and clicking button ⑭ replace Tab codes included in the range with single-byte spaces multiplied by number of box ⑮ (as shown in p. 28 of this document). If the font is distorted by being pasted into box ③, click the ↺ button ⑯. When the file contents have been changed, Save button ⑰ and Rename button ⑱, and Undo button ⑲ appear, and the changed file can be saved, renamed, or redone by clicking each of them. Clicking the ↓⑳ or ↑㉑ button moves the line (row) position of the loaded file up or down, and the contents of the corresponding file are shown in the box ③.

(3) Clicking the button ㉒ moves the loaded file to the one corresponding to column “a” (when the box ㉓ is “a”) at the same line position and clicking the button ㉒ again returns to the original position. Clicking button ㉔ brings up the directory box ㉕, and a new folder can be created by clicking button ㉖. After selecting a folder in box ㉕, clicking on box ㉗ can match the path of box ㉗ to the one of the selected folder. This can be used to copy files in combination with the Save button ⑰. To hide the directory box ㉕, click on the button ㉔ again. The box ㉘ in the right of box ③, whose contents are automatically selected from the type of Exe box ㉙ on the main window, explains data parameters. If you want to see the definitions of other types, use box ㉚ to select them.

6. Edit Replace window (Replacing in file) ▲top
(1) Specify the conversion range ⓪ in the Edit window and click the Replace button ① on the window to display the Edit_Replace window ②. Then, enter the string ③ in the upper box, and click the button ④ to copy the string to the lower box as shown in ⑤. Rewrite ⑤ to the string ⑥ to be converted, and click the Exec button ⑦ to rewrite all strings corresponding to the range ⓪ as shown in ⑧. Clicking the Save button ⑨ saves the changes.


(2) Clicking the button ⑩ switches the contents of the upper and lower boxes as shown in ⑪ and ⑫ (when used in combination with the Exec button ⑦, its function is the same as Undo). Clicking button ⑬ or ⑭ deletes the contents of the upper or lower boxes; clicking Copy button ⑮ copyes the contents of the lower box to the clipboard; clicking Reverse button ⑯ flips the upper box contents vertically and copyes them to the lower box. If the font is distorted by being pasted into the top or bottom box, click the ↺ button ⑰. Click the Return button ⑱ to return to the Edit window.

7. Replace window (Cross-file replacement) ▲top

Click the Replace button ① on the main window, and then the Replace window ② appears. Enter (or paste) the text string ③ to be converted in the upper box of the window ② and click the button ④ to copy it into the lower box. Rewrite it to the string ⑤ and click the Exec button ⑥, then the corresponding string is rewritten across files listed in the column A boxes of the main window, and the converted files are checked in black as shown in boxes ⑦. Files for which no corresponding string exists (or no conversion is performed) are checked in gray. If “Top” is selected in box ⑧, only the string first appeared is converted; if “All” is selected there, all strings in the file are converted. If box ⑨ is checked, the output files with an extension designated in box ⑩ (in the case of “ota”, the files standing in the “a” column boxes) are deleted when the conversion is performed. If the Sequential button ⑪ for “on” is checked, performing occurred by Exec button ⑥ is done over all schedules. Clicking the button ⑫ switch the contents of the upper and lower boxes. if the font is distorted when pasted into the upper or lower box, click button ↺ ⑬. Clicking button ⑭ replaces the line feed code with that of the Windows specification. Clicking the ⑮ and ⑯ buttons erase the contents of the upper and lower boxes, respectively.

8. Adding files using the Select window ▲top
● Step 1(1) Click the Select button ①, and then the Select window ② appears.Check the Add button ③ and select a drive and a directory ④. If you edit and select *.dat in the file pattern ⑤, the corresponding files appear in box ⑥, and the total number of the files is shown in box ⑦. If you click the Select button ⑧ to select the files, a background color for the selected files is reversed and the number of the files is shown in box ⑨.


(2) Clicking the Exec button ⑩ brings up the caution window ⑪. Selecting OK adds a schedule like ⑫, and the selected files are listed on the column A boxes ⑬. If the number of files exceeds 100, Schedule ⑫ is automatically updated and added. The two pairs of boxes ⑭ are both 100 by default. If they are set to 80 and 20, for example, 80 files are added to the first Schedule, 20 files to the next Schedule, and 80 files to the next Schedule, and so on. If box ⑮ is unchecked, this regulation is ignored.


● Step 2
(3) If the directory ① including child directories is selected, check box ②, and then list boxes ③ and ④ appear. The names of all directories including child directories are displayed in box ③ and the names of files contained in all child directories are displayed in box ④. The total number of files appears in box ⑤. Files can be selected by dragging them in box ④ (with reversed background color), or all files are selected by clicking button ⑥. The total number of these files appears in box ⑦.


(4) Clicking the Exec button ⑧ brings up the caution window ⑨, and pressing OK button updates Schedule ⑩ of the main window and the selected files are added to column A boxes as shown in ⑪ (Since the number of files exceeds 50, the page button ⑫ is moved up to P3).

● Step 3
(5) Checking the All box ① displays all files contained in the directory ⓪ on the list box below. These files can be conditionally selected from the list. If you enter a string in box ② and check button ③, you can select files of which names contain the string of ②.

(6) If you input a string in box ④ and check button ⑤, you can select files of which names do’t contain the string of ④. To sort out files by a created time, set the date and time in box ⑥, select “Before” or “After” or “Just on” by button ⑦, and check button ⑧. To sort out them by a file size, enter a numerical value in box ⑨, select a unit name from button ⑩, select a magnitude relationship from button ⑪, and check box ⑫.

(7) If you enter a value (i.e., m and n) in boxes ⑬ and ⑭ and check button ⑮, you can select files from the n-th at m-th intervals.

(8) If you select the extension name (ota) from box ⑯ and check button ⑰, you can select files which cease to exist by an exchange of extension (that is, files that have not been calculated by Wsbch).

● Step 4
(9) Select *.ota for the file pattern ① and click on the All box ②, and the corresponding files are displayed in the lower box ③. Enter a string in box ④ and check the button ⑤ to select files. The back colors of the selected files are reversed in box ③. Enter the file extension in box ⑥, check the Del box ⑦. If you click the Exec button ⑧, caution windows ⑨ and ⑩ appear sequentially.

(10) If you press OK button for each, the selected files are listed on column “A” boxes of the main window with changed extension from “ota” to “dat” as shown in ⑪. Since the files in column “a” boxes ⑫ are deleted due to checked Del box ⑦ (this is confirmed by clicking the ↺ button ⑬), all listed data are eligible for calculation by clicking the Run button ⑭.

9. Deleting files using the Select window ▲top
(1) Select *.ota for the file pattern ① and click on the All box ②, and the corresponding files are displayed in the lower box ③. Enter a string in box ④ and check the button ⑤ to select files. The back colors of the selected files are reversed in box ③. Enter the file extension in box ⑥, check the Del box ⑦. If you click the Exec button ⑧, caution windows ⑨ and ⑩ appear sequentially.

(2) If you press OK button for each, the selected files are listed on column “A” boxes of the main window with changed extension from “ota” to “dat” as shown in ⑪. Since the files in column “a” boxes ⑫ are deleted due to checked Del box ⑦ (this is confirmed by clicking the ↺ button ⑬), all listed data are eligible for calculation by clicking the Run button ⑭.

10. Renaming files using the Select window ▲top
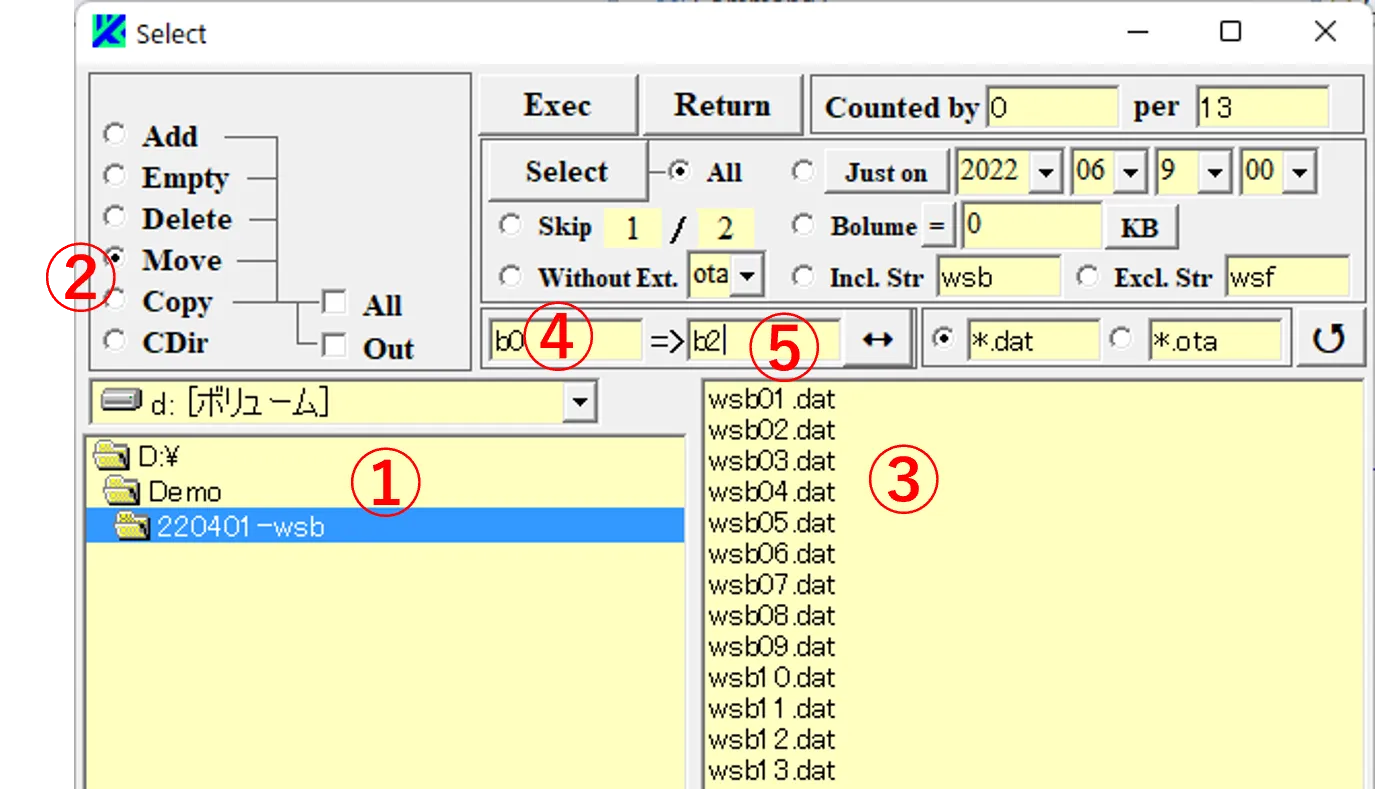
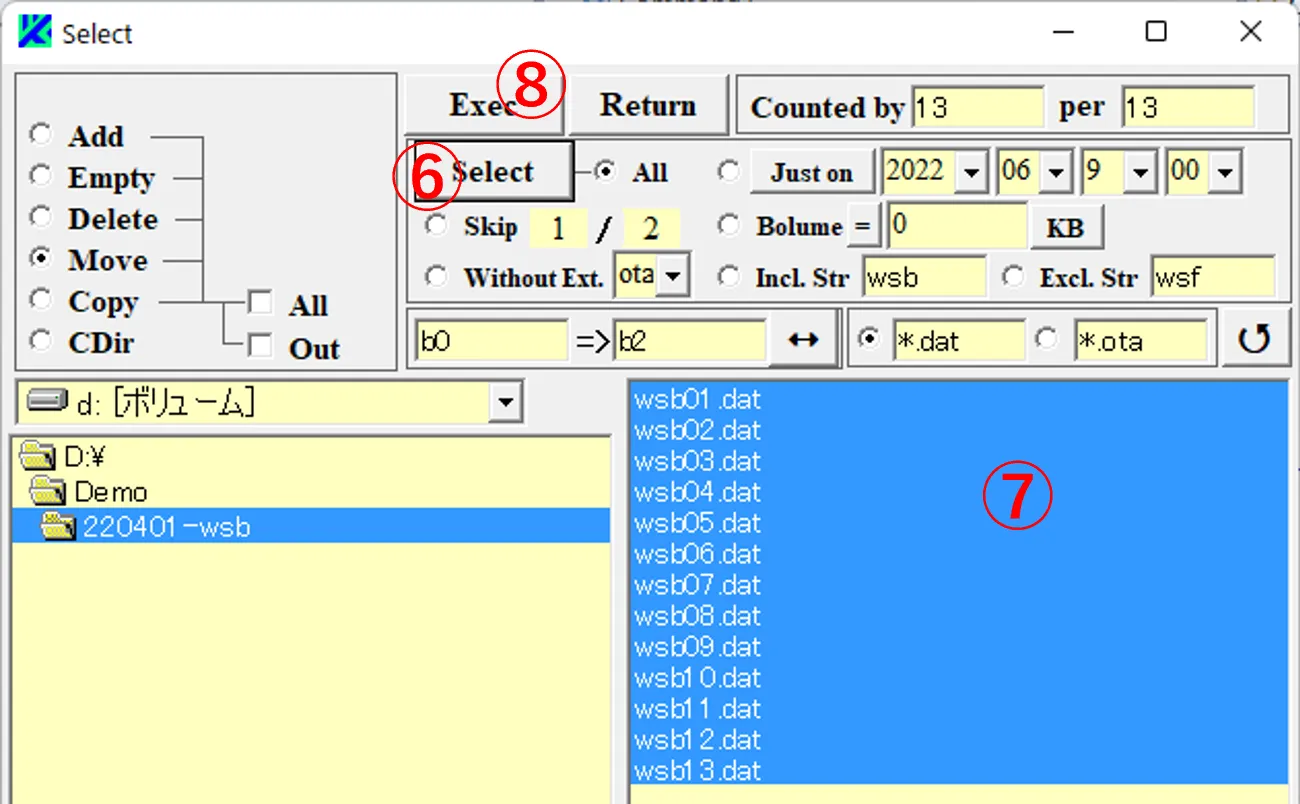
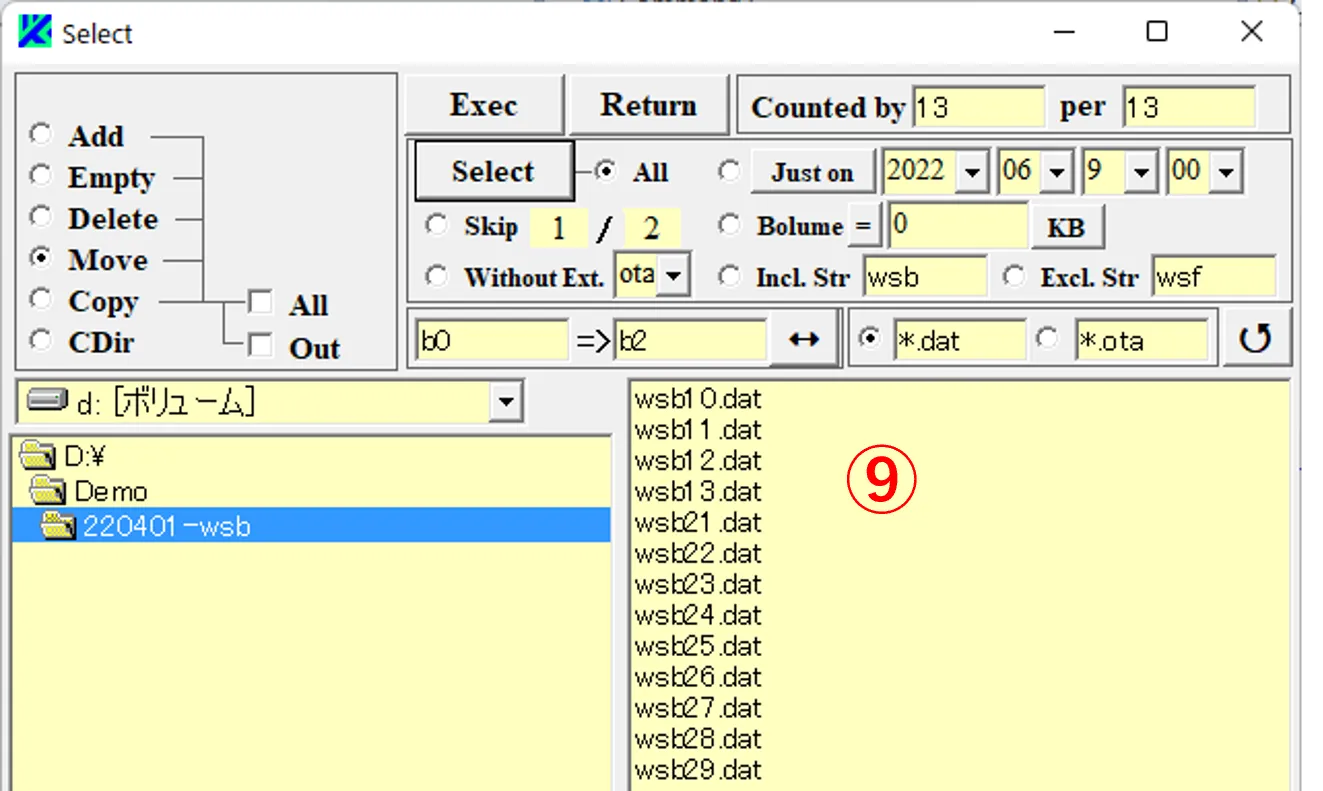
(1) Select a drive or directory ①, check the Move button ②, and list files in the right box ③. Enter a string ④ (before the change)and a string ⑤ (after the change), and click the Select button ⑥ to select files ⑦ to be renamed. Clicking the Exec button ⑧ displays renamed results ⑨ in the box ③.


(2) If a file with the same name already exists, it will be overwritten. To undo the renaming, click the ↔ button ⑩ to exchange the text order for ⑪ and ⑫, and click the Select button ⑬ to select files ⑭, and click the Exec button ⑮ to return them to the ones ⑯ before renamed. If you check the Out button ⑰, you can rename files across folders in the same way.


11. Copying files using the Select window ▲top
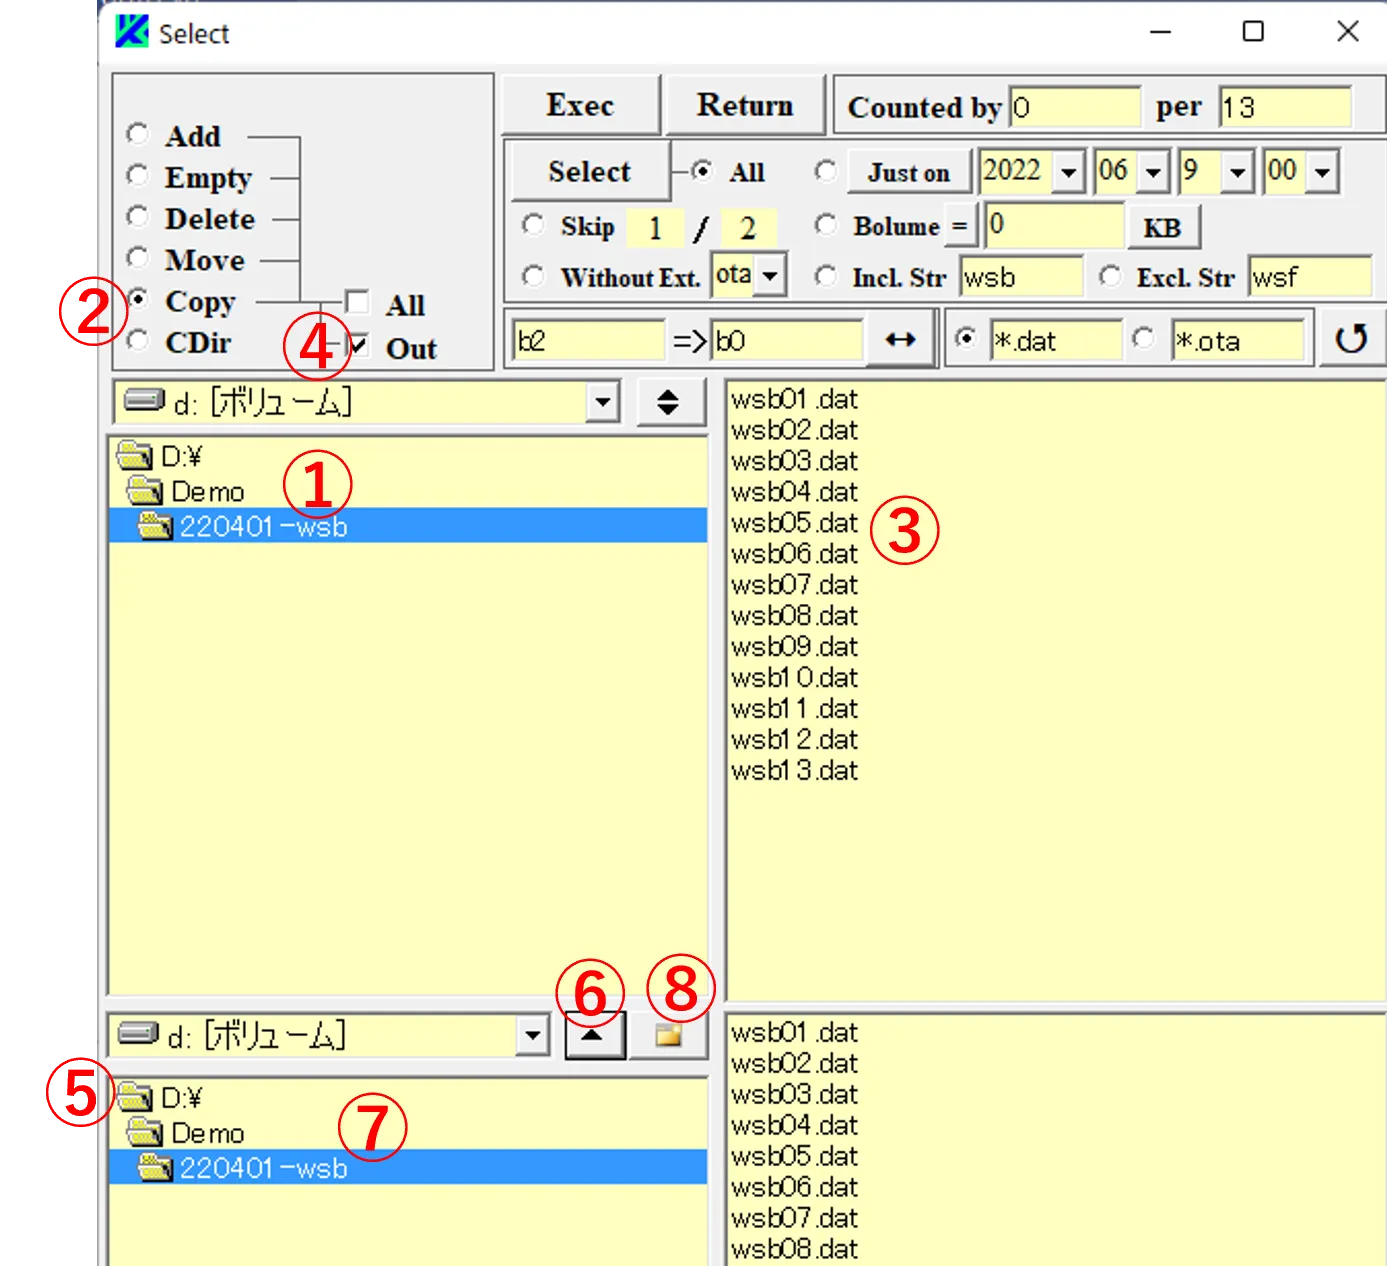
(1) Select the drive and directory ①, check the Copy button ②, and display files included in the folder in the right box ③. By checking the Out box ④, new boxes ⑤ appears in the lower half of the select window. If you click the ▲ button ⑥, the directory ⑦ is aligned with the directory ① above.
(2) Click the button ⑧ to open the caution window ⑨. Enter a folder name (test) there and press OK button to create a new folder ⑩.

(3) By being dragged files in the right box ③ or clicking the Select button ⑪, files ⑫ to be copied are selected.

(4) By clicking the Exec button ⑬, the files ⑫ are copied to the destination folder ⑭. If you enter strings in boxes ⑮ and ⑯, the files are renamed and copied.

12. Renaming a folder using the Select window ▲top
(1) Check the CDir button ① and click the parent directory ③ of the directory ② (test) to be renamed. Enter a name ④ before renaming and a name ⑤ after renaming.
(2) By clicking on the Exec button ⑥, the directory is renamed from ② (test) to ⑦(test1).

(3) If the directory to be renamed already exists, the caution window ⑧ appears and the operation is canceled.

13. Reproducting past execution formats using the Path window ▲top
(1) Click the Pth button ① on the main window, and the Path_Search window ② appears. Select a drive or directory ③, and pth files appear in the right box ④.
(2) Select one of them (a file name of ws? or wsbch) and click the Exec button ⑤, and the caution window ⑥ appears. If you select Yes button ⑨ on caution window ⑥, the main window ⑧ executed in the past appears. If you select No button ⑨, Path_Search window ② is closed.

(3) If the pth file is selected from a name of ws?, the executable file of the main window becomes ws?.exe. However, If it is from a name of wsbch, the executable file is unclear until it appears. In the case of checked Exec button ⑩, each time the Run button ⑪ is clicked, the pth file is stored in the folders indicated in boxes ⑫ and ⑬ with a combination of the file name (“wsb”) listed in the exe box and the extension “pth”, and they are also stored in the folder including wsbch.exe with a combination of the file name “wsbch” and the extension “pth”. The ready-made pth files are saved with the extension of pth1, pth2, and so on (the last number is sequentially moved up and later files of pth9 are deleted). In the main window performed by Schedule operations, the pth file is stored with the extension as “pth-001”, assigned by the Schedule number.

14. Duplicating executable format using the Clip button ▲top
(1) ① and ② are the main windows that appear when execution files (Wsbch.exe) contained in different folders (\Wsems and \Wsems1) are clicked. When the Clip button ③ of window ① is clicked and the Clip button ④ of window ② is right-clicked, caution window ⑤ appears, and when Yes button is pressed, window ② becomes window ⑥ which is the same execution format as window ①. Rename the Exe path in window ⑥ as shown in ⑦. However, the executable file (Wsb.exe) must be stored in the renamed folder in advance.
(2) If the Skip buttons ⑧ and ⑨ are checked, by simultaneously clicking the Run buttons ⑩ and ⑪ on windows ① and ⑥, the same input files are read alternately by each window, and calculations are performed without duplication as shown in ⑫ and ⑬ (the gray check marks indicate skipping of calculations).

15. Concatenating files using the Process box ▲top
● Vertical concatenation(1) By clicking the Run button ①, calculations are performed sequentially as shown in ②.

(2) After the calculations are completed, check the button ③ contained in the Process box, confirm whether the T_Cut box ④ is checked in, and select “*.otb” for a file pattern ⑤. Click input box ⑥ and press Enter key to list all files contained in file box ⑦ into column A boxes as shown in ⑥’. ⑧ is the contents of the first file expressed by the Edit window that appears by clicking the button ⑨. If the Run button ⑩ is clicked, a file ⑪ appending “c” to the end of the file name listed in the top box ⑥ is created in the same folder, where the contents are extracted from all the files listed in the A column boxes and linked up.

(3) Clicking the * button ⑫ displays the results of the concatenation on the Edit window ⑬, and the first lines (Transmitted, etc.) for the second and subsequent files are deleted and concatenated. The data can be easily graphed by clicking on the Copy button ⑭ and pasting it into Excel (by selecting the pasted data in the fixed length field and by aligning it to the right or left by spaces in the Text File Wizard).

(4) By the way, unchecking the T_Cut box ④ generates the concatenated result ⑮ without deleting the first line for each file.

● Horizontal concatenation
This operation uses the Linux command “Cut”, so Gow (https://qiita.com/mizuki_takahashi/items/01f597d9f193ffb549f7) must be installed beforehand.
(5) Check the button ① contained in the Process box, and describe the cutting range by the box ② like 1-12 or 25-36. Check button ③, select “*.otb” for the file pattern, and list the files contained in the file box ④ on column A boxes ⑤.

(6) Click the * button ⑥ to display the file edit window ⑦, where the columns 1-12 in box ② correspond to ⑧ and columns 25-36 to ⑨.

(7) Click the Run button ⑩ to perform horizontal concatenation in the order shown in ⑪, and the merged results are stored in file ⑫.

(8) Clicking the * button ⑬ displays the edit window ⑭, where the strings corresponding to columns 1-12 and 25-36 are listed as ⑮ and ⑯, and the strings of the next-line’s file are listed up to the right of them by the same rules.

16. Shortcut operation ▲top
● About file input(1) By double-clicking a box ① of A-D columns, the color of the first file ② (or the file below the color-reversal line) in the file box becomes reverse , and the file is listed on the box ① as shown in ③.


(2) If you click on box ① and press the Enter key, you can continuously list the files at or below the color-reversal line ② as shown in ④.

(3) If you click on one of column A boxes, its path and file name disappears as shown in ⑤.

(4) If you press Del key there, the paths and file names lower the line disappear as shown in ⑥. If you press Back Space key there, the paths and file names upper the line disappear. If you press Ctrl key, only one file specified in the file box is continuously listed.

(5) If you double-click an Exe file box ⑦ on A-D or a-g column, all the boxes in the lower row become empty. If you right-click on one of the path boxes ⑧, the directory box ⑨ is changed to the path of the right-clicked box.

● About directory
(6) By right-clicking the box ①, it expands downward as shown in ②. By right-clicking again, it turns back. By right-clicking the box ③, it expands downward as shown in ④. By right-clicking again, it turns back.


(7) Clicking the ⑤ button brings up the caution window ⑥. If you enter a folder name and select OK button , a new folder is generated under the directory specified in the box ①.

17. How to input auxiliary data ▲top
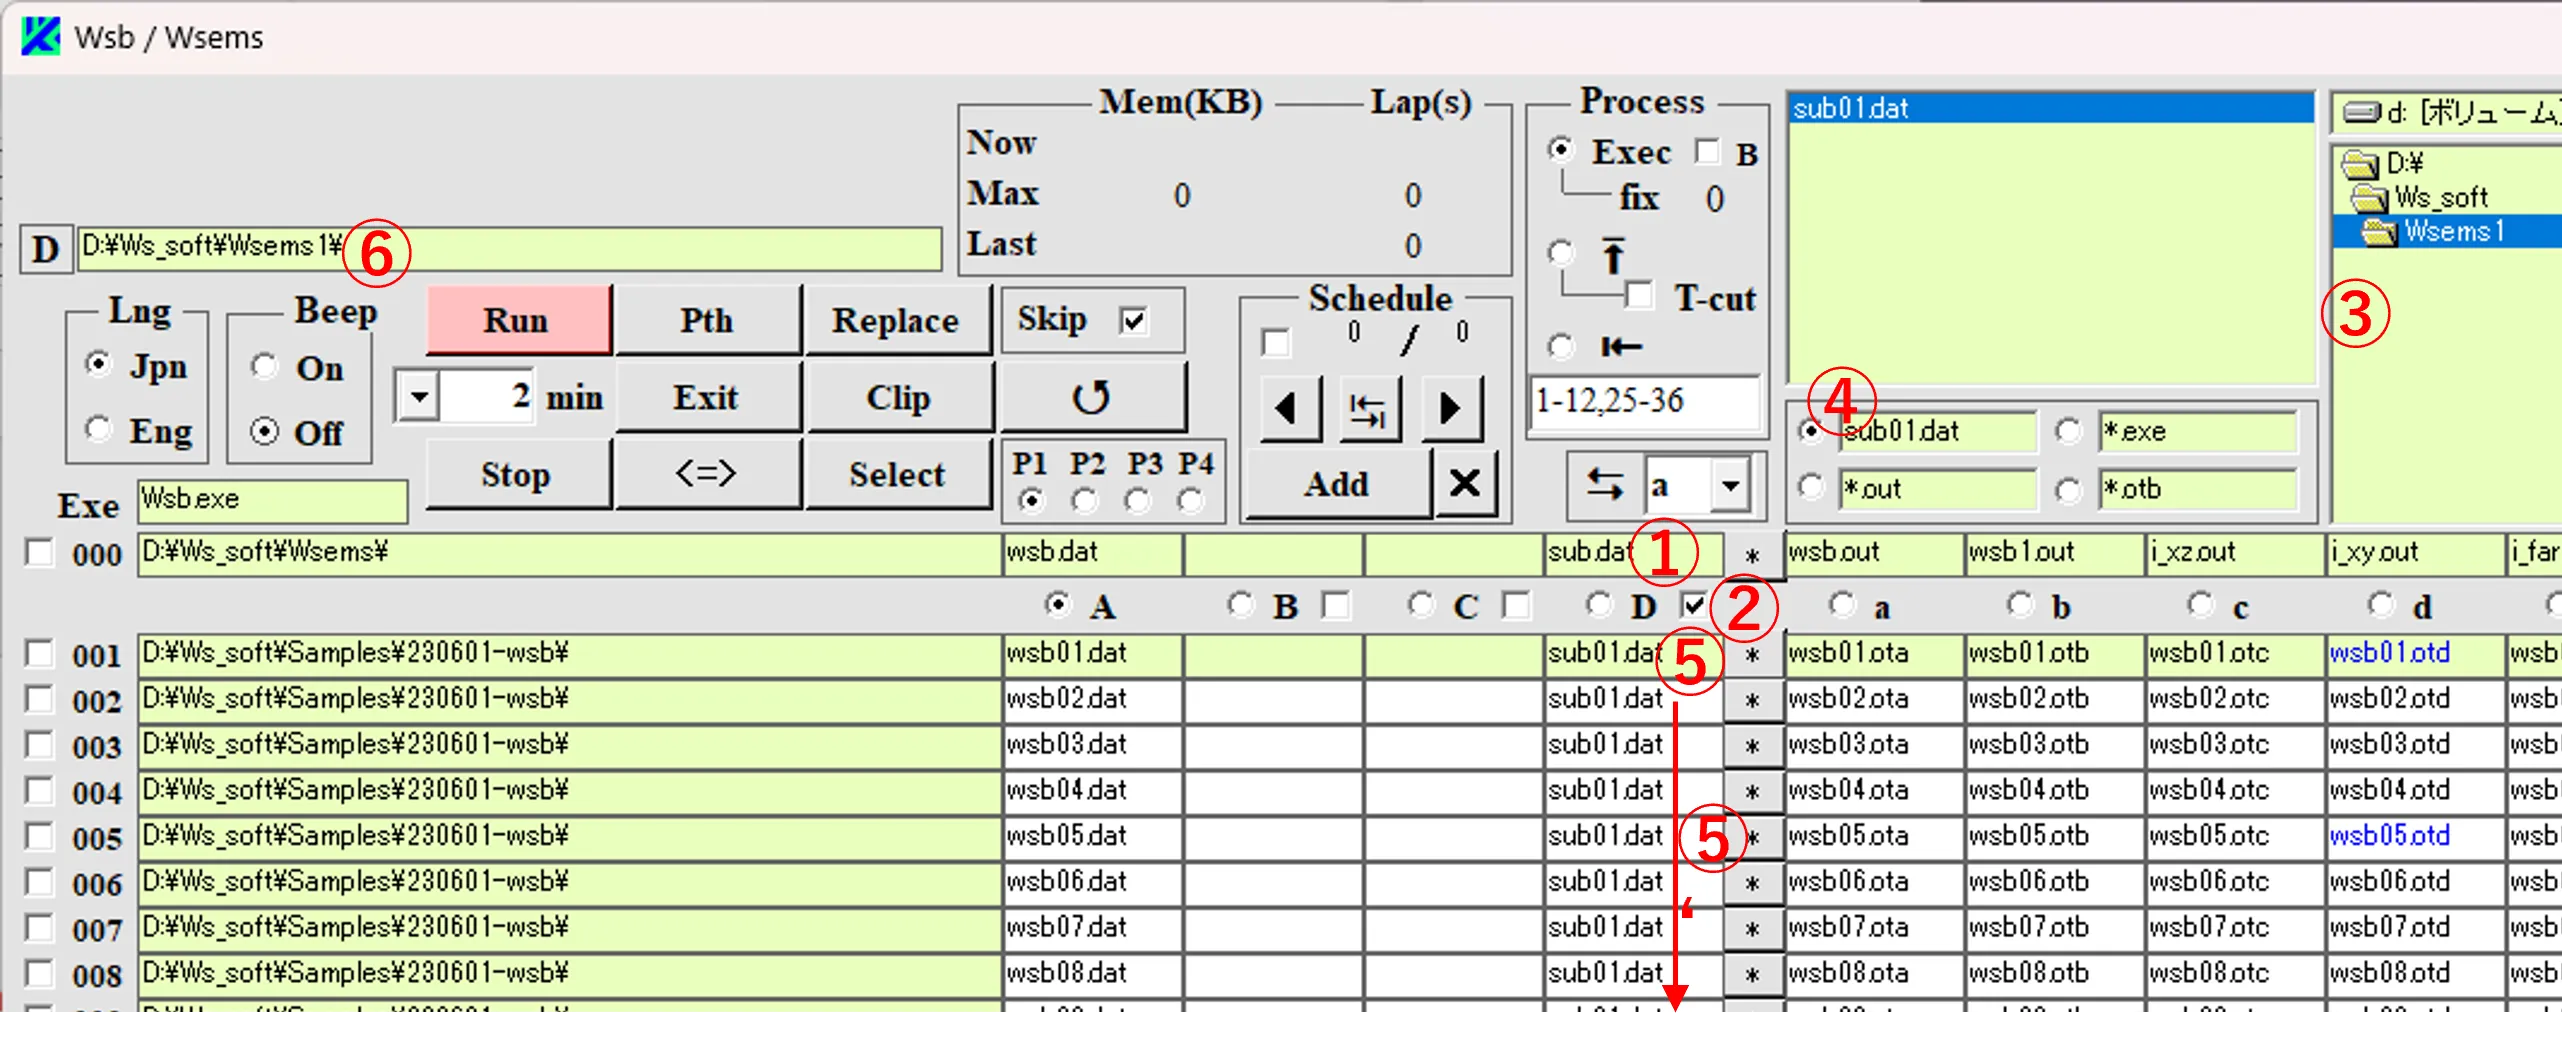
(1) Sub.dat and nk.dat are basically stored in the exe file folder, but you can do the following. sub01.dat and nk01.dat, which are files corresponding to sub.dat and nk.dat, are stored in a folder (e.g., d:\ws_soft\wsems1\) different from the exe file folder. Type “sub.dat” in the Exe input box ①, check the box ②, select the directory ③, set the file pattern ④, click the box ⑤, and press Ctrl key to fill the same file name (sub01.dat) with all column D boxes as shown in ⑤‘. Since box ② is checked, the path of files in column D boxes is listed on box ⑥.
(2) Similarly, type nk.dat in the Exe input box ⑦, check the box ⑧, set the file pattern ⑨, click the box ⑩, and fill the same file name (nk01.dat) with all C column boxes by pressing Ctrl key. Since box ⑧ is checked, the path of filed in column C boxes is listed on ⑪. In the above settings, when the exe file is performed, the files of sub01.dat and nk01.dat stored in another folder (d:\ws_soft\wsems1\) are read and overwrite the sub.dat and nk.dat in the exe file folder.

18. Creating 40 data with an angle parameter from wsb12.dat ▲top
● Step 1(1) From the upper box of the Select window, select the folder ① where wsb12.dat is stored. Select the Copy button ②, check the Out box ③, and click the box ④ to create a new folder ⑤ in the lower box.

(2) Click the file (wsb12.dat) in the upper right box ⑥ and enter a string ⑦ (before the change)and a string ⑧ (after the change) in the respective boxes. Click the Exec button ⑨ to create a renamed file ⑩ (wsb00.dat) in folder ⑤.

(3) Click the Return button ⑪ to return to the main window, specify the folder ⑫, click the A column box ⑭, select file ⑬ from the file list and list it on the box ⑭.

(4) Click the * button ⑮ to display the Edit window, change the value from ⑯ to ⑰, rename the file name from “wsb00.dat” to “wsb01.dat”, and click the Save button ⑲.

● Step 2
(5) Repeat the same procedure 9 times on the Edit window. Finally change the value to ①, change the file name to ②, click the Save button ③, click the Return button ④ to return to the main window, confirm that 10 files have been generated in t he list box ⑤, and click the Select button ⑥ to display the Select window ⑦.

(6) Check the Copy button ⑧ on the Select window ⑦, and enter a string ⑨ (before the change)and a string ⑩ (after the change) in the respective boxes. Click the Select button ⑪ to specify all files, and click the Exec button ⑫ to add the renamed file ⑬ in the folder. In the box ⑩, change “b1” to “b2” or “b3”, and repeat the same procedure to generate files named as wsb00 - wsb39, and then click the Return button ⑭ to return to the main window.

● Step 3
(7) On the main window, change the file pattern to ①, and list all files of the file list ② on column A boxes ③ (by clicking the top of column A box and press the Enter key). Click the * button ④ to display the file contents by the Edit window and specify the range highlighted in blue as shown in ⑤ and copy it. Click the Replace button ⑥ on the main window to display he Replace window and paste the copied one into the upper box ⑦ on the window.


(8) Click the ↓ button ⑧ to copy the contents of the upper box into the lower box and then change the last column ⑨ of the lower box to 1. If you click the Exec button ⑩, contents (i.e., the values corresponding to angle th) for all files ③ listed on column A boxes of the main window, are converted as th becomes 10.0, 11.0, ‥, and 19.0. Change the label “1” of “wsb1” to the label “2” in file pattern ① and change the last column ⑨ of the lower box to 2. By repeating the same procedure, data from wsb00 to wsb39 where the angle parameter is changed can be generated.

19. Converting CSV data and adding to nk.dat ▲top
(1) Change the file pattern to ① on the main window, select the directory ② where nk.dat is stored , and list the file ③ that appears in the file list on the input box ④ of column A.
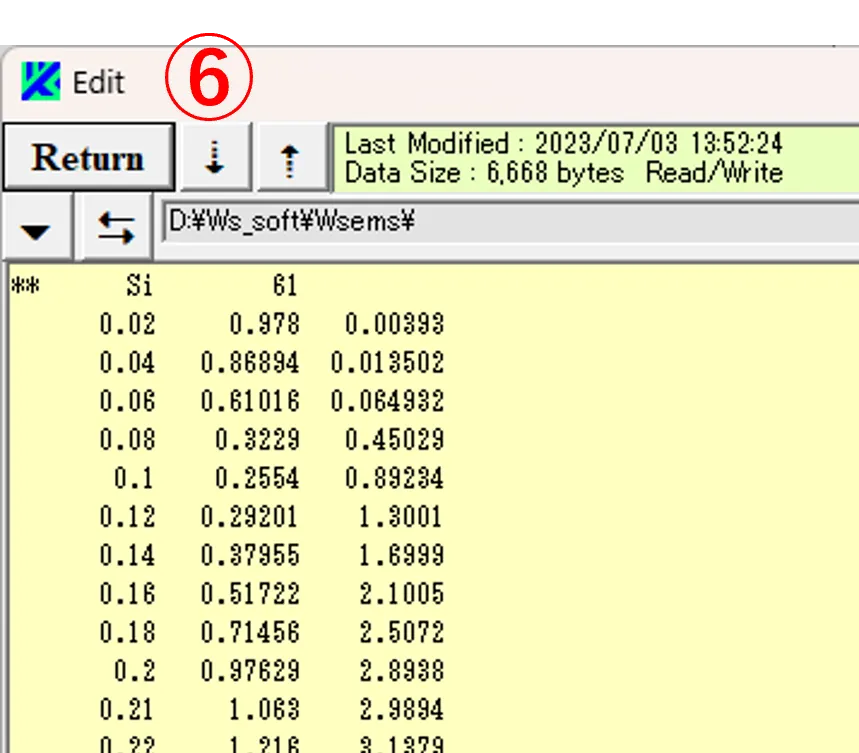
(2) Press the * button ⑤ to display the Edit window ⑥.

(3) Edit Cvs data (https://refractiveindex.info/?shelf=other&book=SiN&page=Vogt-2.13) by Excel. That is, insert an empty cell in the first column, set the second column (wavelength) to 6 digits after the decimal point, the third and fourth columns (n and k) to 5 digits after the decimal point, specify the range from 1st to 4th column as shown in ⑦, and paste it into the box on the Edit window as shown in ⑧.

(4) Specify the pasted area ⑨ with a number m of lines to turn to blue-color reversal, and set the box ⑩ to 2, and click the Tab/Space button ⑪. After clicking the ↺ button ⑫ to reset Font, return to the first line of the pasted area.

(5) Slightly modify a column position of the line and insert a line with the material name and the line number m ⑬ on the top of the line. Click the ↺ button ⑭ again to reset Font, confirm that the material name and the line number end at 10th and 20th column. Finally, click the Save button ⑮ and Return button ⑯ to complete addition to nk.dat.

20. How to deal with miscalculations ▲top
● In the case of input miscalculations(1) If there is a mistake in the input data, by clicking the ↺ button ① after the calculation is completed, an empty output file may be displayed with a blue-color text as shown in ②. The empty file has a file size of zero, but the file exists, so if the Skip box ③ is checked, the calculation is skipped when it starts by clicking the Run button ④. If there are only a few empty files, you can delete them individually and press the Run button ④, but if there are many, it is troublesome. In this case, the solution is as follows. Click the Select button ⑤ to open the Select window.

(2) Select the folder ⑥ where the calculation was performed, set the file pattern ⑦ for the empty files, and check the All box ⑧ to list all corresponding files on the lower box ⑨. If the “Bolume” button ⑩ is checked, box ⑪ is set to 0, and button ⑫ is set to =, only the empty files are displayed with color reversal in the lower box ⑨. Type “dat” in box ⑬, check the Del box ⑭, and click the Exec button ⑮.

(3) A new Schedule is added on the main window, and files ⑯ whose extension “otb” for the color-reversed files ⑨ is changed to “dat” are lined on the input boxes of column A. By clicking the ↺ button ⑰, it can be confirmed that the original empty files ⑱ are deleted and displayed in red text. Therefore, by clicking the Run button ⑲, only the incorrectly calculated files can be recalculated.

● In the case of execute miscalculations
(4) After completing the parallel calculations shared by wsbch and wsbch1 as shown in ① and ②, there may be a case that only the results calculated by wsbch1 should be recalculated due to a setting error (e.g., the inadequacy of sub.dat or nk.dat, etc.) on the wsbch1 side.

(5) In this case, open the Select window, click the Select button ⑤ to specify the files ④ of the file pattern "oth" in the folder ③ where the calculation results were stored, and click the Exec button ⑥ to display the caution window ⑦.

(6) By clicking Yes button there, the files of extension “oth” are listed on the A column input boxes ⑧ of the main window.

(7) The files of extension "oth" contain contents of title bar of wsbch.exe, creation date, computing time, and memory consumption, as shown in the Edit windows ⑨ and ⑩, and they also contain the folder information where wsbch.exe is stored.

(8) Therefore, click the Replace button ⑪ to display the Replace window, check the Del box ⑫, enter the strings ⑬ and ⑭ in the upper and lower boxes. By clicking the Exec button ⑮, the files of extension "ota“ which were performed by wsbch1 are deleted in the main window as shown in ⑯. After that, correct the setting errors and go back to the parallel calculation of ① and ②, and only the deleted files will be recalculated.


21. Precautions ▲top
(1) If there is a mistake in the input data, a calculating termination may not be detected, and the DOS window will not appear, and the execution will often go into a dormant state. In this case, it is necessary to exit the software (either by clicking the Exit button or by opening the Task Manager and terminating the task).(2) When parallel calculations are performed by specifying Wsbch.exe in the same folder, each calculation is interrupted and may move on to the next without waiting for calculating termination. The Wsbch.exe used in parallel calculations should be stored in a different folder.
(3) When multiple Wsbch are launched for parallel computation, if the CPU or memory utilization exceeds 100% for an extended period, the computation may be interrupted and moved to the next without waiting for calculating termination.
(4) Note that if the file lines exceed 2000 on the Edit window and it hadn’t been for pressing the Full button, the edited file is saved under the line limit.
(5) If files such as *.ota are listed on the A input column and the Run button is click by mistake, the file names in the output file boxes are rewritten as *x.ota to prevent overwriting.
(6) When Wsbch.exe is performed, Wsbch.cpn is generated in the same folder as wsbch.exe and it contains information about the title bar of Wsbch.